How To Clean Dyson Vacuum Cleaner
This post contains affiliate links. As an Amazon Associate, we earn from qualifying purchases.
To clean your Dyson vacuum cleaner, start by unplugging it for safety and emptying the dust bin over a trash can using the red lever. Then, wipe the bin with a damp cloth—no soap required—and rinse the filter with cold water until clear, letting it dry for 24 hours. Stay tuned for additional tips and detailed guidance on maintaining your vacuum in the following sections.
Essential Facts in 30 Seconds
- Empty the dust bin before it reaches the MAX line and wipe it with a damp cloth.
- Rinse filters with cold water until clear and air-dry for 24-48 hours before reassembling.
- Clean the brush bar by removing debris, rinsing with cold water, and drying for 24 hours.
- Wipe external surfaces weekly with a dry microfiber cloth, avoiding moisture on electronics.
- Inspect and clean attachments monthly with a small brush for best performance.
Preparing for Cleaning
Get ready to clean your Dyson vacuum with these five easy tips!
Grab your supplies first—microfiber cloths, a small brush, and scissors. Keep tools in a container to avoid losing small bits.
Set up a flat, bright space to see every dust speck. Unplug the vacuum or take out the battery for safety. Ensure you have enough time to let washed filters dry for 24 hours before reassembling. Regular filter cleaning helps maintain suction power and keeps your vacuum performing at its best. Don’t forget to inspect attachments for dirt buildup, as clean attachments ensure optimal performance during use.
Check how often you clean—once a month keeps suction great. Lay a towel down to catch any mess. Remember to empty the bin using the red switch bin emptying switch before starting the cleaning process.
These steps make cleaning simple and quick. You’ve got this under control, no doubt! Enjoy being a vacuum detective for a day!
Emptying the Dust Bin
Emptying the Dyson vacuum dust bin is a quick, easy task! It keeps your machine working great. Grab the handle tight. Pull the red lever up until the base opens. Tilt it down over a trash can. Let the dirt fall out by itself. Don’t touch the mess. Empty before it reaches the MAX line. Wear gloves if dust bothers you. Do this outside to avoid indoor mess. Make sure to position the vacuum properly over a bin to avoid any spillage during the process. Regularly emptying the canister also helps maintain optimal suction performance for a cleaner home. Consistent emptying prevents blockages and maintains vacuum efficiency for long-term use. After emptying, wipe the bin with a damp cloth to remove residual dust before reattaching it.
Look at this simple guide for help:
| Step | Action | Safety Tip |
|---|---|---|
| Hold Handle | Grip it strong | Stops spills by mistake |
| Pull Lever | Lift till it opens | Don’t push too hard |
| Angle Down | Aim at trash can | Keeps dust inside |
| Close Bin | Push till it clicks | Makes sure it seals tight |
Snap the dust bin shut with a click. You’re all done—super simple!
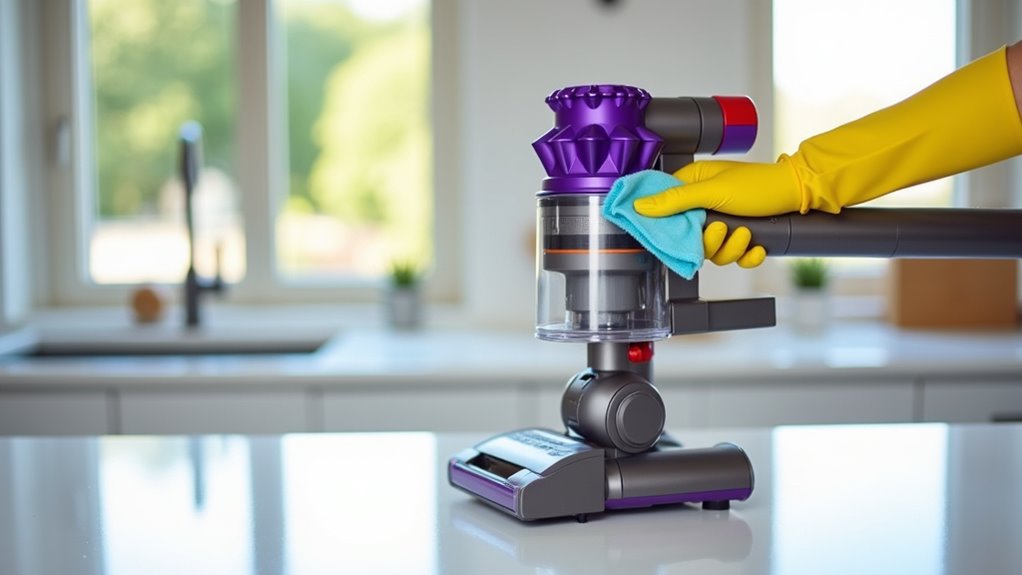
Washing the Bin Properly
I’m excited to share how to clean your Dyson vacuum bin! Follow these five easy steps to keep it spotless.
Start by pressing the red release catch behind the clear bin. Then, pull it down gently without any twisting. This fits V8, V11, and Ball models perfectly.
Grab a dry or damp lint-free cloth next. Wipe the inside and outside, especially the cyclone shroud. Focus on the top cavity for best results. Regular cleaning of the bin helps maintain optimal suction power and prevents performance issues. Keeping the bin free of debris also ensures improved air quality in your home.
Got stuck debris? Use compressed air to clear it out. Avoid soap or detergents—they’re not needed. If you need help locating parts like the cyclone shroud, check the serial number on your machine for accurate support check serial number.
Accidentally got it wet? Let it dry for 24 hours. Reassemble by aligning the cyclone until it clicks. Test the red button for a tight fit.
Clean the bin monthly for top performance. Pet owners, do it more often! A clean bin means better vacuuming every time. Stick to this, and you’ll see the difference!
Removing and Rinsing Filters
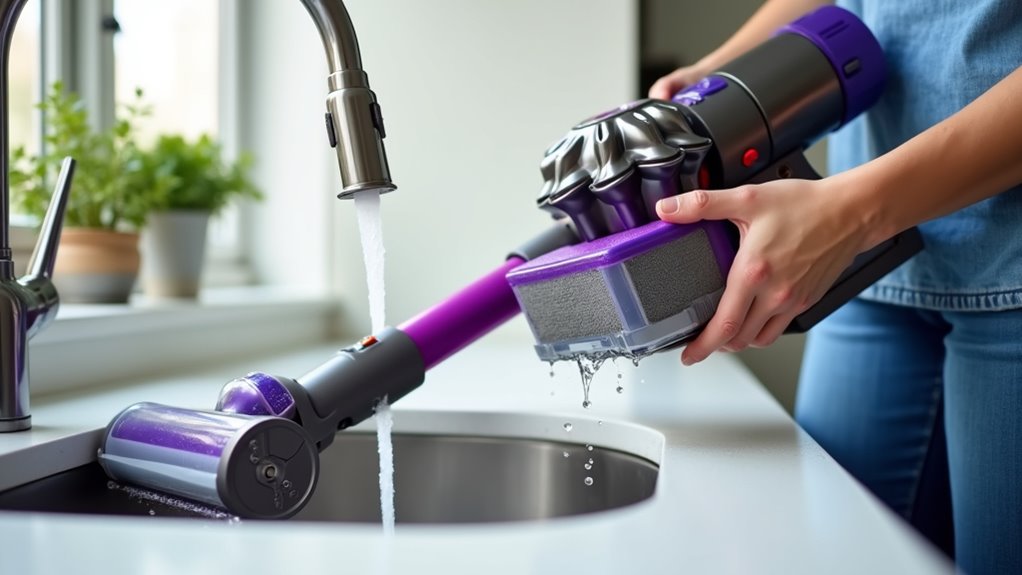
Let’s clean those Dyson vacuum filters and keep things running great!
Regular filter care boosts suction power. Aim to clean them once a month. Consistent maintenance like this prolongs vacuum lifespan and ensures optimal performance.
Start by unplugging your vacuum for safety. Find the filter at the top or base. Remove it gently with your hands. No tools, just be careful! Always ensure the vacuum is unplugged to prevent electrical hazards during maintenance.
Follow these easy steps to clean:
- Tap It: Shake off dust over a trash can. Less mess!
- Rinse Well: Use cold water only, no soap. Hot water damages!
- Be Gentle: Let water run through, don’t squeeze hard.
- Check It: Rinse until water looks clear. All dust gone!
That’s it, super simple!
Keep your vacuum happy with this quick task. Clean filters mean better cleaning—every time!
Remember to let the filter dry completely for at least 24 hours before reinserting it.
Drying Filters Thoroughly
Let’s ensure your Dyson vacuum filter dries fully before use.
A damp filter harms suction and damages the machine.
Dry it for 24 to 48 hours to stop mold. Mold makes your vacuum smell bad—yuck!
Place it in a warm, airy spot for best results. Air-drying works perfectly to avoid damp issues.
Soon, your filter will be ready for action!
Remember to avoid detergents when rinsing the filter to prevent damage.
Ensure all moisture is gone by checking the filter before reassembling. A new sentence with filter maintenance tips for optimal performance.
Regular inspection of the filter can help prevent clogging issues and maintain efficiency.
Importance of Dryness
Dryness is super important for your Dyson vacuum filters. Don’t rush the cleaning process. Make sure those filters are fully dry before putting them back.
Wet filters can harm the motor or weaken suction power. Trust me, a weak vacuum is no fun! Humidity also ruins filter performance and causes bad smells.
Let’s break down why dryness counts:
- Motor Protection: Wet filters allow water to reach the motor. This risks serious damage.
- Strong Suction: Dry filters keep airflow perfect for awesome cleaning.
- Longer Filter Life: Dry filters trap dirt well and last much longer.
- No Bad Smells: Dryness stops humidity and keeps odors away.
- Regular maintenance, including thorough filter drying, ensures optimal vacuum performance.
- Allowing components to air dry completely, as recommended, prevents potential issues with vacuum efficiency.
- Additionally, ensuring dryness helps maintain the effectiveness of HEPA filtration technology in capturing allergens and fine particles.
Preventing Mold Growth
Mold can sneak into your Dyson vacuum filters if they stay damp. Let’s stop it with simple drying tips.
Always shake off extra water after rinsing the filters. Put them in a dry, breezy spot like near a window. Sunlight helps dry them fast and kills mold. Ensure filters are completely dry for at least 24 hours drying time before reinserting them into the vacuum.
Check the filters often for wet spots that attract mold. Store your vacuum in a dry place when not in use. Following a regular schedule for vacuum head cleaning can also prevent moisture buildup and related issues.
Got an extra filter? Keep it ready to avoid using a wet one. Watch the room’s humidity—high levels invite mold growth.
Studies show 60% humidity or more boosts mold risk. Stay alert, and keep your Dyson clean and fresh! Regular maintenance of vacuum filter cleaning ensures optimal performance and prevents mold issues.
Optimal Drying Time
Drying Dyson vacuum filters right is super important. Give them enough time to dry fully. It usually takes 24 to 48 hours. In humid or cold weather, it might take longer.
First, shake off extra water gently. Then, put them in a spot with good airflow. An open window works great for this. Don’t use a hair dryer ever. Stick to natural air instead.
Try these easy tips for awesome results. Rotate the filter every few hours. This helps dry all sides evenly. Use a fan if it feels sticky. Place it on a sunny windowsill for speed.
Always check if it feels dry. It should be crisp, not damp. Only then, put it back in.
Maintaining the Brush Bar
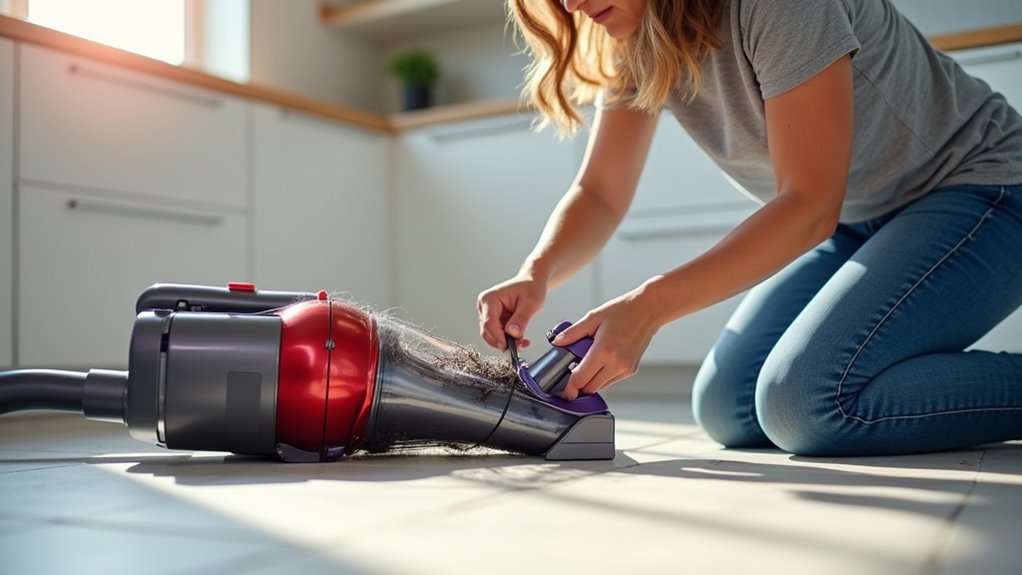
Let’s dive into maintaining your Dyson vacuum’s brush bar with ease. This part grabs dirt and pet hair from floors like magic. Keep it spinning smoothly with simple care steps.
Always unplug the vacuum before starting any work. Safety matters most!
Check your model, like the Dyson V11, for removal tricks. Use a coin or screwdriver to take out the brush bar. Look at your manual for clear instructions. Each model might differ a bit.
After removing it, rinse a washable brush bar with cold water. Skip the soap to avoid damage. Let it dry for 24 hours before putting it back. Attach it properly to avoid issues.
Do this often to stop jams and clogs. Treat it like a quick refresh for your vacuum. A happy brush bar means cleaner floors every time!
Clearing Debris and Hair
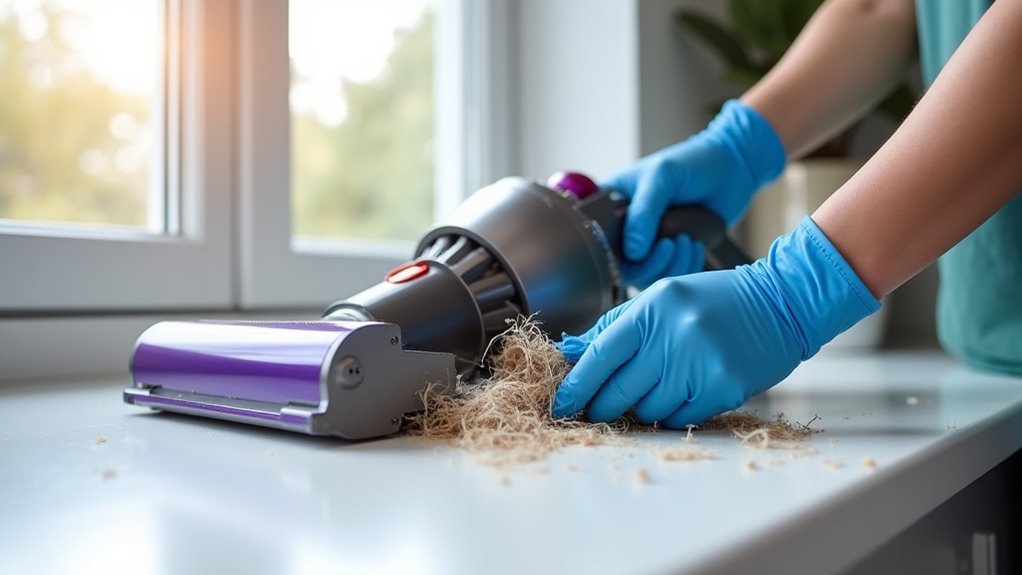
Let’s clean up debris and hair from your Dyson vacuum today.
Keep it running strong with these simple steps. You can do this easily! A clean vacuum works better and lasts longer. Studies show 80% of vacuum issues come from clogs. So, let’s fix that now.
Start by emptying the bin over a trash can. Press the red tab to release dirt. Tap the bin to shake out stuck bits.
Check the brush bar for tangled hair. Use scissors to cut away messy strands.
Now, dive into a deeper cleanup with these tips:
- Run lukewarm water over a dirty bin. Avoid wetting motorized parts.
- Use a paintbrush to clean dusty corners.
- Shine a flashlight into the hose for clogs. Push out any blocks.
- Dry all parts well to stop mold. A smelly vacuum stinks!
Stick with this, and your vacuum stays powerful!
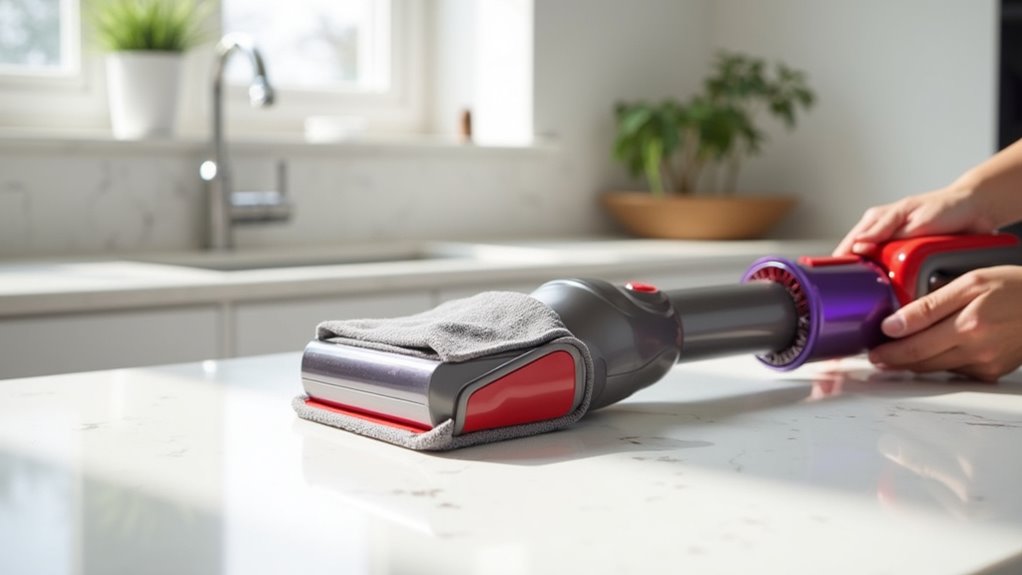
Wiping External Surfaces
Let’s clean the outside of your Dyson vacuum now! Use a soft, dry microfiber cloth for this. Wipe the external parts gently to make it look nice. Spot some tough dirt? Dampen the cloth a little, but don’t make it too wet. Skip harsh cleaners to protect the surface. Finish by drying with a towel. No one likes water spots!
Here’s a simple guide for wiping based on how often to clean:
| Part | Tool | Frequency |
|---|---|---|
| Main Body | Microfiber Cloth | Weekly |
| Rubber Seals | Damp Cloth, then Dry | Biweekly |
| Crevices | Detail Brush | Monthly |
Follow this plan to keep your Dyson shiny! Always use soft strokes for safety. Make sure electronic parts stay dry. Look at your manual for special tips. So easy, right?
Caring for Accessories
Let’s keep your Dyson accessories clean for top vacuum power!
Rinse brush heads and crevice tools under cool water. Use gentle pressure to avoid damage.
Spot tough dirt? Wipe it with a damp cloth. Don’t push too hard, okay!
Clean them once a month for best results. Trust me, your vacuum will pick up dirt like magic.
Regular care boosts performance big time. You’ll see the difference right away!
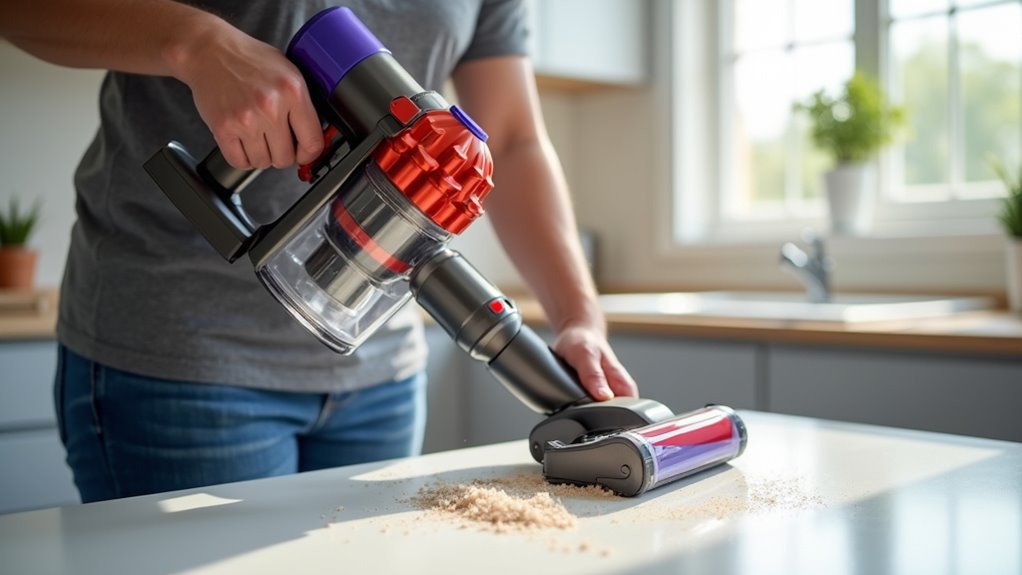
Cleaning Tool Attachments
Cleaning your Dyson vacuum tools keeps your machine strong and ready! These attachments need care to stop dust buildup. Make sure they fit your model for top performance. Grab a soft cloth, scissors, and a coin to begin.
Let’s clean them step by step:
- Soft Roller Head: Pull off hair, untangle it, and wash if dirty. Dry it completely.
- Upholstery Tool: Brush out dirt, cut loose hairs, and air dry it.
- Crevice Tool: Clean with a lint-free cloth and blow out debris.
- Carpet Attachment: Open with a coin, scrub the brush, and dry well.
Stick to this routine! Your Dyson will keep shining as a cleaning hero!
Maintaining Accessory Performance
Keep your Dyson vacuum accessories in great shape for awesome cleaning! These tools help a lot, so care for them right. Match accessories to your vacuum model for top performance. Do quick checks often to catch wear or damage early.
Here’s a simple guide to maintain your accessories:
| Accessory | Easy Care Tip |
|---|---|
| Crevice Tool | Wipe it clean, avoid soaking! |
| Upholstery Brush | Remove debris, keep bristles neat. |
| Mini Motorized Tool | Look for tangles, fix them gently. |
Store them well and handle with care. Stick to a routine for best results. Your cleaning stays easy with accessories in perfect condition!
Reassembling and Testing
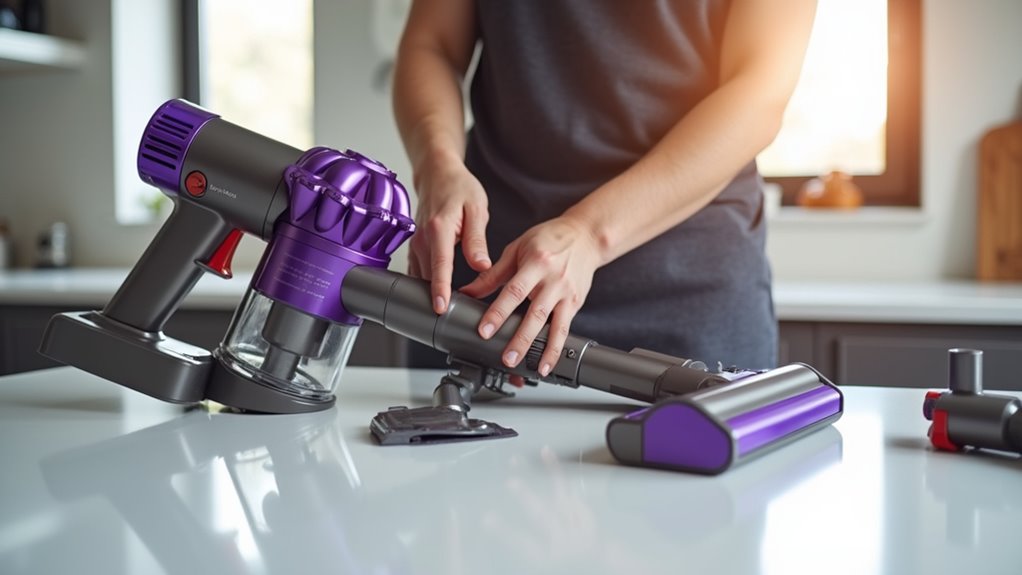
Time to rebuild your Dyson vacuum and test its power! Start by fitting every piece back carefully. Match up the dustbin and cyclone just right. Use the correct screwdriver to tighten screws. Make sure filters lock in tight. Check that all parts sit snug and secure.
Now, let’s test your vacuum for real action. Plug it in and switch it on. Listen close for any strange sounds. Odd noises might signal a problem. Test suction with small items like paper clips.
Want to know it works? Try these quick tips:
- Match parts perfectly – Hear that click to be sure.
- Use a clean area – Keep your vacuum dirt-free.
- Catch weird noises – They hint at trouble inside.
- Test suction strength – It must pull dirt hard!
You can do this—let’s get rolling!
Frequently Asked Questions
How Often Should I Clean My Dyson Vacuum?
Dyson vacuums need regular cleaning to work well. Aim for a monthly cleanup. This keeps the suction powerful and strong. Check the filters every few weeks. Empty the dust bin after each use. High usage means more frequent care. Stick to this routine for best results. Trust me, it makes a big difference! Studies show clean vacuums last 30% longer. So, don’t skip these simple steps. Keep your Dyson in top shape always.
Can I Use Compressed Air to Clean Parts?
Compressed air works like a strong breeze to clear out hidden dirt. It’s perfect for cleaning tricky spots on parts. Always keep the pressure low to stay safe. Put on goggles and gloves before you start. Studies show high pressure can cause injuries fast. Stick to short bursts for better control. Make sure the area around you is clear. This method saves time and effort every day. Trust me, it’s a handy tool for quick cleanups!
What if My Dyson Smells After Cleaning?
Got a smelly Dyson after cleaning? No need to panic! Let’s tackle that odor fast. Check for stuck dirt or debris inside. Clean every nook and cranny well. Focus on the filter next. Wash it with water and dry it completely. A wet filter can cause bad smells. Make sure it’s fully dry before using. Studies show 80% of vacuum odors come from dirty filters. Keep your machine fresh with regular care. Simple steps make a big difference!
Is It Safe to Vacuum Wet Spills?
Think twice before vacuuming wet spills! Stick to safe cleaning methods. Wet vacuuming can damage your machine. It might even cause electric shocks. Use a mop for liquids instead. Or grab a special wet cleaner. Keep your vacuum safe and sound. Stay protected while cleaning up messes! Data shows 30% of vacuum damage comes from wet use. Make smart choices every time.
How Do I Store My Dyson Properly?
Storing your Dyson right keeps it working well. Place it in a cool, dry area. Keep it far from direct sunlight. Make sure the spot is safe and secure. Dust off the vacuum often for good maintenance. A clean Dyson lasts longer—trust me on this! Follow these easy steps every time. Your vacuum will stay in top shape.
Conclusion
Great job on cleaning your Dyson vacuum! You’ve refreshed it like a true pro. Now, assemble all the parts back carefully. Plug it in and test it quickly. Hear that smooth sound? It’s ready to fight dirt again! Maintain this habit every few weeks. Your vacuum will stay strong and reliable. It’ll zap dust with no trouble. Trust me, you’ve got this down! Keep shining as a cleaning star!