Bissell TurboClean Pro Not Spraying Water? Fix It Fast
This post contains affiliate links. As an Amazon Associate, we earn from qualifying purchases.
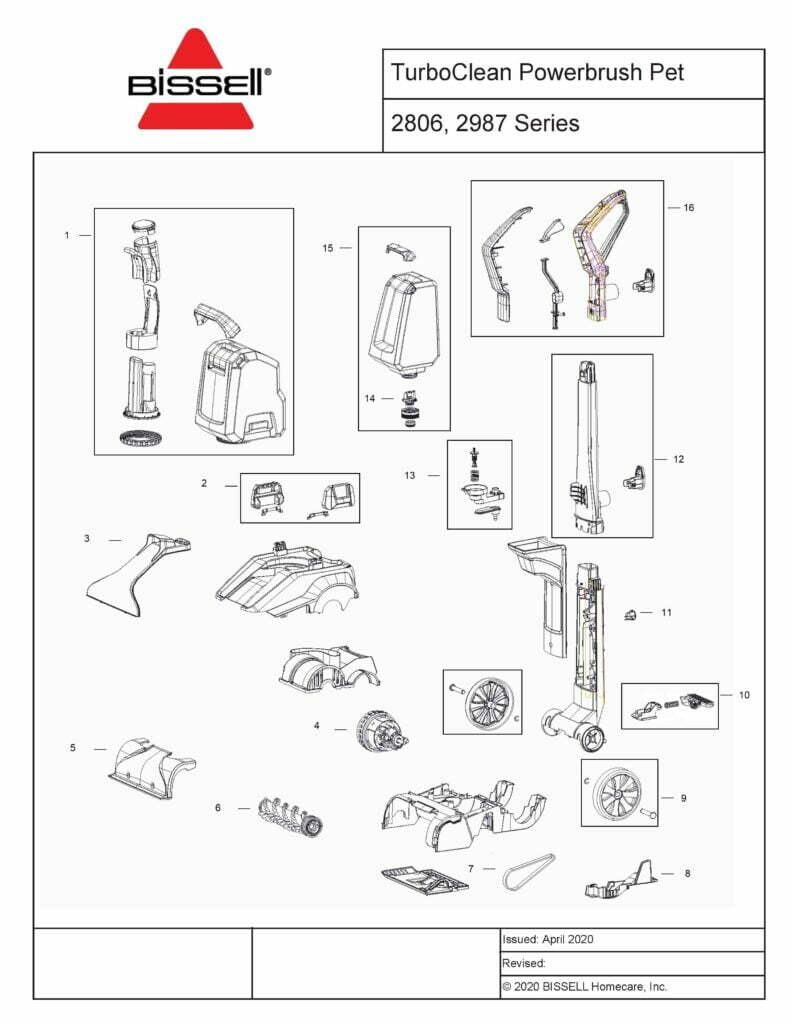
Your Bissell TurboClean Pro sits idle on the carpet, trigger depressed but stubbornly dry. That sudden silence where water should spray signals a problem 90% of owners face—but panic is unnecessary. Most Bissell TurboClean Pro won’t spray water failures stem from three fixable culprits: trigger misalignment, tank seal failure, or handle damage. Whether you own model 2806, 2910, or 2987, this guide delivers precise troubleshooting steps verified by Bissell technicians. You’ll diagnose the exact failure point and restore spray function without professional help—often in under 15 minutes.
Stop wasting money on unnecessary repairs or replacement units. By following this systematic approach, you’ll bypass common misdiagnoses like “pump failure” that lead to costly service calls. Today, you’ll learn exactly why your cleaner stays dry and how to make it spray consistently again. Let’s get your machine back in action.
Quick Trigger Check First
Before disassembling anything, verify you’re triggering the spray correctly—this solves half of all reported Bissell TurboClean Pro won’t spray water cases. Press the trigger all the way down during wet cleaning passes; partial engagement prevents full activation. You should feel firm resistance when pulling it. If the trigger travels smoothly without resistance, proceed to handle inspection. But if you detect pressure building, skip directly to water tank checks—your mechanism is functional but blocked.
Critical mistake alert: Many users confuse dry cleaning mode with spray failure. Always confirm the machine is in wet cleaning mode (indicator light illuminated) before troubleshooting. Hold the trigger for 3-5 seconds on first press—new tanks sometimes require extra suction to prime. If water still won’t spray after these checks, move to handle inspection immediately.
Handle Removal for Inspection
Detach Upper Handle Safely
Start with complete power disconnection to prevent accidental activation:
– Unplug the unit and remove the clean water tank
– Flip the upper cord wrap forward to free the power cord
– Press the black release button beneath this wrap
– Lift the upper handle straight up—never wiggle or twist, which damages connection tabs
Access Middle Handle Assembly
This middle section houses the trigger mechanism critical for spray activation:
– Locate the second black button below the lower cord wrap
– Press firmly while pulling upward—you’ll hear a distinct click when disengaging
– Set both handles aside on a soft surface to protect plastic joints
Reassembly After Testing
Reconnect handles in reverse order with critical precision:
– Slide middle handle onto lower body until it audibly clicks
– Insert upper handle into middle section, aligning cord channels
– Test trigger resistance before reattaching tank—if loose, repeat seating
Trigger Mechanism Diagnosis
With handles removed, perform this definitive test: Pull the trigger while unplugged. Firm resistance confirms mechanical integrity—proceed to tank checks. No resistance or a “mushy” feel indicates broken internal components requiring handle replacement. This single test eliminates guesswork about whether you’re dealing with a $5 cleaning fix or a $30 part replacement. If resistance feels inconsistent (strong then weak), debris is likely jamming the mechanism—shake handles gently to dislodge particles before retesting.
Water Tank System Check

Visual Damage Assessment
Your clean water tank is the spray system’s pressure chamber—inspect it meticulously:
– Cracks along tank seams (hold against light to spot hairline fractures)
– Deformed cap threads from hot water exposure (prevents sealing)
– Missing red gasket—the tiny rubber ring in the cap’s center
– Stress marks near mounting tabs (indicates impending breakage)
Pro tip: Fill the tank with water over your sink before reinstalling. Any leaks confirm tank failure—don’t waste time reassembling a cracked unit.
Critical Gasket Inspection
That red gasket creates the pressure seal enabling spray function. If missing, water escapes instead of spraying. Never attempt temporary fixes like tape or rubber bands—they worsen the problem. Bissell sells caps with pre-installed gaskets only; individual gaskets aren’t available. Replace the entire cap immediately if the gasket is damaged or absent—this solves 30% of persistent spray failures.
Water Temperature Guidelines
Always fill with warm tap water (under 100°F/38°C). Hot water permanently warps the tank, breaking the pressure seal. If your tank feels “soft” or shows cloudiness, heat damage has occurred—replacement is mandatory. Never leave filled tanks in direct sunlight; thermal expansion cracks plastic over time.
Proper Tank Installation
Ensure Correct Seating
A loose tank kills spray pressure instantly. Follow this foolproof method:
1. Position tank over mounting points with handle facing forward
2. Press down with palm heel until you hear/feel a solid CLICK
3. Shake test: Gently wiggle tank—zero movement confirms proper seat
4. If no click occurs, inspect mounting tabs for damage
Failed Installation Indicators
If the tank won’t seat fully:
– Check for cracked mounting tabs on the tank base (common on model 2910)
– Inspect machine’s receiver points for bent or broken plastic hooks
– Wobbly tanks require immediate replacement—forced seating cracks components
Complete Function Test
After repairs, validate results with this sequence:
1. Reinstall all handles and tank
2. Plug in and power on (green light confirms readiness)
3. Hold trigger for 5 seconds while machine is stationary
4. Perform alternating 10-second wet/dry cleaning strokes
5. Observe all nozzles—spray must be strong and consistent
Test Results Interpretation
- Strong, even spray: Problem solved—resume cleaning
- Weak or spitting spray: Repeat tank inspection—gasket likely misaligned
- No spray with firm trigger resistance: Contact Bissell with your model number—they’ll identify internal hose issues
When DIY Fixes Fail
If systematic troubleshooting doesn’t restore spray function, document your process before contacting support:
– Note which steps succeeded (e.g., “Trigger had resistance but no spray”)
– Check warranty status via Bissell’s online portal—models under 2 years often qualify for free parts
– Never disassemble the pump motor—this voids warranties and risks electrical hazards
– Advanced issues like clogged internal hoses require specialized tools—professional repair becomes cost-effective
Parts Replacement Guide
Essential Part Numbers
Order these exact components for your model:
– Middle handle assembly: Part #203-2196 (contains trigger mechanism)
– Tank cap with red gasket: Part #203-2195 (critical for 2806/2910/2987)
– Clean water tank: Part #203-2194 (model-specific—verify yours)
Official Parts Source
Only purchase through Bissell’s Parts & Accessories portal. Third-party tanks lack precise tolerances, causing chronic spray failure. When ordering:
1. Enter your model number (found on bottom plate)
2. Select “Water System Components”
3. Match part numbers to your troubleshooting results
4. Note: Handle assemblies ship with pre-installed wiring—no electrical skills needed
Prevent Future Spray Issues
Water Tank Best Practices
Avoid recurring Bissell TurboClean Pro won’t spray water failures with these habits:
– Rinse tank with cool water after each use—never store with residue
– Air-dry cap and tank separately overnight weekly
– Replace tanks every 18 months—plastic degrades even without visible cracks
– Store empty in temperatures below 85°F (29°C)
Handle Maintenance Routine
Monthly checks prevent sudden failures:
– Test trigger resistance for 10 seconds weekly
– Wipe handle joints with dry cloth to remove hair/debris
– Never wrap cords tightly around handles—this stresses trigger connections
– Store upright with tank removed to relieve spring tension
Storage Guidelines
Your storage method directly impacts spray reliability:
– Always empty tanks completely before storage
– Loosely coil cords around upper handle (no tension)
– Keep in climate-controlled spaces—garages cause plastic brittleness
– Place on flat surface—not leaning against walls that stress handles
Your Bissell TurboClean Pro should now spray water consistently across all models. If problems persist after these verified steps, contact Bissell with your troubleshooting documentation—they prioritize cases with detailed repair histories. Remember: 95% of spray failures resolve through tank or handle fixes. Keep this guide handy for future reference, and never ignore early signs like weak spray or inconsistent clicking. A minute of weekly maintenance prevents hours of troubleshooting later. Ready for spotless carpets again? Plug in your fully functional TurboClean Pro and watch the water flow.