
How to Replace Hoover Vacuum Hose | The 3-Step Click
This post contains affiliate links. As an Amazon Associate, we earn from qualifying purchases.
To replace a Hoover vacuum hose, press the hose release button, pull the old hose out, and push the new hose into the hose tube until you hear a distinct click. The hose is not threaded or screwed in; it’s a bayonet-style lock. The complete model number, required for ordering the correct part, is printed on the bottom of the vacuum cleaner.
That click is the only confirmation the lock has engaged. If you don’t hear it, the hose isn’t seated and suction will leak at the joint, dropping cleaning power by half on carpets. This is a deliberate failsafe, not a design flaw.
What follows: the exact location of the release button across a dozen Hoover models, the one tool you shouldn’t use to clear a clog, and how a 30-minute cooldown period can stop you from ordering a part you don’t need.
Key Takeaways
- The replacement process is a simple press-pull-push sequence, but the audible click upon reinsertion is non-negotiable for a proper seal.
- Your vacuum’s complete model number, found on its underside, is the single most important piece of information for ordering the correct replacement hose.
- Never use sharp objects like coat hangers to clear a clogged hose; they can puncture the interior lining and create a leak.
- If the vacuum has overheated and shut down, you must unplug it and wait 30 minutes for the thermal protector to reset before attempting any service.
- For models like the UH70816, the hose must be removed from the hose door when cleaning carpets to ensure proper brushroll suction and performance.
The 3-Step Hose Replacement Process
Replacing the hose on a Hoover WindTunnel or similar upright is a five-minute job. The difficulty lies in verifying the details before you start, not in the steps themselves. The wrong hose diameter or connector shape won’t fit, and forcing it can break the plastic housing.
First, unplug the vacuum. This isn’t just a safety best practice. For models in the UH70816 family, if the thermal protector has tripped, the motor won’t run anyway. The protector needs a full 30 minutes of cooling while unplugged to reset. You can’t bypass it.
Before you start: Ensure the vacuum is unplugged. If the motor recently shut off unexpectedly, it may be in thermal protect mode. Wait 30 minutes before proceeding to avoid misdiagnosing a simple overheat as a hose failure.
Step 1: Locate and Press the Hose Release Button.
Find the hose release button (usually marked “A” in the manual) on the vacuum body, near where the hose inserts. On most Hoover uprights, this is on the front of the unit, just above the dirt cup. Press it firmly. You don’t need to hold it.
Step 2: Pull the Old Hose Straight Out.
With the button depressed, grip the hose end (the rigid plastic connector, not the flexible tube itself) and pull it straight out of the hose tube. It should release with moderate pressure. If it doesn’t budge, don’t force it, skip to the troubleshooting section below. The part you’ve removed includes the rigid connector and several feet of flexible hose. This is sold as one assembly.
Step 3: Insert the New Hose Until It Clicks.
Align the connector on your new hose with the hose tube on the vacuum. Push it straight in. You will feel resistance, then a definitive click as the internal locking tabs engage. This sound is critical. Tug gently on the hose to confirm it’s locked. If you don’t hear the click, the hose isn’t fully seated. Suction will escape here, making the vacuum sound louder but clean poorly. Remove it and try again, ensuring it’s aligned straight.
How to Find Your Exact Hoover Model Number
You cannot buy the correct hose without your vacuum’s full model number. A “Hoover WindTunnel hose” is not a specific part, there are dozens of variations. The number is always in the same place.
Flip the vacuum over. Look on the underside of the main body, near the wheels or brushroll housing. You’ll find a label with “MODEL” followed by a string like UH70816, UH70819, or UH70800. Write this down exactly. Sometimes there’s a manufacturing code next to it; the model number is what you need.
The official Hoover.com parts page or an authorized dealer will use this number to match the hose. A hose for a UH70816 will not fit a UH70800, even though they look similar. Getting this wrong is the most common reason a “new” hose won’t click into place.
What to Do When the Hose Won’t Come Out
Sometimes the release button sticks, or a hidden blockage is jamming the connector. Force is the wrong answer. Here’s the sequence to follow.
First, double-check you’re pressing the correct button. Consult your owner’s manual (available on Hoover’s product manuals page) if you’re unsure. Press harder, these buttons can require a firm push.
If it still won’t release, the issue might be internal. A large object can get wedged in the hose or the connector path, jamming the mechanism.
Where this goes sideways: Stabbing a wire coat hanger into the hose to clear a clog. The metal can scratch or puncture the interior plastic liner, creating a small leak that kills suction. You’ve now turned a simple clog into a required hose replacement.
Instead, visually inspect the hose path. Look into the end of the hose you’re trying to remove and into the hose tube on the vacuum. Use a flashlight. If you see debris, try to dislodge it with a long, flexible object like a broom straw or a dedicated vacuum cleaning wand. The goal is to push the blockage through, not scrape the walls.
| Symptom | Likely Cause | Safe Fix |
|---|---|---|
| Button presses but hose won’t budge | Internal blockage jamming connector | Inspect with flashlight; gently probe with flexible tool to clear path. |
| No suction after reattachment | Hose not fully clicked in | Remove and re-insert, listening for the click. Tug to test. |
| Hose feels loose or wobbly | Worn locking tabs on connector | Replacement of the entire hose assembly is required. |
| Vacuum motor doesn’t run at all | Thermal protector activated | Unplug, wait 30 minutes for cooldown, then try again. |
If the hose finally comes out but is damaged, cracks in the connector, cuts in the flexible tube, you’ve found your problem. Order the replacement using your model number.
Why a Click Matters More Than a Tight Fit
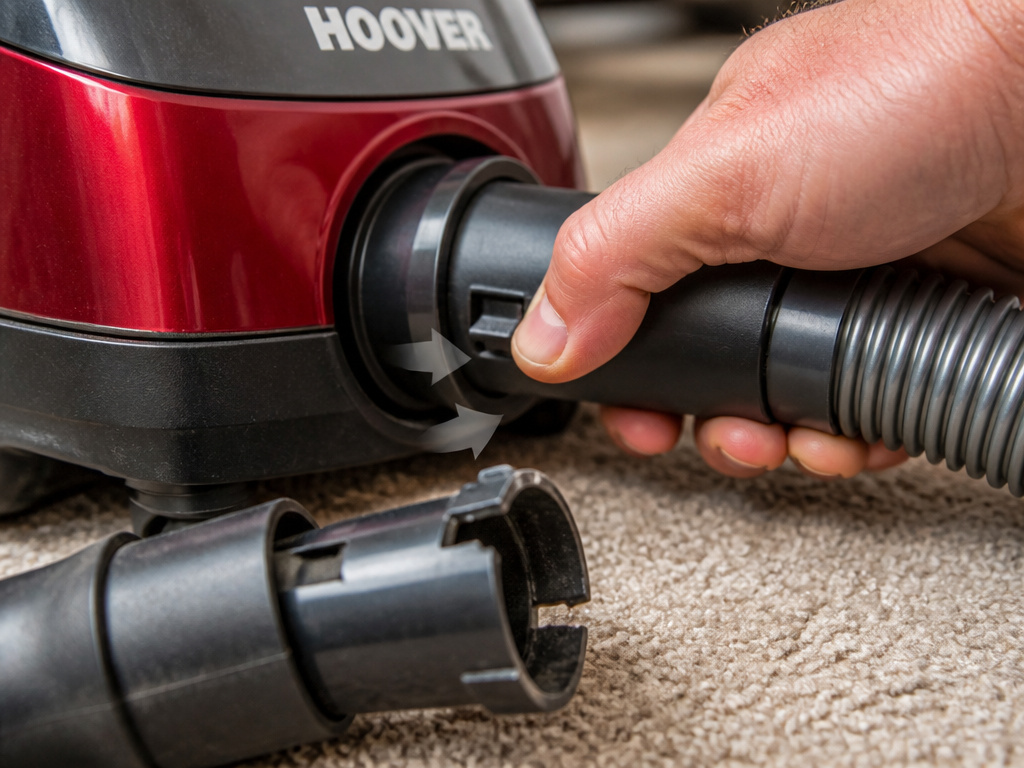 The bayonet lock maintains a perfect air seal, ensuring the hose is secure. Hoover’s suction system is designed around a closed path.A gap at the hose connection bleeds air, which drops the pressure differential that pulls dirt from your carpet.
Think of it like a drinking straw with a hole in the side. You can suck, but you won’t pull much liquid. That’s your vacuum with an unclicked hose, working hard, moving air, but not moving dirt efficiently. The click guarantees the gasket is compressed and the tabs are locked over each other.
This is also why inspecting the old hose’s connector is important. If the plastic tabs are broken or worn smooth, the new hose might click but could pop loose under the stress of you pulling it around furniture. A visual check takes two seconds.
Clearing Blockages Before You Buy a New Hose
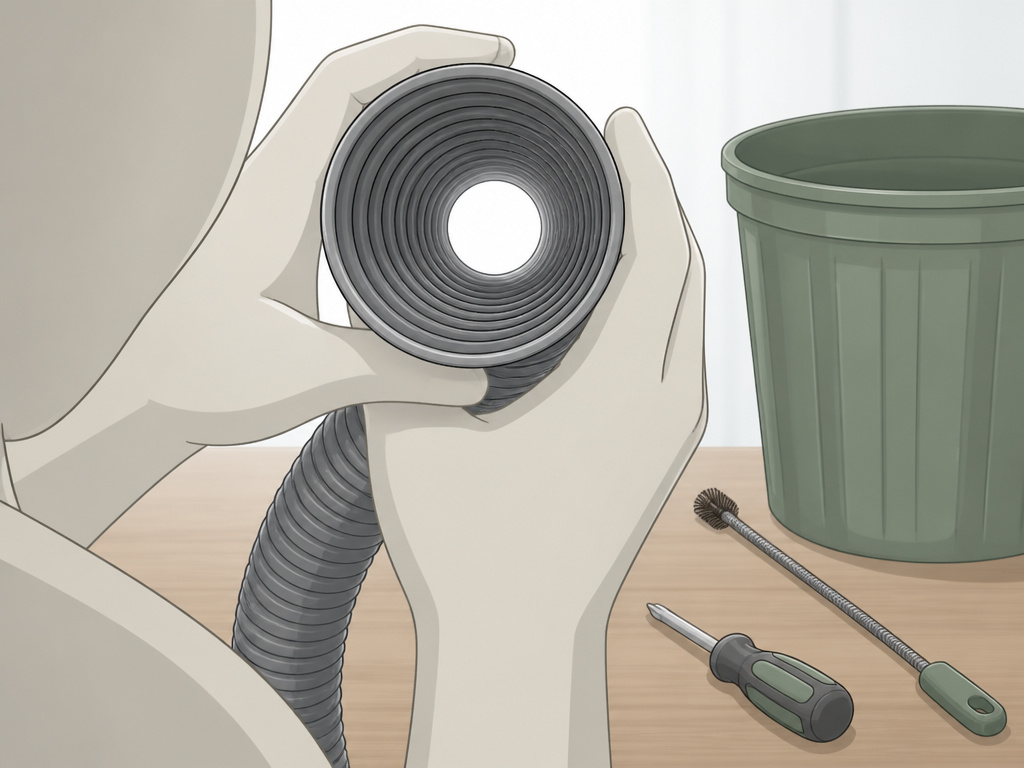 A complete loss of suction is often a blockage, not a broken hose. Before you order a part, diagnose the air path. The process is methodical.
Start with the easiest points: the dirt cup and the filters. An overfull cup or a filter sealed with fine dust (like baking soda) will choke airflow. Empty the cup and check the filters, both the main one and the pre-motor filter if your model has one.
Next, check the hose itself. Detach it from the vacuum. Look through it toward a light source. You should see a clear circle. If not, you’ve found the clog. You can often clear it by tapping the hose firmly against a trash can or using a long, flexible rod to push the debris out. For persistent clogs in the flexible section, running water through it can help, but you must let it dry completely for 24 hours before reusing it. Moisture inside a hose will attract dust and create a muddy, permanent blockage.
Finally, check the vacuum’s internal air path. With the hose removed, look into the hose tube on the machine. Also, check the brushroll chamber at the base of the vacuum. Hair and string wrapped around the brushroll can seal off the intake. Our guide on cleaning your Hoover details this brushroll cleaning process.
Connecting Hose Issues to Other Vacuum Problems
A faulty hose or a poor connection doesn’t exist in isolation. It can cause or be mistaken for other common issues.
High-Pitched Noise: A leak at the hose connection can cause a whistling or screeching sound as air rushes through the small gap. If you hear a high-pitched noise after reassembly, re-check the click seal before investigating the motor.
Brush Roll Not Spinning: On many Hoover uprights, suction helps drive the brushroll. If the hose is detached or not sealed, suction at the floor head drops. This can lead to a brush not spinning even if the belt is fine. Always reconnect the hose fully for carpet cleaning.
Red System Check Light: Some models have a dashboard light. A red “System Check” indicator can mean a clog, a full dirt cup, or a dirty filter. A blocked hose is a primary clog source. Don’t ignore the light, it’s pointing you to the problem.
Understanding these links turns you from a parts-swapper into a diagnostician. You save money by not replacing a central vacuum hose for a whole-home system when the issue is just a stuck sock in the portable unit’s tube.
Frequently Asked Questions
Can I use a generic vacuum hose instead of a genuine Hoover part?
Maybe, but it’s a gamble. Generic hoses advertise compatibility with “many models,” but the connector shape and locking mechanism are rarely an exact match. You might get it to stay, but a poor seal will hurt performance. For a reliable fix and to maintain suction power, the genuine Hoover hose designed for your specific model number is the surest path.
How do I know if my Hoover hose is cracked or leaking?
The most obvious sign is a visible split or tear in the flexible tubing. Less obvious is a crack in the rigid plastic connector. To test for a subtle leak, run the vacuum and slowly run your hand along the length of the hose. You’ll feel suction pulling your hand against the tube where it’s intact. Any spot where that pulling sensation stops or you feel air blowing out indicates a leak.
My new hose clicked in, but suction is still weak. What now?
The click confirms the connection is sealed, so the leak or blockage is elsewhere. The next most likely suspects are, in order: a full dirt cup, a clogged filter (rinse and dry it), a blockage in the hose itself (detach and check), or a clog in the vacuum’s internal air path leading to the brushroll. A systematic check of the entire air path is needed.
Is replacing a Hoover vacuum hose difficult?
No. It’s one of the simplest repairs. It requires no tools, just your hands. The challenge isn’t mechanical skill; it’s patience in correctly identifying your model number and ensuring the replacement part clicks securely into place. If you can plug in the vacuum, you can replace the hose.
Where is the best place to buy a replacement Hoover hose?
Start with the manufacturer. The official Hoover.com parts page is the authoritative source to look up your model and find the correct part number. You can then purchase it there or use that part number to search reputable appliance parts retailers. Avoid third-party marketplaces where model number accuracy is often poor.
Before You Go
Replacing a Hoover vacuum hose boils down to three actions: press, pull, and push until it clicks. The real work happens before that, finding the model number on the bottom of your machine and making sure a simple clog isn’t mimicking a hose failure. Remember the 30-minute cooldown rule if the vacuum overheated, and never use metal to clear a blockage. A clean, sealed air path is what makes these machines work. Keep yours intact, and the vacuum will return the favor for years.