
Dyson Hand Vacuum Keeps Stopping: 3 Proven Fixes That Work
This post contains affiliate links. As an Amazon Associate, we earn from qualifying purchases.
A Dyson hand vacuum keeps stopping for three mechanical reasons: a physical blockage in the airway, a wet or clogged filter, or a battery that’s too cold, too hot, or failing. The machine’s thermal cut-out triggers within seconds of a blockage and shuts it down to prevent motor damage. Start by checking for clogs in the bin, cyclone, and wand before moving to the filter and battery.
That thermal cut-out is the machine protecting itself, not a fault. The frustration comes from the cut-out resetting the problem before you can find the actual cause—a tiny wad of lint deep in the wand or a filter that’s still damp inside the pleats.
What follows is the diagnostic sequence that works, pulled from the service manuals. We’ll walk through the three most common failure points, the specific temperature limits that cause shutdowns, and what to do when the simple fixes don’t work.
Key Takeaways
- The thermal cut-out activates in under a minute if airflow is restricted, shutting the vacuum off to prevent overheating. Clearing the airway is the first fix.
- A filter must dry for 24 hours after washing. Using it damp blocks airflow and triggers the cut-out immediately.
- Batteries shut down below 3°C (37.4°F) on older models and 5°C (41°F) on newer ones. Storing a charged vacuum in a cold garage guarantees a no-start.
- Clearing blockages is not covered by the Dyson limited warranty for models like the DC34 and DC31. DIY fixes are your only option.
- For persistent electrical cut-outs, the trigger mechanism on V10/V11 models is a known weak point that cracks and fails to engage.
The 3-Step Diagnostic Sequence
Don’t start by taking the whole thing apart. Follow this order. It’s the same sequence Dyson’s own phone support walks through, because 90% of “keeps stopping” issues live here.
Before you start: Unplug the charger. Remove the battery if your model allows it. Never probe for blockages with the power connected. A jammed motor can overheat in seconds.
Step 1: Empty and inspect the bin.
Take the bin off and empty it. Look past the obvious debris. Shine a light into the bin’s inlet—the hole where dirt enters from the cyclone. A clump of hair or a shredded plastic wrapper often lodges right there, creating an instant blockage the moment you turn it on. If the bin is overfilled past the MAX line, empty it. An overfull bin chokes the cyclone.
Step 2: Check the cyclone and main airway.
With the bin removed, look into the machine’s body where the cyclone sits. Use a flashlight. You’re looking for a compacted plug of fine dust or a small object. For models with a removable wand, detach it and look through both ends. A common hiding spot is the joint where the wand clicks into the main body or the tool. A kid’s Lego brick, a coin, or a dense felt pad from furniture will stop airflow completely.
Step 3: Verify the filter is clean, dry, and seated.
Remove the filter. Is it bone dry? A filter that feels cool or damp to the touch needs another 12-24 hours of drying time. Tap it over a trash can to dislodge fine dust. Hold it up to a light; if you can’t see light through the pleats, it’s clogged and needs washing. When re-seating it, ensure it clicks into place fully. A misaligned filter creates an air leak that the sensor reads as a blockage.
If the vacuum runs for a few seconds then dies, you have a partial blockage. If it pulses or won’t start at all, think battery or electrical.
Where Blockages Hide (Beyond the Bin)
The obvious places are empty. The problem is usually one joint further down the line. These are the spots most people miss.
The wand-to-body connection. On models like the V12, the wand detaches for storage. The O-ring seal in that connection can trap a hair tie or a piece of thread. When you reattach the wand, it pushes that debris into the airway, creating a perfect plug. Disconnect the wand and look into both sockets with a flashlight.
Inside the cleaner head or motorized tool. The mini motorized tool for upholstery is a notorious culprit. Hair wraps around the brush bar axle and slowly works its way into the intake, forming a dense felt. Remove the brush bar cover (usually by pressing two tabs) and clear any wound fibers.
The cyclone shroud itself. On older models (DC31, DC34), the clear plastic shroud around the metal cyclone can accumulate a layer of fine, plaster-like dust. It doesn’t look blocked, but it reduces airflow just enough to trip the thermal sensor after 30 seconds of use. Wipe it clean with a dry cloth.
Common mistake: Only checking the main bin. A blockage in the wand or tool will make the vacuum seem fine for a second before the cut-out engages, sending you back to empty an already-empty bin.
If you’ve cleared every physical path and the vacuum still stops, the issue shifts from mechanical to chemical or electrical.
The Filter & Battery: The Invisible Stoppers
These two components don’t always look broken, but they fail in predictable ways.
The 24-Hour Filter Rule
Dyson’s manuals are strict: a filter needs at least 24 hours to dry completely after washing. Not 12, not overnight. A full day in a warm, ventilated spot.
| Filter Condition | What Happens | Timeline to Failure |
|---|---|---|
| Damp | Blocks airflow, triggers thermal cut-out | Immediate on startup |
| Clogged with fine dust | Restricts suction, motor overheats | Cuts out after 30-60 seconds of use |
| Bone dry and clean | Allows full airflow, machine runs normally | N/A |
Why? The filter is a pleated paper and polyester mesh. Water trapped in those pleats acts like a plug. The motor strains to pull air through, overheats, and the thermal cut-out kills the power. It’s not a suggestion—it’s a physical limit.
Wash the filter with cold water only, no detergent. Rinse until the water runs clear, squeeze out excess water (don’t twist), and let it dry end-up. Never use a heater, microwave, or dryer.
Battery Temperature & Failure
Your Dyson has a built-in low-temperature cutoff. It’s not a defect; it’s to prevent permanent damage to the lithium-ion cells.
Where this goes sideways: Charging the vacuum in a warm house, then storing it in a garage that drops below 3°C (37.4°F) overnight. The battery will refuse to operate until it warms up above that threshold.
Here are the model-specific limits from the manuals: * DC56, DC34, DC31: Shuts off if battery temperature is below 3°C (37.4°F). * HH15, HH12: Will not operate or charge if ambient temperature is below 5°C (41°F).
If your vacuum has been in a cold car or garage, bring it inside and let it sit for a few hours before trying again. The battery itself might also be failing. A battery that can’t hold a charge will cause the vacuum to pulse or shut off erratically. Look at the battery LEDs: * Solid blue: Charged/ready. * Flashing blue: Charging. * Rapidly flashing blue/red: Temperature fault (too hot or too cold). * No lights: Battery may be dead or unseated.
When It’s Not a Blockage: Electrical & Mechanical Faults
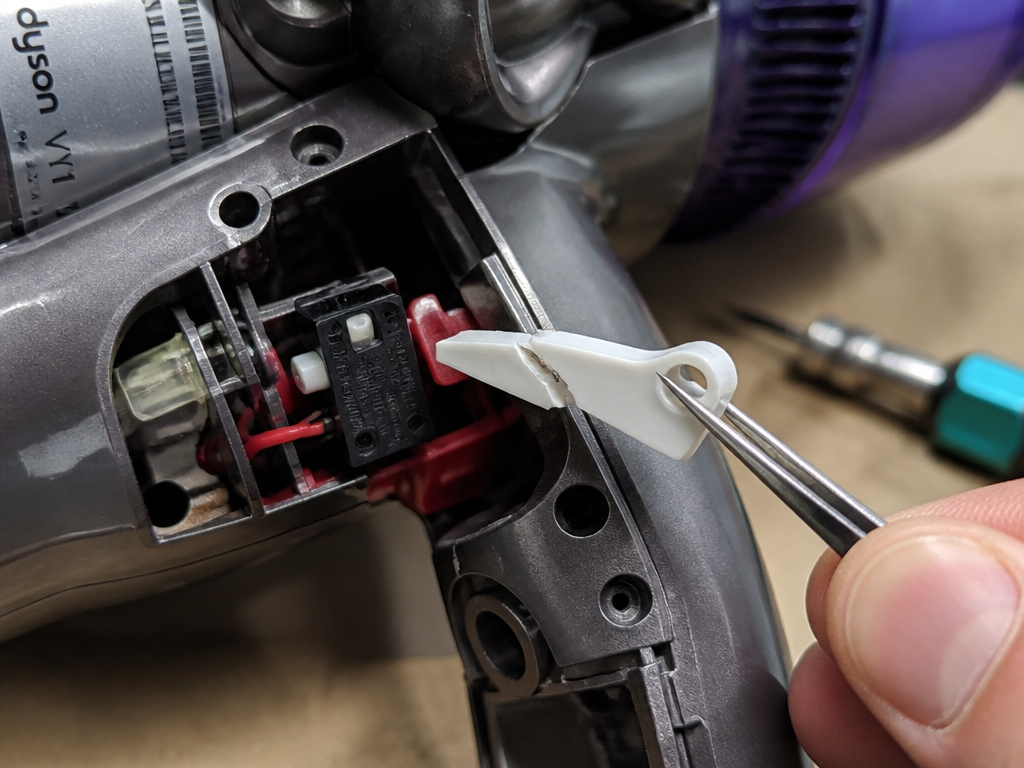
You’ve cleared the airway, verified a dry filter, and warmed the battery. The vacuum still stops. Now you’re looking at component failure.
The trigger microswitch. This is a known issue on V10 and V11 models. The plastic trigger arm inside the handle cracks, so pressing the button no longer depresses the internal microswitch. The vacuum gets no “on” signal. The fix is replacing the trigger assembly, which requires disassembly.
A failing motor or main circuit board. If the motor bearings are seizing or the board has a fault, the vacuum may start for a second then die with a strange noise or smell. This is less common but happens with age. A YouTube teardown community points to this as a “hidden” cause after all else is checked.
Charger or charging port issues. If the battery never reaches full charge, the vacuum will run for a minute then die. Try a different charger if you have one. Check the charging port for bent pins or debris.
The part nobody mentions: Dyson’s limited warranty for models like the DC31 explicitly states that clearing blockages is not covered. If your vacuum is out of warranty and the fix is a $5 part, you’re on your own. Knowing how to diagnose it yourself saves a costly service visit.
Dyson Hand Vacuum Keeps Stopping: Next Steps
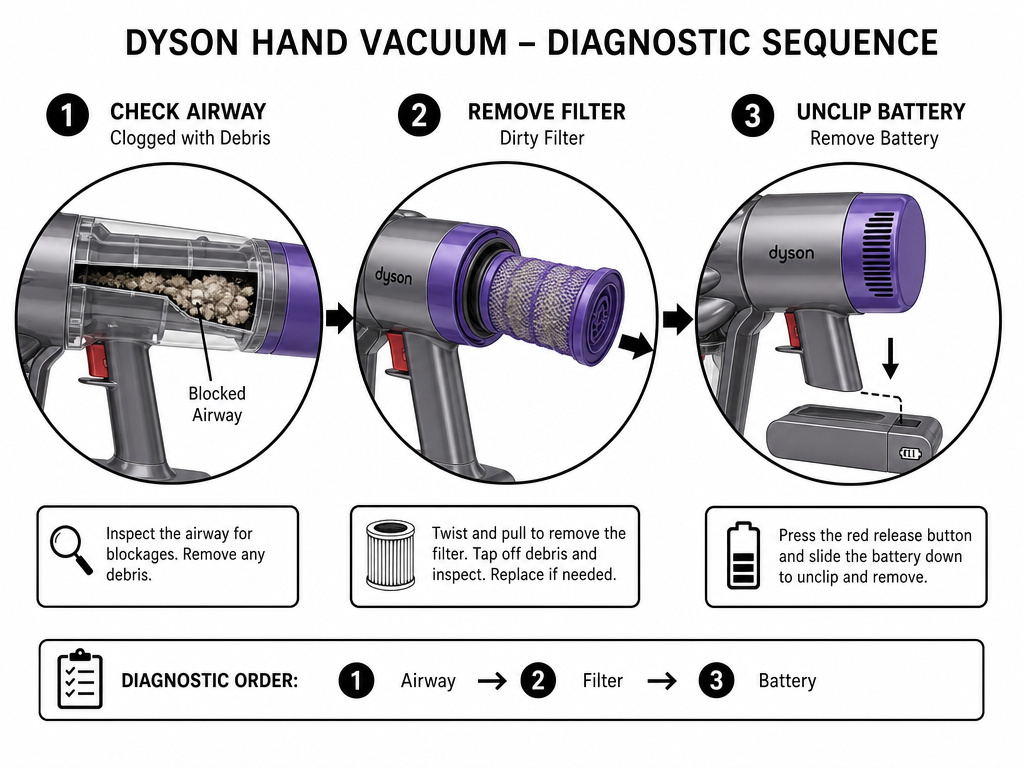
You have two paths after diagnosis: repair or replace.
For a repair, you need the right part. Sites like Dyson’s official spares store or reputable third-party vendors sell genuine filters, batteries, and trigger mechanisms. For a Dyson V12 Detect Slim or HH15, the official support site has PDF guides. For older models like the DC34, the manual is archived online.
If the repair cost approaches a new vacuum, consider an upgrade. The current Dyson V12 Detect Slim is the default for most homes. For a simpler, more durable option for cars and workshops, the Dyson Car and Boat model (HH12 variant) is built for tougher jobs.
Bottom line: Start with the physical airway. Move to the filter and battery. Only then consider internal electrical faults. That sequence fixes the vast majority of “keeps stopping” problems without a trip to the service center.
Frequently Asked Questions
Why does my Dyson handheld vacuum run for a few seconds then stop?
This is the classic sign of a partial blockage or a damp filter. The machine starts, but restricted airflow causes the motor to overheat. The thermal cut-out engages within 30-60 seconds and shuts it down. Check the wand, tools, and filter dryness.
Can a cold battery cause a Dyson hand vacuum to not start?
Yes. Older models (DC56, DC34, DC31) will not operate if the battery temperature is below 3°C (37.4°F). Newer models like the HH15 have a cutoff at 5°C (41°F). If stored in a cold place, warm the vacuum to room temperature for a few hours before use.
How long does a Dyson filter take to dry?
Dyson filter requires a full 24 hours to dry completely after washing, as stated in the user manuals. Using it while damp will block airflow and cause the vacuum to shut off immediately. Dry it end-up in a warm, well-ventilated area.
Is a Dyson hand vacuum stopping covered under warranty?
Routine issues like blockages or filter maintenance are not covered by the limited warranty. The DC31 manual explicitly excludes “clearing blockages” from warranty coverage. Electrical or motor defects within the warranty period (2 years for the DC31) are covered.
What does a rapidly flashing blue light mean on my Dyson?
Rapidly flashing blue (or blue/red) light on the battery indicator is a temperature fault warning. It means the battery is either too hot or too cold to operate safely. Let the vacuum cool down or warm up to room temperature before attempting to use or charge it again.
Why does my Dyson pulse on and off when I use it?
Pulsing is almost always a battery issue. The battery is either severely depleted, failing and unable to deliver consistent power, or experiencing a temperature fault. Ensure it’s fully charged and at room temperature. If pulsing continues, the battery likely needs replacement.
Before You Go
The pattern is almost always physical: something is blocking the air, something is wet, or something is too cold. Start with the simple, free fixes—clear the airway, dry the filter, warm the battery. That solves most cases.
For the stubborn ones, you now know the less common culprits: a cracked trigger, a worn motor, or a failed circuit board. Decide if a $30 battery or $15 trigger is worth it for an older model, or if it’s time to move to a newer machine like the Dyson V12.
Either way, you’re not stuck. You have the sequence. Start at the bin and work your way in.