
Hoover Vacuum Power Button Not Working? Here’s the Fix
This post contains affiliate links. As an Amazon Associate, we earn from qualifying purchases.
A Hoover vacuum power button not working is almost never the button itself. The problem is upstream: a tripped thermal cut-out, a blown internal fuse, or a blockage that triggers a safety shut-off. The button is just the last link in a chain of electrical checks the vacuum runs before it lets the motor spin.
That chain starts at the wall plug and runs through a fuse, a thermal protector, and often a second safety switch for the brush roll. If any link is broken, by heat, a jam, or a worn part, the power button does nothing. It’s a symptom, not the cause.
What follows: the three most common failures, how to diagnose which one you have using model-specific timings and a multimeter, and the one repair that usually requires a professional.
Key Takeaways
- The thermal cut-out on models like the Hoover HU300RHM locks the vacuum for a full 45 minutes after tripping, not the 30 minutes listed for older models.
- A “blown fuse” often refers to an internal 20 amp, 250 volt ceramic fast-blow fuse inside the vacuum, not your home’s circuit breaker.
- A worn power switch feels loose, clicks without power, or requires multiple presses, a clear sign the internal contacts have failed.
- Always unplug the vacuum and let it sit for at least an hour before testing any electrical component.
- Forcing a vacuum with a tripped thermal cut-out to run can permanently damage the motor windings.
The Hoover Power Button Circuit
The power button on a Hoover is a momentary switch. Pressing it completes a low-voltage signal circuit that tells the main control board or a relay to send full power to the motor. For that signal to get through, every safety interlock in line must be closed.
Think of it as a series of gates. The thermal protector is one gate. The brush roll safety switch is another on many models. The internal fuse is the master gate. If the motor overheats, a brush jams, or a power surge hits, one of these gates slams shut. The button press can’t get through.
Technical Snippet: In upright Hoover models, the power circuit typically routes household AC current through a line fuse, then a thermal cut-out switch (often rated 15-20A), before reaching the power switch. The switch activates a relay or directly completes the circuit to the motor. A separate, normally-closed micro-switch on the brush roll housing can interrupt this circuit if the brush jams.
Your first job is to figure out which gate is closed. Start with the simplest and work toward the complex: power source, thermal cut-out, brush roll safety, internal fuse, and finally the switch itself.
Is It the Thermal Cut-Out?
This is the most common reason a Hoover stops mid-clean and refuses to restart. The thermal cut-out is a bimetallic strip that bends and breaks the circuit when the motor temperature exceeds a safe limit, usually around 130°C. It’s a safety feature to prevent the motor from burning its own windings.
The critical detail most guides miss is the reset time. It’s not a universal 30 minutes.
| Hoover Model / Manual | Documented Cool-Down Time | Primary Cause of Trip |
|---|---|---|
| HU300RHM Upright | 45 minutes | Blockage, full dust bin, dirty filters |
| U3524 (PurePower) | 30 minutes | Overheating from continuous use or blockage |
| UH72405 & PowerDrive Series | 30 minutes | Thermal protector activation |
If your vacuum just quit while vacuuming a high-pile carpet or a full bin, this is your likely culprit. The fix is procedural: unplug it, clear any blockages in the hose, nozzle, and brush roll, empty the bin, and clean the filters. Then walk away.
Where this goes sideways: Plugging it back in after 10 minutes because it feels cool. The internal bimetallic strip needs the full 30-45 minutes to snap back into position. Trying to power it on early resets the timer. You’ll wait another 45 minutes.
Set a timer. Use the full duration listed for your model. If it starts after that, you’ve confirmed the issue was overheating. If it still doesn’t work, the cut-out may have failed permanently or a deeper electrical fault exists.
The Hidden Internal Fuse
When troubleshooting guides say “check for a blown fuse,” they almost always mean your home’s circuit breaker. For many Hoover uprights, especially older Wind Tunnel models, there’s a second fuse inside the vacuum itself.
This is a 20 amp, 250 volt ceramic fast-blow fuse soldered onto the main wiring harness near the motor housing. It’s a user-serviceable part, but Hoover’s official troubleshooting often omits it, directing you to a $30 wiring harness replacement instead.
| Symptom | House Fuse / Breaker | Internal Vacuum Fuse |
|---|---|---|
| Vacuum behavior | Complete deadness – no lights, no sound, nothing | Complete deadness – no lights, no sound, nothing |
| Other appliances on outlet | Also dead | Work fine |
| Testing method | Reset breaker; test outlet with lamp | Visual inspection; multimeter continuity test |
| Fix | Reset breaker or replace home fuse | Replace with 20A 250V ceramic fast-blow fuse |
To check it, you’ll need to open the vacuum’s baseplate. Unplug the vacuum first. The fuse is usually a small, white ceramic cylinder with metal end caps, wired in-line with the main power cord. A blackened glass window or a broken filament inside means it’s blown.
Replacing this fuse costs a few dollars. The catch is finding the exact physical size, some replacements are shorter than the original and won’t seat in the clips. Measure the old one.
Electrical Diagnosis: The Switch and Safety Interlocks
If the vacuum has power and is cool, the problem moves downstream. Now you’re checking for broken connections and failed components. This requires a multimeter set to continuity (the setting that beeps).
Before you start: Unplug the vacuum and discharge any stored power by pressing the power button a few times. Do not probe any components while the vacuum is plugged in.
Testing the Brush Roll Safety Switch
Many Hoover uprights have a micro-switch that kills power if the brush roll jams. It’s a plastic plunger switch located where the brush roll housing meets the vacuum body. If debris holds this plunger in, the circuit stays open.
- Locate the switch (consult your model’s manual).
- Set your multimeter to continuity.
- Place one probe on each of the switch’s two terminals.
- Press and release the plunger. You should hear a beep when the plunger is released (circuit closed) and silence when it’s pressed (circuit open).
If the switch beeps constantly or never beeps, it’s stuck or broken. Sometimes the electrical contacts fitted to the dust container that mate with this switch become worn or dirty, breaking the connection. Clean them with isopropyl alcohol and a cotton swab.
The Power Switch Itself
A failing power switch has physical tells. Does it feel mushy, not crisp? Do you have to press it multiple times or hold it at a certain angle? Can you hear a faint click but get no motor sound? That’s the internal contacts arcing or wearing out.
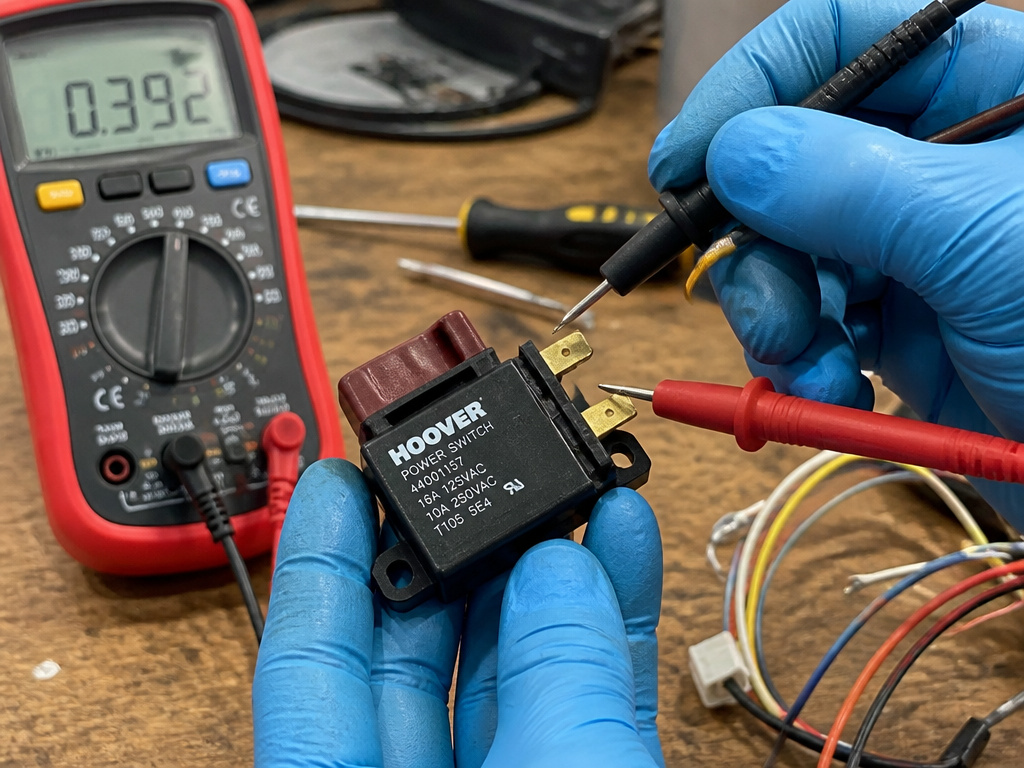
To test it with a multimeter: 1. Find the switch’s terminals (usually 2 or 4 pins on the back). 2. Identify which pair of terminals are for the main power circuit (often the two largest). 3. With the multimeter in continuity mode, place a probe on each of these two terminals. 4. Press and hold the power button. The multimeter should beep, indicating a closed circuit. 5. Release the button. The beep should stop (open circuit).
If the switch fails this test, it needs replacement. This is where many DIY repairs end. The switch is often integrated into a complex wiring harness or control board. Desoldering the old switch and soldering in a new one requires skill. For most people, this is the point to call a professional vacuum repair service or consider the cost of a new unit versus repair.
Step-by-Step Troubleshooting Flow
Follow this sequence. Do not skip steps.
- Unplug and Cool. Unplug the vacuum. Let it sit for 60 minutes to ensure any thermal cut-out is fully reset.
- Check External Power. Plug a known-working lamp into the same outlet. If the lamp doesn’t work, reset your home’s circuit breaker or GFCI outlet.
- Inspect the Cord. Visually check the entire power cord for cuts, frays, or damage. Feel along its length for unusual soft spots.
- Clear All Blockages. Empty the dust bin. Remove the hose and look through it. Clear the brush roll and the nozzle intake. Clean all filters.
- Test the Brush Roll Switch. Manually depress and release the brush roll safety micro-switch (if present). Listen for a faint click.
- Listen for the Thermal Cut-Out. After the 60-minute cool-down, plug the vacuum in and press the power button. Do you hear a faint click from the motor area? That’s often the thermal cut-out resetting. Try the button again.
- Internal Fuse Check. If still dead, open the baseplate to visually inspect the internal 20A ceramic fuse.
- Switch Test. As a last resort, use a multimeter to test the power switch for continuity.
Common mistake: Starting with step 8. The switch is the least likely point of failure. The hundreds of hours spent checking switches by owners who simply had a tripped thermal cut-out is a testament to backwards troubleshooting.
When to Call a Professional
 Some repairs exceed practical DIY. You should stop and seek professional help if:
* The internal wiring harness is visibly melted or burnt near the motor.
* The power switch is soldered to a proprietary control board.
* You are uncomfortable using a multimeter on live components.
* The vacuum is under warranty, tampering will void it.
Some repairs exceed practical DIY. You should stop and seek professional help if:
* The internal wiring harness is visibly melted or burnt near the motor.
* The power switch is soldered to a proprietary control board.
* You are uncomfortable using a multimeter on live components.
* The vacuum is under warranty, tampering will void it.
A certified Hoover technician has the schematics and proprietary parts. The cost of a service call might be $80-$120. Weigh that against the age and value of your vacuum.
Frequently Asked Questions
Why did my Hoover vacuum suddenly stop working?
It most likely overheated and the thermal cut-out tripped. This happens from a blockage, a full dust bin, dirty filters, or vacuuming thick carpet for too long. Unplug it, clear everything, and wait the full model-specific cool-down time (30-45 minutes).
Is there a reset button on a Hoover vacuum?
Most Hoover uprights do not have a user-accessible reset button. The thermal cut-out resets automatically after the cool-down period. Some cordless stick models have a reset button on the side or near the battery, but for power button issues on corded models, the “reset” is the waiting period.
Can a clogged vacuum cause the power button to not work?
Absolutely. A severe clog in the hose, nozzle, or brush roll housing is the number one cause of overheating. It can also physically jam the brush roll safety switch plunger. Both events break the electrical circuit before it reaches the power button.
How much does it cost to fix a Hoover power switch?
If it’s just the switch, a replacement part might cost $15-$30. However, the labor for a professional to disassemble the vacuum, replace it, and reassemble it typically runs between $75 and $150 total. Always get a quote before proceeding.
My Hoover vacuum clicks but won’t turn on. What does that mean?
Single click when you press the power button often indicates the thermal cut-out has reset and is now allowing power through. Try pressing the button again immediately. If you hear a rapid clicking but the motor doesn’t spin, it could be a failing relay or a severely worn switch where the contacts are barely making connection.
The Bottom Line
A non-working Hoover power button is a circuit problem, not a button problem. Start with the 45-minute wait for a HU300RHM or the 30-minute wait for older models. Then methodically check for blockages and the internal fuse. The switch itself is the last suspect. Most of the time, the fix requires patience and a screwdriver, not a soldering iron.