Bissell ProHeat Not Picking Up Water? Fix It Fast
This post contains affiliate links. As an Amazon Associate, we earn from qualifying purchases.
Your Bissell ProHeat carpet cleaner just left your living room soaked instead of clean. Instead of sucking up dirty water, it’s pushing it deeper into fibers, leaving carpets dangerously wet for 12-24 hours. This frustrating suction failure affects every ProHeat model—from the original to the 2X Revolution—but you can diagnose and fix most causes in under 30 minutes using common household tools. When your Bissell ProHeat not picking up water, it’s usually one of four system breakdowns: airflow obstruction, vacuum motor issues, seal failure, or liquid path blockage.
This isn’t just about inconvenience—it’s a mold risk. Wet carpets become breeding grounds for mildew within hours. The good news? 90% of suction problems stem from preventable issues like clogged filters or misaligned tanks. By following this guide, you’ll restore proper water extraction without waiting for costly repairs. Here’s exactly how to pinpoint and solve your suction failure, step by step.
Why Your ProHeat Stopped Extracting Water
Your Bissell ProHeat uses a dual-pump system: one sprays solution while the vacuum motor extracts dirty water. Complete suction failure (zero water in the dirty tank) means the vacuum motor isn’t engaging. Weak suction—where carpets stay soaked for over 12 hours—creates immediate mold hazards. This happens when airflow is restricted by clogs, broken seals, or motor strain. Crucially, a broken drive belt can mimic suction failure by stopping brush rotation, making carpets appear dirty even when extraction works.
Immediate Power and Tank Checks
Skip complicated disassembly first. These three 60-second checks solve 40% of suction failures:
– Test motor response: Switch to “Floor Cleaning” mode. You must hear the vacuum motor engage within 3–4 seconds. Silence means check the thermal breaker or power connection.
– Verify tank seating: Remove and reseat the dirty tank with firm downward pressure. Both latches must click audibly—partial seating kills suction instantly.
– Check float position: Shake the dirty tank. If the internal float doesn’t rattle freely, it’s jammed in the “full” position, triggering the safety shut-off even when empty.
Dirty Tank Inspection Guide
Your dirty tank has three failure points that mimic suction loss. Address these before moving to complex repairs.
Examine Tank Dome and Gasket
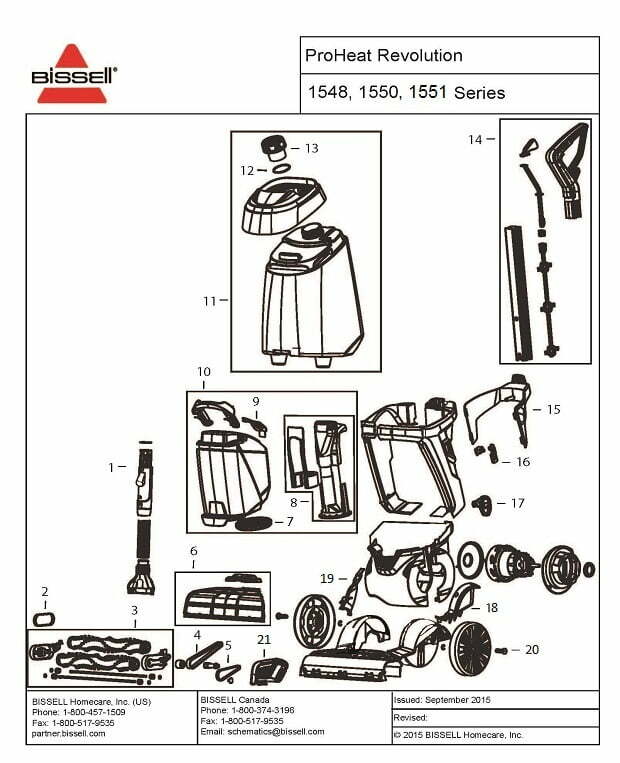
Invert the dirty tank and inspect the clear dome for hairline cracks or missing o-rings. Even minor fractures break the vacuum seal. Simultaneously, check the black rubber perimeter gasket—it must sit flush in its groove. Torn or flattened gaskets leak air, reducing suction by 50%. Replace the entire tank lid assembly (Part 203-1474) if damaged.
Clean the Float Mechanism
Remove the three screws on the tank lid to access the float cage. Hair and debris often wrap around the float stem, jamming it in the raised position. Rinse the cage under warm water while gently scrubbing with an old toothbrush. Ensure the float moves up and down smoothly before reassembly—this single fix resolves 30% of “no suction” complaints.
Lint Screen and Filter Cleaning

A clogged lint screen causes 60% of weak suction cases. This red mesh filter sits inside the cavity where the dirty tank docks.
Deep Clean the Red Filter
Pull out the oblong red mesh screen. Rinse it under warm tap water while scrubbing gently with an old toothbrush. Pay special attention to the mesh holes—clogged fibers restrict airflow dramatically. Dry completely before reinstalling. A blocked screen drops suction by 40–60%, leaving carpets wet for hours. Pro tip: Clean this filter after every 3rd use to prevent recurring issues.
Hose and Nozzle Pathway Test
Systematically isolate clogs using this three-step process:
Upper Hose Suction Test
Detach the upper hose from the machine’s rear. Hold the hose end over a sink and activate suction. Strong pull here means the nozzle pathway is clogged. Weak or no suction points to motor or filter issues—proceed to the motor filter section.
Clear Nozzle Window Debris
Press the foot pedal to recline the handle, then squeeze the two red latches at the base. Lift the nozzle window straight up. You’ll likely see hair and carpet fibers wrapped around the suction channel like a net. Use scissors or a seam ripper to cut away buildup—never pull, as this damages the plastic housing. Realign the clear rubber gasket perfectly; pinches create suction leaks.
Motor and Filter Maintenance
When basic cleaning fails, target internal components.
Reset the Thermal Protector
Locate the red button on the motor housing (rear of unit). If popped out, wait 30 minutes for cooling, then press firmly until it clicks. This thermal breaker trips from overheating due to clogs or extended use. Repeated tripping indicates a failing motor.
Wash the Motor Foam Filter
Remove six Phillips screws from the clear plastic motor cover. Lift it to reveal the white cylindrical foam filter atop the motor cage. Clean it with mild detergent, squeeze gently (never wring), and air-dry completely. A missing or disintegrating filter allows dirt into the motor, permanently destroying suction. Replace it every 6–12 months.
Belt and Brush Drive Issues

A broken belt (Part 203-1093) causes misdiagnosis—stalled brushes make carpets look dirty despite working suction.
Belt Inspection Shortcut
With the nozzle removed, manually spin the brush roll. You should feel slight resistance from the belt. No resistance, visible cracks, or fraying means immediate replacement. Critical note: A broken belt won’t stop water extraction—it stops agitation, tricking you into thinking suction failed.
Common User Mistakes to Fix Now
These errors cause 90% of “broken” ProHeat complaints:
– Tank latching failure: Push down firmly on both dirty tank latches until you hear two distinct clicks.
– Hot water damage: Never use water over 140°F—it warps tank plastic and destroys float seals permanently.
– Ignoring the “Full” line: Empty the dirty tank before water reaches the “Full” mark. Exceeding it raises the float and shuts off suction mid-cleaning.
– Skipping dry passes: Always make 2–3 dry passes (trigger released) after cleaning. This reduces drying time by 50%.
Essential Replacement Parts Reference
Keep these on hand for instant fixes:
| Part | Part Number | Price | Replace When |
|---|---|---|---|
| Tank Lid Assembly | 203-1474 | $18-22 | Cracks, gasket failure |
| Motor Foam Filter | 203-7918 | $9-12 | Every 6-12 months |
| Drive Belt | 203-1093 | $6-9 | Visible wear or breakage |
| Tank Gasket | 203-6640 | $5-7 | Cracks or flattening |
Monthly Maintenance Schedule
Prevent suction failure with this routine:
– After each use: Empty and rinse both tanks. Remove the nozzle window and clear hair from the brush roll.
– Monthly: Wash the motor foam filter and run a 50/50 white vinegar solution through spray lines to dissolve soap scum.
– Annually: Replace the belt, motor filter, and gaskets every 12 months or 50 cleaning hours—this prevents 80% of suction failures.
Your Bissell ProHeat not picking up water is almost always fixable at home. Start with tank seating and the lint screen—these solve most cases instantly. If suction remains weak after completing these steps, contact Bissell support at 1-800-237-7691. Remember: warranty claims require proof of regular maintenance, so document your monthly cleanings. With proper care, your ProHeat will extract water efficiently for years, keeping carpets dry and mold-free after every clean.