
Learn How to Clean the Bissell ProHeat Pro After Every Use
This post contains affiliate links. As an Amazon Associate, we earn from qualifying purchases.
To clean a Bissell ProHeat Pro after use, you must flush the system with clean water, completely empty and rinse the dirty water tank, and clean the brush roll and nozzle. The critical step is a 15-second trigger press with the dial set to “Rinse” to clear solution from internal lines. Storing it wet guarantees mold and motor damage within weeks.
That 15-second flush is what stops the sour, mildewy smell that starts three days after you put the machine away. Most people dump the tanks and call it done, but leftover formula sits in the pump and the hose. It dries into a sticky film that clogs the spray jets and feeds bacteria.
What follows is the full breakdown: the seven steps for the clean, the two parts everyone misses, the warranty-voiding mistake with cleaner, and where to store it so it works next season.
Key Takeaways
- Run a 15-second flush cycle with hot tap water on the “Rinse” setting immediately after cleaning to purge all cleaning formula from the internal pump and hose.
- Disassemble and rinse the float stack inside the dirty water tank every time; skipping this lets hair and grit jam the float, causing the tank to overfill and leak into the motor.
- Only use genuine Bissell 2X cleaning formulas; non-Bissell solutions can damage internal seals and will void the machine’s warranty.
- Never store the machine where temperatures may drop below freezing, as residual water will expand and crack internal plastic components and tubing.
- Check the brush roll for wrapped hair and debris after every use to prevent belt wear and stalling, which triggers the machine’s internal circuit breaker.
Why the Post-Use Clean Matters More Than the Carpet Clean
A ProHeat works by injecting hot, soapy water and then immediately vacuuming it back up. When you finish, that soapy water isn’t all gone. It’s in the hose, the pump, the spray path. If you just unplug it, that residue hardens.
The machine’s manual states that stalling the brush roll from wrapped debris “may result in premature belt failure.” That’s a mechanical consequence. The biological one is worse. A damp, dark hose with organic residue is a perfect incubator. The smell isn’t just bad; it means the next time you spray, you’re putting that biofilm onto your carpet.
Common mistake: Only emptying the dirty tank. Leftover formula in the pump and lines dries into a clogging paste and begins to smell within 72 hours in a warm closet.
This process isn’t about being fussy. It’s about making sure the machine you spent money on works the fifth time you need it, not just the first.
The 7-Step Post-Use Cleaning Process
Follow these steps in order immediately after your final carpet cleaning pass. You’ll need hot tap water and a clean sink or utility tub.
Step 1: Flush the System
Fill the clean water tank with hot tap water. Set the machine’s Custom Clean dial to “Rinse.” Plug in the machine, turn it on, and press the spray trigger for a full 15 seconds while making slow forward and backward passes over a hard floor or into a drain. This forces clean water through the internal heater, pump, and spray line, pushing out residual cleaning formula. Release the trigger and make a few more dry passes to suction the flush water back up.
Step 2: Empty the Dirty Water Tank
Unplug the machine. Lift the dirty water tank by its carry handle and bring it to a sink. Pull the rubber quick-empty tab on the bottom to drain the bulk of the water. This gets the heavy load out first.
Step 3: Rinse the Clean Water Tank & Tools
Empty any remaining clean water. Rinse the entire clean water tank, including under the heavy-duty bladder at the top. Rinse off the hose attachment tools (upholstery tool, crevice tool) under running water.
Step 4: Clean the Dirty Water Tank & Float
This is the step that prevents overfill alarms and leaks. After the quick-empty, open the tank fully. For a thorough clean, unscrew the plastic ring at the tank’s bottom, remove the float stack, and rinse every component. Ensure the colored float slides freely on its rod. Hair and sand here will jam it, making the tank think it’s full when it’s not.
Step 5: Clean the Floor Nozzle and Brush Roll
Lift the nozzle cover (sometimes called the accessory hose door) to access the nozzle. On many ProHeat models, you press two release buttons to detach the nozzle. Rinse the nozzle thoroughly under running water, clearing the suction path. Manually spin the brush roll and cut away any wrapped hair, string, or carpet fibers with scissors. A bound brush roll stalls the motor and strains the drive belt.
Step 6: Air Dry Everything
Reassemble the clean tank and dirty tank, but leave their lids off. Stand the nozzle and tools on a towel. Let all parts air-dry completely for at least 24 hours before reassembling the machine for storage. Do not seal damp parts in a closet.
Step 7: Final Reassembly & Storage
Once bone-dry, snap the tanks back onto the machine, secure the nozzle, and wrap the hose and cord. Store the machine upright in a climate-controlled area. The manual for the 2066 Series explicitly warns: “Do not store unit where freezing may occur. Damage to internal components may result.”
| Step | Key Action | Risk If Skipped |
|---|---|---|
| 1. Flush | 15-sec trigger press on “Rinse” | Formula residue clogs spray jets within 2-3 uses. |
| 2. Quick-Empty Tank | Pull rubber drain tab. | Heavy sludge sits, promoting mold growth. |
| 3. Rinse Clean Tank | Rinse under heavy-duty bladder. | Dried formula flakes contaminate next clean. |
| 4. Clean Float Stack | Disassemble, rinse, ensure free movement. | Float jams, causing premature “tank full” alarm or leakage. |
| 5. Clear Brush Roll | Remove wrapped debris manually. | Brush stalls, tripping circuit breaker and wearing belt. |
| 6. Air Dry | 24-hour dry with lids off. | Guaranteed mildew smell and metal corrosion. |
| 7. Store Indoors | Upright, in conditioned space. | Frozen residual water cracks internal plastic lines. |
Cleaning the Dirty Water Tank & Float Assembly
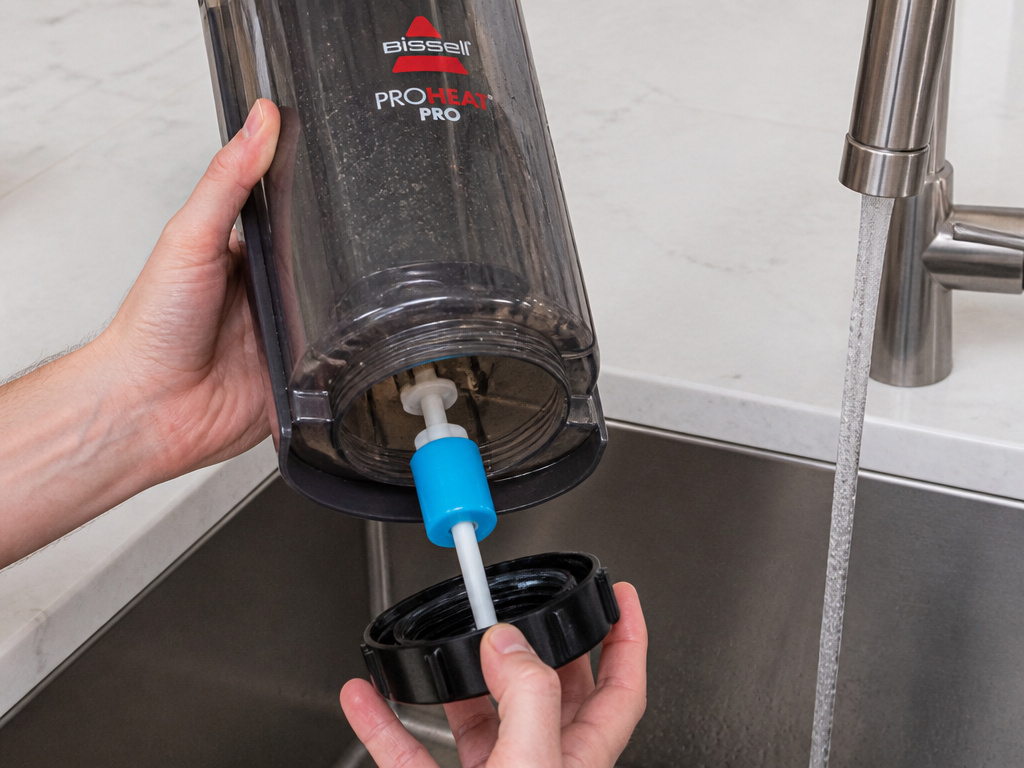
The dirty tank isn’t just a bucket. It has a mechanical float switch that tells the machine when to stop suction to prevent an overflow into the motor. This float assembly, a plastic rod with a colored buoy, is where problems start.
You must remove it and clean it every single time. The process is simple but non-negotiable: 1. After draining, unscrew the large plastic ring at the very bottom of the dirty tank. 2. Lift out the entire float stack. 3. Rinse the float, the rod, and the interior chamber of the tank. 4. Check that the colored float slides up and down the rod without sticking.
If this float jams in the “up” position, the machine thinks the tank is full and will shut off suction prematurely. You’ll get a change in motor sound and weak pickup, leading you to troubleshoot a Bissell ProHeat not picking up water problem when the tank is actually empty. If it jams “down,” the tank can overfill and leak, risking water damage to the machine’s electronics.
Nozzle, Brush Roll, and Hose Care
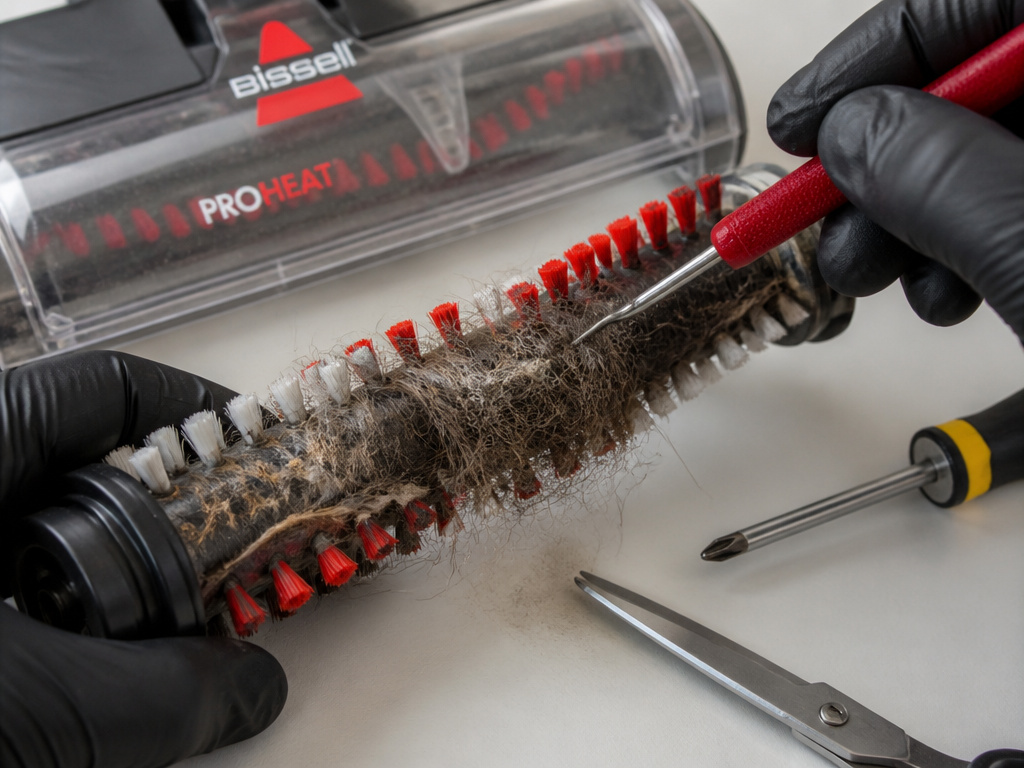
The business end of the machine needs as much attention as the tanks. Dried carpet fibers and hair are the enemy.
For the Nozzle: Detach it according to your model’s method (often release buttons or a twist-lock). Use a Phillips head screwdriver to remove the end caps on some series, like the 9500. Rinse every crevice. The suction channel must be clear, or wet pickup fails.
For the Brush Roll: This is direct-drive maintenance. Spin it by hand. If it doesn’t spin freely, something is wound around it. Use a seam ripper or small scissors to cut and remove all debris. A stalled brush roll doesn’t just stop cleaning, it can trigger the internal thermal breaker, causing a Bissell ProHeat won’t turn on situation until it cools down and resets. Chronic stalling, as the manual warns, leads directly to a broken drive belt.
For the Hose: After flushing, stretch it out straight and lift it high to help any trapped water drain back toward the tank. This minimizes internal moisture.
Where this goes sideways: Using generic carpet shampoo. The ProHeat 2X Premier manual states: “Always use genuine cleaning formulas. Non-BISSEL cleaning solutions may harm and will void the warranty.” These machines are calibrated for specific chemical formulations. Off-brand cleaners can foam too much, clogging the system, or damage plastic and rubber seals.
The One Storage Rule That Trumps All Others
You can do every cleaning step perfectly and still ruin the machine with one storage mistake.
Never store it where it might freeze. This warning is printed in the user guide for a reason. Even a tablespoon of residual water trapped in a pump or line will expand when frozen. Plastic fittings crack. Tubing splits. The repair is often more than the machine is worth. A garage or unheated shed in winter is a death sentence.
Store it indoors, upright, and fully dry. This also protects the belt and brush roll from ambient moisture that causes rust and rubber degradation.
Troubleshooting: What If It’s Already Dirty or Smelly?
If you’ve neglected the after-care and now have a smelly machine or one that won’t spray water, you need a deeper clean.
- For smells: Run multiple flush cycles with hot water and a small amount of white vinegar (a cup per tank). Follow with several clear-water flush cycles to rinse the vinegar out. Air dry with tanks open for 48 hours.
- For clogs: Disassemble the spray nozzle at the base of the floor tool. Soak it in warm water to dissolve dried formula. Use a pin to clear the tiny spray jets.
- For mold/mildew in hose: You may need to manually scrub the inside of the flexible hose with a long brush and a mild detergent solution, then rinse thoroughly.
This recovery process is more work than the standard post-use clean. It’s the penalty for skipping the flush.
ProHeat Pro vs. Other Bissell Cleaners: Maintenance Differences
The core principle, flush, dry, store indoors, applies to all Bissell deep cleaners. But the specifics vary by model.
| Machine Model | Key Maintenance Difference | Shared Critical Step |
|---|---|---|
| Bissell ProHeat Pro | Requires float stack cleaning; detailed brush roll access. | 15-second system flush. |
| Bissell PowerClean Pro | Often has a different tank latch mechanism. | Complete tank drying. |
| Bissell SpotClean Pro | Smaller tanks, but hose and tool cleaning is identical. | Use of genuine formula only. |
| Bissell CrossWave | Has a separate brush roll wash cycle; multi-surface tank care. | Preventing brush roll jams. |
| Bissell Little Green | Simpler tank, no float. Still requires hose flushing. | Air-drying all parts. |
The ProHeat’s built-in heater adds another component that can scale or clog if flushed with hard water regularly. Using hot tap water for the rinse cycle helps minimize this.
Frequently Asked Questions
Can I use vinegar to clean my Bissell ProHeat?
You can use a dilute vinegar solution (one part white vinegar to four parts hot water) as an occasional deodorizing flush. Run it through, then immediately follow with at least two clear-water flush cycles to rinse the vinegar out. Do not use vinegar as your regular cleaning formula, and never let it sit in the machine.
How often should I clean the brush roll?
Check it after every use. Hair and string wrap around it instantly. A full clean, where you detach the nozzle for better access, should be done every 2-3 cleaning sessions or anytime you notice reduced agitation. A clogged brush roll is a primary cause of Bissell vacuum brush not spinning issues.
Why does my machine smell bad even after I empty it?
The smell comes from residual formula and moisture in the internal lines, hose, and pump, places the quick-empty doesn’t reach. You missed the 15-second flush cycle. The organic material in the carpet solution sours. You need to run multiple flush cycles now and ensure everything air-dries for at least two days.
What if my dirty water tank is leaking?
First, ensure the rubber quick-empty tab is pushed fully closed and sealed. Second, disassemble and clean the float stack; a jammed float can cause overfilling. Third, check the tank’s seam and the ring seal for cracks. A leak often starts at the float, not the tank wall.
Is it really that bad to use a different brand of carpet shampoo?
Yes. The warranty clause is there because the chemical composition matters. Non-Bissell formulas can create excess suds that overwhelm the suction system, leading to Bissell vacuum suction loss. They can also degrade rubber seals and plastic over time. The risk isn’t worth saving a few dollars.
Before You Go
Cleaning the Bissell ProHeat Pro after use boils down to three non-negotiable actions: flushing the lines for 15 seconds, disassembling and drying the dirty tank’s float, and storing it bone-dry where it won’t freeze. Skip any of these, and you’re borrowing trouble, a clogged sprayer, a leaking tank, or a motor that won’t start next season. The machine is built to handle the dirt; it’s your job to handle the wet aftermath. Do that, and it pulls water for years.