
How to Use a Hoover Wet and Dry Vacuum Cleaner | Pro Guide
This post contains affiliate links. As an Amazon Associate, we earn from qualifying purchases.
To use a Hoover wet and dry vacuum cleaner, you must treat it as two separate machines. For dry vacuuming, install the pre-motor filter and a dust bag. For wet vacuuming, remove both, install the sponge filter and dam board, and use the wet nozzle. The suction regulator on the hose handle controls power, and the float valve will shut off suction when the tank is full of liquid.
That distinction is mechanical, not optional. The motor pulls air through a filter to trap dust. Pour liquid into that same airflow without swapping the filter assembly, and you send a slurry straight into the fan and windings. It’s not a cleaning problem. It’s a repair bill.
What follows is the setup most manuals bury on page six, the two failure modes you can diagnose by sound, and the one accessory swap that decides whether your vacuum lasts three months or ten years.
Key Takeaways
- The filter swap is non-negotiable. Dry mode uses a paper pre-motor filter and a dust bag. Wet mode requires the sponge filter and the plastic dam board. Using the dry setup for liquids will destroy the motor.
- Listen to the float valve. A sudden loss of suction during wet pickup means the tank is full. Turn the vacuum off, empty it, and restart. Ignoring it and continuing to run the pump dry burns out the seals.
- The suction regulator is on the hose. The dial or slider on the hose handle isn’t a toggle; it’s a fine control for delicate surfaces. Closed is full power; open reduces suction to prevent sucking up curtains or loose papers.
- Buy genuine Hoover filters. Aftermarket filters often have the wrong pore size or lack the anti-static treatment. The wrong filter passes fine dust like plaster powder, which coats the motor and kills it within weeks.
- Empty and dry the tank after every wet use. Standing water promotes mildew and corrodes the float mechanism. The smell is the first sign; a stuck float valve is the second.
The Hoover Wet/Dry Setup: Two Different Machines in One
Most vacuum cleaners have one job. A Hoover wet/dry vac has two, and the switch between them isn’t just changing a nozzle. It’s rebuilding the air path inside the tank. Get this right once, and the rest is just pointing the hose.
The Hoover TWDH1400 requires a specific filter configuration for each mode. For dry vacuuming: pre-motor filter + dust bag. For wet vacuuming: sponge filter + dam board. The motor filter chamber physically changes; using the wrong set sends debris or liquid into the motor chamber.
The core components you’ll be swapping are on the motor top cover, which you release by flipping the two securing latches on the tank. Here’s what each part does:
| Part Name | Purpose in Dry Mode | Purpose in Wet Mode | What Happens If Missing/Wrong |
|---|---|---|---|
| Pre-motor Filter | Final barrier for fine dust before air hits motor. | Must be removed. | Dust bypasses, coats motor windings. Motor overheats, fails. |
| Dust Bag | Catches bulk debris; protects pre-motor filter. | Must be removed. | Bag soaks, disintegrates, clogs pump. |
| Sponge Filter | Not used. | Allows air to pass while blocking liquid splash into motor. | Liquid is sucked directly into motor. Immediate failure likely. |
| Dam Board | Not used. | Installed in bag compartment to direct liquid into tank base. | Liquid spills into bag compartment, sloshes near motor seal. |
The physical act takes ninety seconds. Unlatch the cover, pull off the dry filter, click in the sponge. Pull out the dust bag, snap in the plastic dam board. The mental act—remembering to do it—is what saves the machine.
Where this goes sideways: Assuming “wet/dry” means it figures out the filter on its own. It doesn’t. The motor doesn’t know what’s coming up the hose. You are the sensor. This is the single most common cause of premature motor death on these units.
Before You Start: The Three Non-Negotiables
Before you start: This machine moves water and debris. Respect the electrical hazard, the weight of a full tank, and the chemistry of what you’re picking up. Plug into a grounded outlet only. Do not move the vacuum by the hose or cord when the tank is full. Never vacuum flammable liquids, solvents, or hot ashes.
The safety rules aren’t just legal boilerplate. They trace to specific, documented failures.
- Grounding. The motor is housed near a metal tank that can fill with water. A fault without a ground path makes the whole unit live. That’s a direct shock risk.
- Chemical Dangers. Petrol, paint thinners, acetone. These vapors can ignite from a spark inside the motor or static discharge. The manual’s ban is absolute.
- Weight and Balance. A full 14-liter tank weighs over 15 kilograms. Lifting it by the hose strains the inlet fitting. The plastic latch is the weakest point. Carry it by the tank handle or the molded carry handle on the motor cover.
Also, check your extension cord. If you need one, it must be a heavy-duty, grounded cord rated for outdoor/workshop use. A thin indoor cord will overheat.
Step-by-Step: Dry Vacuuming Mode
Dry mode is for dirt, dust, crumbs, and fine debris like plaster or ash. The goal is to capture particles in the bag and filter so almost nothing reaches the motor.
- Install the Pre-Motor Filter. Ensure the blue foam or white paper filter is seated correctly on the motor cover. Rotate it clockwise until it locks. A loose filter passes dust.
- Install the Dust Bag. Remove the plastic dam board if present. Slide the dust bag’s collar onto the mounting ring inside the bag compartment. It should sit flat without gaps. For fine dust like cement powder or fireplace ash, this bag is mandatory.
- Assemble the Hose and Tool. Insert the hose end into the hose inlet on the tank. Twist clockwise until it clicks. Attach the telescopic tube to the hose handle, then click on the carpet and floor nozzle or crevice tool.
- Set the Suction Regulator. On the hose handle, slide the regulator towards the closed position for maximum suction on floors. Open it slightly (more air inlet) for delicate upholstery to prevent fabric from being pulled in.
- Vacuum. Turn on the unit with the switch on the motor cover. The sound is a steady, medium-pitched hum. If the pitch rises sharply and suction drops, the bag is full. Turn off, replace the bag, and continue.
The part nobody mentions: That dust bag isn’t just for convenience. It creates a static charge that helps trap fine dust particles. Skipping it because you “just vacuumed some sawdust” lets the finest powder through. That powder is an abrasive. It wears the motor bearings and insulates the windings, causing slow overheating. The bag is a wear item. Change it.
Step-by-Step: Wet Vacuuming Mode
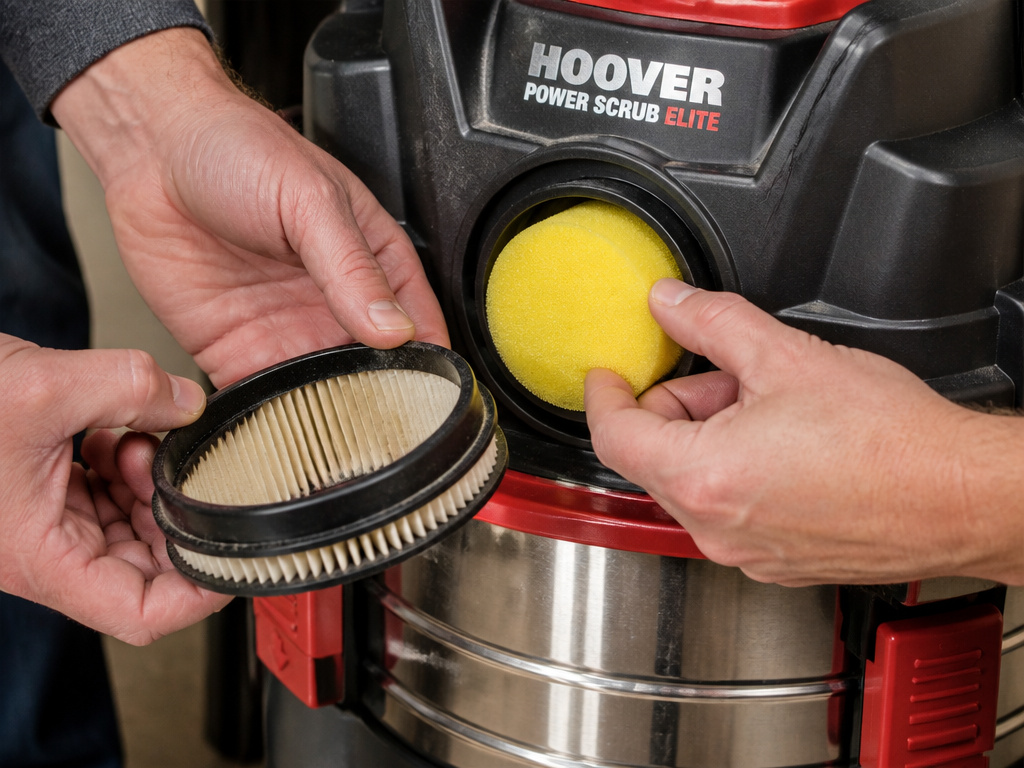 This is where the machine’s dual nature matters. You are now moving liquid, not air with particles. The air path must be clear, and the tank must be sealed from the motor.
- Swap the Motor Filter. Release the securing latches and remove the motor top cover. Remove the dry pre-motor filter. Install the sponge filter over the motor intake. This foam block lets air through but catches any liquid spray.
- Install the Dam Board. Remove the dust bag. Insert the plastic dam board into the bag compartment. It clicks into place, sealing that chamber and creating a path for liquid to flow down into the empty tank base.
- Attach the Wet Nozzle. Use the dedicated wet nozzle or squeegee tool. The standard floor nozzle has openings that can restrict water flow. The wet nozzle is designed for maximum liquid intake.
- Check the Float Valve. Before starting, ensure the float inside the tank moves freely. It’s a small plastic ball or cup. If it’s stuck up, tap the tank to free it.
- Vacuum the Liquid. Submerge the nozzle tip in the liquid and turn on the vacuum. You’ll hear a deeper, gurgling sound as liquid moves up the hose. Keep the vacuum upright. Tilting it can cause liquid to spill into the motor chamber even with the dam board installed.
- Respond to the Shut-Off. When the tank is full, the float rises and blocks the air inlet. The motor’s sound will change to a strained, higher-pitched whine, and suction will stop. Turn the vacuum off immediately. Do not keep trying to run it.
Common mistake: Lifting the hose out of the liquid before turning the vacuum off. This breaks the siphon, and residual water in the hose can drain back into the motor area when you disconnect it. Turn the vacuum off while the nozzle is still submerged, then lift the hose.
After wet use, you must empty, rinse, and dry the tank. Let the sponge filter air-dry completely before you store the vacuum. A damp sponge left inside will mildew, and that smell is almost impossible to remove.
Troubleshooting: What That Noise Means
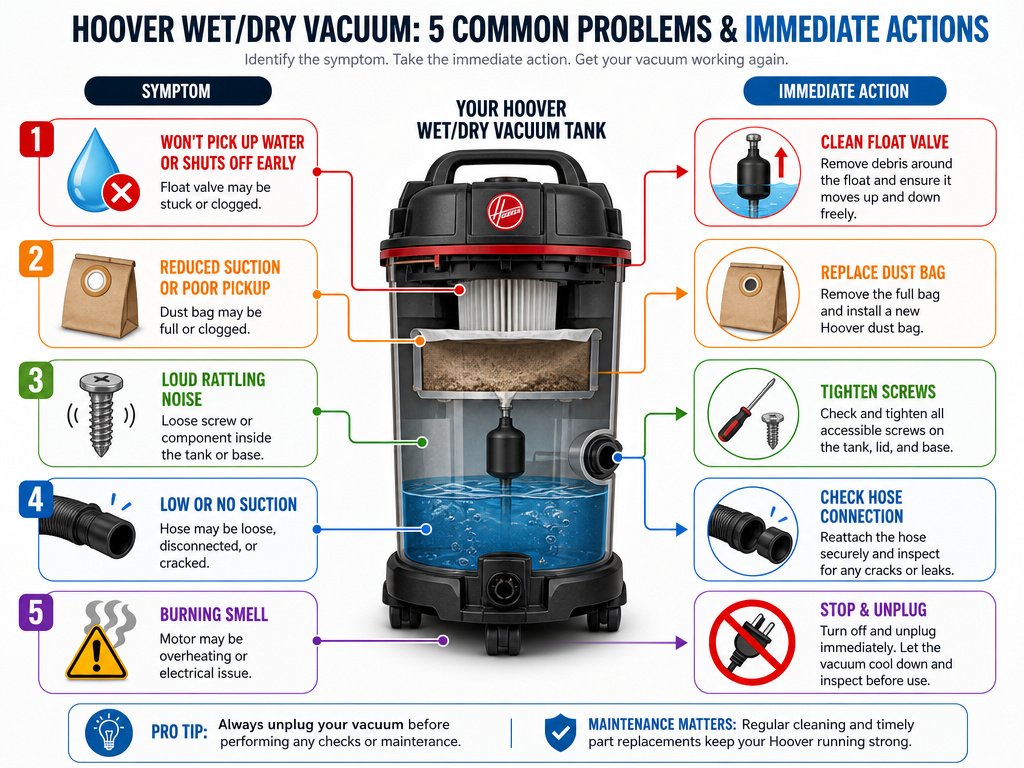 Hoover wet/dry vacs communicate through sound and suction. Most problems have a clear audible signature.
| Symptom | Likely Cause | Immediate Action | Long-Term Fix |
|---|---|---|---|
| High-pitched whine, no suction (wet mode) | Float valve has engaged (tank full). | Turn off. Empty tank. Restart. | None. This is normal operation. |
| Loss of suction, motor labors (dry mode) | Dust bag is full or filter is clogged. | Turn off. Replace bag, tap clean filter. | Check filter after each use for heavy debris. |
| Sudden loud rattling/banging | Large object (rock, screw) entered impeller. | Turn off immediately. Disconnect power. | Disassemble hose and tube to retrieve object. Inspect impeller fins. |
| Motor runs but no suction | Hose, tube, or nozzle is disconnected/blocked. | Check all connections from nozzle to tank inlet. | Visually inspect hose for cracks or collapses. |
| Burning smell | Motor overheating due to clogged filter or blocked intake. | Turn off, unplug. Let cool for 30 mins. | Check and clean all filters. Ensure dam board is installed for wet use. |
A note on the suction regulator: If you have full suction on “open” but none on “closed,” the regulator is broken or installed backwards. This is a common issue with aftermarket hoses. The fix is a genuine Hoover replacement hose assembly.
Accessories and Upgrades: What’s Actually Useful
The basic kit includes a floor nozzle, crevice tool, and wet nozzle. That covers 95% of jobs. Two add-ons are worth considering for specific tasks.
- The Inflator Attachment. Some kits include a plastic inflator for air mattresses or pool toys. It works, but slowly. Don’t expect shop-vac power.
- The Mini Turbo Nozzle. This is a powered brush for upholstery or stairs. It’s effective for pet hair on couches. If you have pets, it’s a good investment.
- Extra Filters and Bags. Buy a pack of genuine Hoover dust bags and a spare sponge filter. When the sponge filter eventually degrades or smells, you have a swap ready. Aftermarket filters are cheaper but often less effective.
For bigger jobs, you might look at a dedicated wet and dry vacuum with a larger tank capacity. For car or workshop spills, a best wet dry vac like a shop-vac style unit has more power. If you hate cords, a cordless wet dry vacuum offers mobility but less runtime.
Maintenance: The 10-Minute Ritual That Doubles the Lifespan
This isn’t complicated. It’s five steps after every major use.
- Empty the Tank. Dump debris or liquid. Never let standing water sit for more than a day.
- Rinse. For wet pickup, rinse the tank with clean water. For dry pickup, wipe it out with a damp cloth.
- Check the Filters. Tap the dry filter clean. Rinse the sponge filter in lukewarm water. Let both air-dry completely.
- Inspect the Hose and Seals. Look for cracks in the hose. Check the rubber seal on the tank lid for tears.
- Store It Dry and Open. Leave the tank latches open or the lid off to air out. This prevents musty odors.
This routine is the difference between a vacuum that dies in three years and one that lasts a decade. The enemy is moisture and abrasive dust. Your defense is a dry, clean tank.
For deeper cleaning, especially if you’ve used the machine for cleaning your Hoover carpet cleaner, you’ll need to disassemble the hose and nozzle for a scrub. The principles are the same: remove debris, eliminate moisture.
Frequently Asked Questions
Can I use my Hoover wet/dry vac to clean a flooded basement?
Yes, but in stages. The float valve will shut it off when the tank is full. The risk is if the water level is deeper than the tank’s capacity and you keep the hose submerged. The vacuum can pull water past the float valve. Vacuum in partial amounts, turn off the machine while the hose is still submerged, empty the tank, and repeat. For more than an inch of water, a dedicated best shop vac with a larger tank is more efficient.
Why does my vacuum smell bad after wet use?
You didn’t dry it. Mildew and bacteria grow on the damp sponge filter and in tank residue. The fix: wash the tank and sponge filter with a mild detergent, rinse thoroughly, and let everything air-dry for at least 24 hours before reassembling. Leaving the lid open during storage prevents recurrence.
Is the paper filter washable?
The pre-motor filter is often made of washable material. Check your manual. For the Hoover TWDH1400, you can wash it in hand-warm water. Do not use detergents or hot water, and let it dry thoroughly before reusing. A damp filter restricts airflow and can cause overheating.
Can I vacuum up plaster dust or drywall sanding dust?
Yes, but only with a dust bag installed. This fine powder will sail right through the pre-motor filter alone and destroy the motor. The bag is essential. Even then, empty it frequently to prevent clogs. For heavy construction dust, a wet/dry vacuum designed as a shop vac is a better tool.
What’s the difference between this and a carpet cleaner?
Everything. A Hoover wet/dry vac extracts spilled liquid and dry debris. A Hoover carpet cleaner injects cleaning solution, agitates, and then extracts dirty water. They are not interchangeable. Do not try to shampoo a carpet with a wet/dry vac.
The Bottom Line
A Hoover wet and dry vacuum is a versatile tool that punishes assumptions. Its core rule is simple: dry stuff gets a bag and a paper filter; wet stuff gets a sponge and a dam board. Forget that rule once with liquid, and you’re shopping for a new motor.
Listen to it. A full tank sounds strained. A clogged filter sounds weak. The machine tells you what’s wrong. Your job is to hear it and act—empty the tank, clean the filter, check the hose.
For most home spill and workshop jobs, the model you have is enough. If you need more power for a garage, look at a corded wet dry vacuum. For pet hair on furniture, consider a model billed as a best wet dry vacuum for pet hair. For quick car clean-ups, a handheld wet dry vacuum is more convenient.
But start with the machine in your closet. Set it up right. Keep it dry. It’ll handle the mess.