
Hoover Vacuum Carpet Cleaner Cleaning & Maintenance Guide
This post contains affiliate links. As an Amazon Associate, we earn from qualifying purchases.
To clean a Hoover vacuum carpet cleaner, you must empty and rinse both tanks after every use, wash the removable filters under running water until clear, and let them air dry for 24-36 hours. Never remove the non-removable filter screen in the dirty water tank, and always store the machine completely dry to prevent mineral deposits and mildew.
That 24-to-36-hour filter dry time is the line between a machine that works next month and one that smells like a wet basement. Hoover prints it because a damp filter reintroduces mold spores into your clean water on the next fill, turning a cleaning tool into a contamination source.
What follows: the anatomy of the automatic shut-off, the one tank you should never try to disassemble, how to read upholstery codes, and the storage mistake that pits internal seals. This isn’t a wipe-down. It’s a reset.
Key Takeaways
- Hoover’s official filter drying time is 24-36 hours, a damp filter causes mildew and foul odors.
- The filter screen inside the dirty water tank on models like the Pro Clean Pet is not removable; prying it out breaks the assembly.
- Always run dry strokes until little water is visible in the dirty tank lid to avoid oversaturating your carpet.
- Never store the cleaner with liquid in either tank; residual water leads to mineral deposits and permanent mildew smells.
- Only clean upholstery marked with a W (wet clean) or S/W (solvent/dry or wet clean) code.
Before You Start: The Hoover Safety Basics
Unplug the machine from the wall outlet. Press the handle release pedal to lower the handle to the floor. This gives you stable access to the tanks and prevents the unit from tipping over while you work.
Locate the two main tanks. The upper tank is for clean water and solution. The lower tank holds the dirty water you extract. Their shapes differ, but the clean tank is usually taller and slimmer.
Before you start: The machine’s internal wiring and pump are not user-serviceable. Never immerse the main body in water or use solvent-based cleaners on the plastic housing, as they can craze the plastic and weaken latches.
The 7-Step Cleaning Sequence
Follow this order every time. Skipping steps or reversing them leaves debris in the flow path, which dries and causes the next clog.
Step 1: Empty the Dirty Water Tank
Step on the handle release pedal to lower the handle. Rotate the two dirty water tank latches outward, one on each side, and lift the tank off the base. Carry it to a sink or toilet to empty.
Look inside. You’ll see a yellow float disk. When the tank is full, this disk rises to the top of the tank lid and triggers an automatic shut-off. The suction drops and the motor pitch gets noticeably higher. That’s your cue to stop and empty.
Step 2: Rinse the Dirty Water Tank
Rinse the tank with warm water. Swirl it around to dislodge any hair or fine sediment stuck to the sides. Most grime rinses out easily.
Now, inspect the inlet where the dirty water enters from the nozzle. There is often a fixed, non-removable filter screen here.
Common mistake: Trying to pry out the fixed filter screen on models like the Hoover Pro Clean Pet. The manual explicitly states it is not removable. Forcing it cracks the plastic housing, and a broken screen lets debris into the pump.
If this screen is clogged with hair, use an old toothbrush or a pipe cleaner to gently scrub it from inside the tank under running water. Do not use sharp objects.
Step 3: Empty and Scrub the Clean Water Tank
Press down on the handle and pull forward to release the clean water tank. Remove the cap by rotating it counterclockwise. Dump any leftover solution.
Fill the tank halfway with warm water, replace the cap, and shake vigorously. Empty and repeat until the water runs clear. Soap residue left inside will congeal and block the spray nozzle.
Step 4: Clean the Removable Filters
Your Hoover has at least one removable filter, typically located in the dirty water tank lid or within the clean water tank assembly. Pop it out.
Hold it under a running tap and rinse until the water passing through it is clear. No soap is needed. Squeeze it gently to remove excess water, but do not twist or wring it, as this can tear the mesh.
Place the clean filter on a dry towel or a rack. This is where the clock starts.
The 24-Hour Filter Dry (And Why It’s Non-Negotiable) Hoover’s FAQ states filters need 24-36 hours to dry completely. A filter that feels dry on the outside can still be damp inside the pleats. Storing it early traps moisture in the dark tank, and mold spores colonize the cellulose material within a week. The next time you add clean water, you’re pumping that mildew smell directly into your carpet.
Step 5: Flush the Nozzle and Hose
Debris like sand or pet hair can jam the suction nozzle. The fix is simple: pour one or two cups of clear water onto a non-carpeted, non-wood surface (like a garage floor or laundry sink). Run the cleaner over the puddle with the spray trigger off, using suction only, until the water runs clear through the hose and into the dirty tank.
For models with a detachable hose for stairs and upholstery, disconnect it and run warm water through it from one end to the other. A long, flexible brush or a broom handle can help clear stubborn clogs.
Step 6: Wipe Down the Exterior
Use a damp cloth with a drop of mild dish soap to wipe the machine’s plastic housing, handle, and cord. Avoid all solvent or petroleum-based cleaners, as they can degrade the plastic and make it brittle.
Dry everything with a separate towel. Pay attention to the crevices around the tank latches and the handle hinge, where dirt accumulates.
Step 7: Reassemble and Air Out
Only reassemble when every part is bone-dry. Click the clean tanks back into place, ensuring the latches snap securely. A proper seal is critical for suction.
Leave the tank lids off and the machine in a well-ventilated area for an hour before final storage. This evaporates any residual moisture from internal channels you can’t see.
Where Most Cleanings Go Wrong: Storage
The work isn’t done when the machine looks clean. The final step determines whether it will start fresh next time or smell like a swamp.
| Storage Mistake | Direct Consequence | Timeline |
|---|---|---|
| Storing with liquid in tanks | Mineral deposits form on pump internals; mildew grows in dark, wet plastic. | Deposits in 2-3 uses; mildew smell within 2 weeks. |
| Putting away a damp filter | Mold spores multiply inside filter pleats. | Odor transfers to carpet on next use. |
| Leaving machine in freezing garage | Residual water in internal lines freezes, expands, and cracks plastic manifolds. | Failure occurs on first thaw. |
| Not securing tank latches | Suction seal is broken, machine pulls air instead of water, motor overheats. | Overheats within 10 minutes of next use. |
Never store the cleaner in a place that drops below freezing. The manual warns against it for a reason, ice breaks things that are expensive to fix.
Special Case Cleaning: Upholstery Tools and Tough Stains
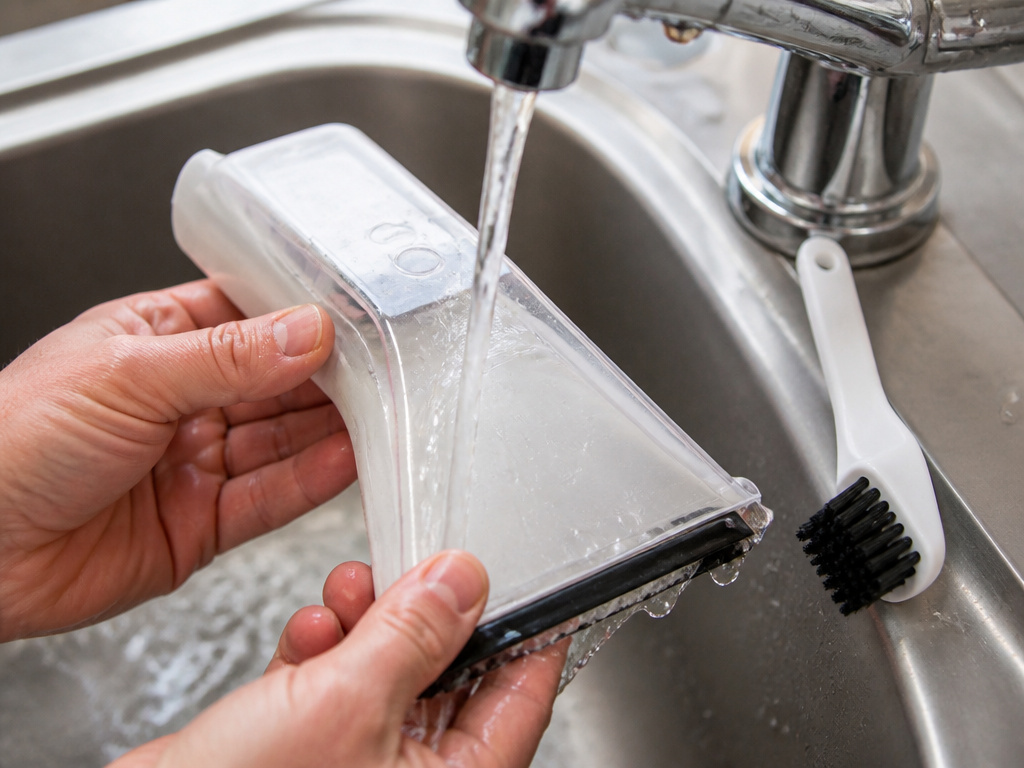 If you’ve used the upholstery or stair tools, they need separate attention. Detach them from the hose and rinse the plastic tools under warm water. Use a small brush to clean the suction openings.
Easy to miss: Upholstery fabric codes. Only use your Hoover cleaner on fabric marked W (for wet clean) or S/W (for solvent/dry or wet clean). Do not clean fabric marked S (solvent/dry only). If there’s no code, don’t guess, consult a professional.
For set-in stains, pre-treat with a dedicated Hoover spot cleaner before running the machine. Do not pour undiluted detergent or other chemicals into the clean water tank, as they can foam excessively and damage the pump.
Troubleshooting a Clean Machine That Doesn’t Work
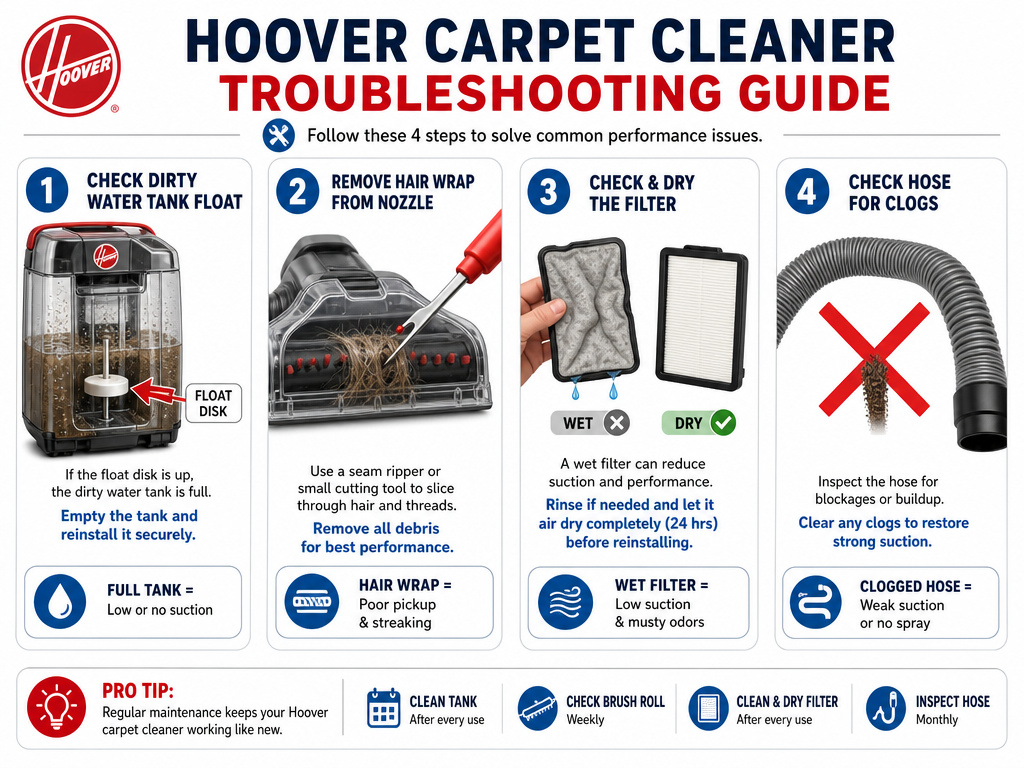 You followed all the steps, but on the next job, suction is weak or the spray doesn’t work. Here’s where to look.
- Check the float disk. Is it stuck in the up position in the dirty water tank? Gently tap the tank to free it.
- Inspect the nozzle. Is it clogged with a hair wrap? Use a seam ripper or small scissors to cut and remove the wrap.
- Verify the filter. Is it completely dry? A damp filter restricts airflow dramatically.
- Listen to the motor. Does it sound strained? You might have a more serious clogged Hoover vacuum hose deep in the system.
If basic checks don’t solve it, the issue may be a worn belt or a pump problem. At that point, consult a professional or cross-reference symptoms with a complete guide to cleaning a Hoover upright vacuum for related mechanical fixes.
Frequently Asked Questions
Can I use vinegar to clean my Hoover carpet cleaner?
No. Do not put vinegar or any homemade solution in the tanks. Acids can degrade rubber seals and plastic components over time. Use only Hoover-brand cleaning solutions or those explicitly recommended in your manual. For tank cleaning, warm water is sufficient.
How often should I clean the entire machine?
Perform this full clean after every use. The critical parts, the dirty water tank and filters, must be addressed immediately to prevent odors and bacterial growth. A quick wipe-down of the exterior can be weekly.
Why does my carpet smell worse after cleaning?
This almost always points to a damp filter or residual water in the tanks. Mildew spores from the machine are being deposited onto the wet carpet. Ensure your filter dries for a full 24-36 hours and both tanks are bone-dry before storage.
Is it okay to use my carpet cleaner on hard floors?
Only if your model includes a specific hard floor attachment and you switch the brush rolls off. Using a carpet-cleaning nozzle on hard floors can scratch surfaces and may void your warranty. For hard floors, a dedicated hard floor cleaner like the Hoover ONEPWR FloorMate JET is the right tool.
What’s the difference between this and cleaning my regular vacuum?
Carpet cleaner is a wet appliance with pumps, tanks, and complex fluid paths. A regular Hoover upright vacuum is a dry system dealing with dust and debris. The maintenance is more intensive and moisture-sensitive. Understanding the difference between a vacuum and carpet cleaner is key to not damaging either.
The Bottom Line
Cleaning a Hoover carpet cleaner isn’t optional maintenance. It’s the price of admission for a machine that handles gallons of dirty water. The sequence is simple: empty, rinse, dry, repeat. But the stakes are in the specifics, the 36-hour filter dry, the non-removable screen, the upholstery codes. Miss those, and you’re not cleaning your carpets. You’re just moving messes around. Get the drying time right, store it dry, and the machine will pull water, not excuses, for years.