
Troubleshoot a Bissell Turboclean Pro Not Spraying Any Water
This post contains affiliate links. As an Amazon Associate, we earn from qualifying purchases.
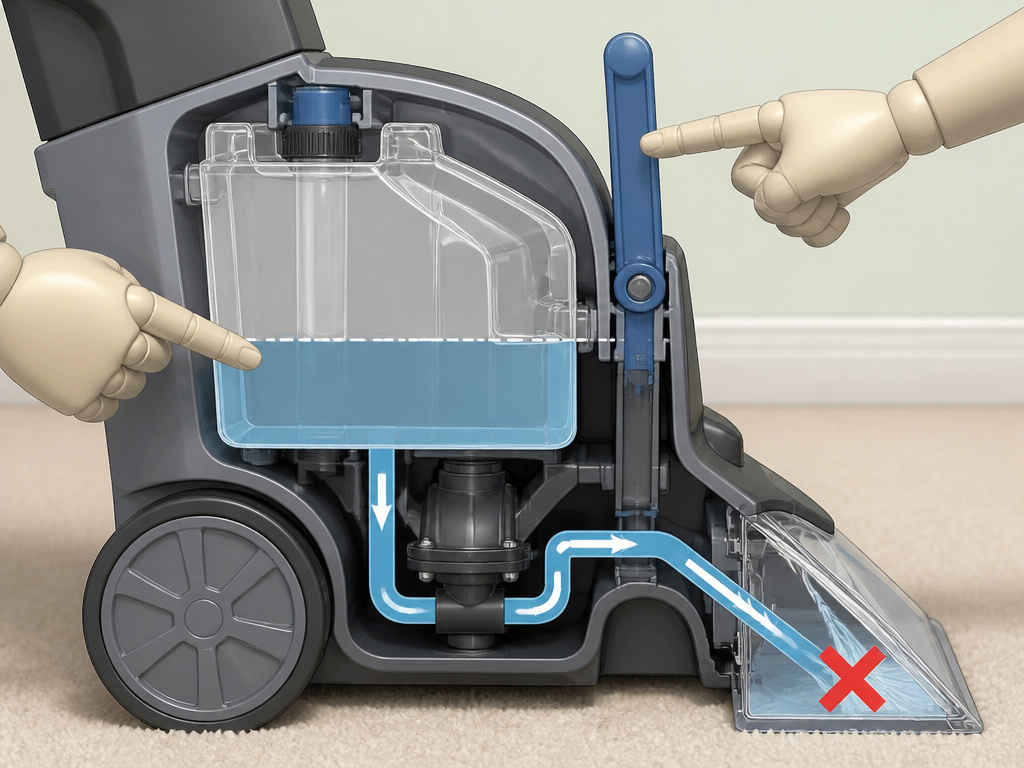
A Bissell Turboclean Pro won’t spray water for three main reasons: the clean water tank isn’t full enough (needs at least 3.5 inches of liquid for gravity-fed models), the handle isn’t fully extended and locked, or the spray nozzle is clogged with debris. The machine’s gravity-fed design means it should dispense solution even when powered off if the trigger is pressed and these conditions are met.
That 3.5-inch minimum is the first place owners get caught. It isn’t a suggestion. If the liquid level sits below that mark, the internal pickup tube can’t reach it, and you get nothing but air when you pull the trigger. This is a physical limit of the design, not a malfunction.
What follows is the sequence that works: a four-point diagnostic to rule out the obvious, then the deeper fixes for clogs and airlocks. By the end, you’ll know whether you need a simple rinse, a part replacement, or a service call.
Key Takeaways
- Check the liquid level first — the tank needs at least 3.5 inches (9 cm) of solution to spray in gravity-fed models like the Turboclean Pro.
- Extend and lock the handle by twisting the blue collar; an unlocked handle physically disengages the spray mechanism.
- Never use water hotter than 140°F (60°C); it can warp the clean water tank or cap and create a permanent leak.
- If basic checks pass, the pump may have an airlock; unplug the machine, hold the spray trigger for 30 seconds, then plug it back in to re-prime the system.
- Persistent no-spray issues after troubleshooting often point to a failed water pump or a cracked internal hose, which require professional repair.
The Quick Diagnostic Checklist
Start here. These four checks solve eighty percent of “no spray” reports. Do them in order before you take anything apart.
- Tank Level & Cap Seal. Is the clean water tank at least half full? For models like the 2084, 2085, and 2089, Bissell specifies a minimum of 3.5 inches of liquid. Also, ensure the tank is clicked firmly into its base and the cap is on tight with its red gasket intact. A missing gasket breaks the vacuum.
- Handle Position. Is the handle fully pulled up and locked? Find the blue plastic collar near the base of the handle. Twist it to unlock, pull the handle up until it stops, then twist the collar back to lock. The machine won’t spray if this isn’t done.
- Water Temperature. Did you use hot water? If the water exceeded 140°F (60°C), it can deform the plastic clean water tank or its cap. A warped tank won’t seal, and a deformed cap won’t hold pressure. Let everything cool and inspect for gaps.
- Nozzle Inspection. Look at the spray nozzle on the cleaning head. Is it caked with dried detergent, hair, or carpet fibers? A visible clog here blocks everything.
Common mistake: Topping off the tank with an inch of solution. The internal pickup tube sits higher than you think. If the liquid isn’t deep enough, the tube draws air and the spray function stays dead until you add more.
Run through these steps. If the Turboclean Pro still won’t spray, the problem is deeper inside the fluid path.
Why the 3.5-Inch Minimum Isn’t a Suggestion
The Turboclean Pro uses a gravity-fed system, not a pressurized pump, to move clean solution to the spray nozzle. The pickup tube inside the tank only reaches down so far. When the liquid level drops below the tube’s intake, the system pulls air instead of water.
The result is a sputter or complete silence at the trigger. This design is why the machine can dispense solution even when unplugged — it relies on gravity and a manual pump stroke. Understanding this turns a frustrating mystery into a simple rule: keep the tank level well above the halfway mark during use.
Step-by-Step Troubleshooting for a Dead Spray
When the quick checks don’t work, follow this sequence. It moves from external fixes to internal ones without unnecessary disassembly.
Step 1: Deep-Clean the Spray Nozzle and Fluid Path
Debris is the most common cause of a total spray block. Detergent residue hardens, and fibers get sucked up.
- Unplug the machine and empty both the clean and dirty water tanks.
- Locate the spray nozzle on the front of the cleaning head. Use a toothpick or straightened paper clip to gently clear any visible debris from the small hole.
- Fill the clean water tank with two cups of plain, warm water (under 140°F). Do not add detergent.
- Reinstall the tank, extend and lock the handle, and plug the machine in.
- Hold the spray trigger over a sink or bucket for a full minute. This flushes the internal tubes. You may hear gurgling as air clears.
If water eventually sprays, the clog is gone. If it doesn’t, the block is further back.
Step 2: Inspect the Tank, Cap, and Hose Connections
A physical leak in the system destroys the suction needed to pull water through.
- Check the Cap’s Red Gasket. Remove the clean water tank cap. A small red rubber gasket should be seated in its groove. If it’s missing or cracked, the cap cannot seal. You need a replacement cap.
- Inspect the Tank for Warping. Look for uneven edges or a lid that doesn’t sit flush. This is a telltale sign of damage from overheated water. A warped tank cannot click securely into the machine’s base.
- Verify Hose Connections (if applicable). On models with a hose attachment, ensure the hose is fully pushed onto its port at both ends. A loose hose causes an immediate air leak.
Where this goes sideways: Using water that’s too hot. By 150°F, the plastic begins to soften. A single use with near-boiling water can permanently deform the tank, and the resulting spray issue won’t be fixed by any other troubleshooting step. The tank must be replaced.
Step 3: Verify the Handle Lock Mechanism
The handle lock isn’t just for storage. On many Bissell uprights, it connects a mechanical linkage that opens the fluid path to the spray nozzle.
| Handle Position | Spray Result | Why It Happens |
|---|---|---|
| Fully down & locked | No spray | Fluid path is physically closed by the linkage. |
| Fully up but unlocked | No spray | The linkage is disengaged and floating. |
| Fully up & locked | Spray should work | Linkage is engaged and path is open. |
If the blue locking collar is stripped or the handle feels loose when locked, the internal linkage may be broken. This requires opening the machine’s chassis, which leads to the next step.
Step 4: Prime the Pump (The Pro’s Trick)
If the system is clear and sealed but still air-bound, you need to re-prime the pump. This is a known technique among repair technicians that isn’t always highlighted in user manuals.
- Ensure the clean water tank is at least half full with plain water.
- Unplug the machine from the wall.
- Hold the spray trigger down firmly and keep it held for 30 seconds. This allows gravity to slowly push water through the dry pump and tubes, displacing the air pocket.
- While still holding the trigger, plug the machine back in.
- Release the trigger and try spraying normally.
This often resolves an intermittent no-spray issue that occurs after the machine has been stored or tipped on its side.
When to Suspect a Mechanical Failure
If you’ve completed all flushing, priming, and inspection steps and the Turboclean Pro won’t spray water, the problem is likely a failed component. Here are the two most common culprits.
The Water Pump Has Failed
The electric pump that creates spray pressure can wear out or burn out. Signs include: – A humming sound from the base when you press the trigger, but no water movement. – No sound at all from the pump area when the trigger is pressed (check that the machine is powered on). – Intermittent spraying that stops completely after a few minutes of use.
Pump replacement is a moderate repair. It involves opening the lower chassis, disconnecting hoses, and swapping the unit. For the Bissell Turboclean Pro, this is often a job for a service center unless you’re experienced with appliance repair.
Internal Fluid Hoses Are Cracked or Disconnected
Inside the machine, plastic or rubber hoses carry water from the tank to the pump and then to the nozzle. These can become brittle, crack, or pop off their connectors.
- Visual Check: If you’re comfortable removing the bottom plate (usually held by screws), inspect the hose network. Look for obvious disconnections, cracks, or leaks.
- Smell Test: A faint, sweet smell or visible residue around the machine’s base can indicate a slow leak from a cracked hose.
Reconnecting a hose is simple. Replacing a cracked one requires finding the correct diameter and length of replacement tubing.
Bissell Turboclean Pro vs. Other Model Spray Systems
 Not all Bissell cleaners work the same. Knowing your model’s design explains why fixes differ.
| Model Type | Spray System | Key Difference | Primary Fix for No Spray |
|---|---|---|---|
| Turboclean Pro / PowerForce | Gravity-fed manual pump | Sprays even when unplugged | Ensure 3.5-inch minimum liquid, lock handle, clear nozzle. |
| SpotClean Pro / Little Green | Electric pump, pressurized | Requires power to spray | Check for power at outlet, listen for pump hum, check for kinks in hose. |
| ProHeat 2X Revolution | Heated, electric pump | Has a thermal fuse and heater | Check thermal fuse on pump, ensure heater isn’t scaled. |
The gravity-fed design of the Turboclean Pro line makes it both simpler and more susceptible to user error like low tank level. A pressurized system like the one in a SpotClean Pro fails more often due to electrical or pump issues.
Frequently Asked Questions
Why did my Turboclean Pro stop spraying suddenly?
Sudden stop usually points to a simple blockage or an airlock. You likely ran the tank too low, picking up debris from the bottom that clogged the nozzle, or the pump lost its prime. Perform the deep-cleaning flush and the 30-second pump priming steps outlined above before assuming a part has broken.
Can I use vinegar to clean the spray system?
You can, but dilute it. Use a mix of one part white vinegar to three parts warm water. Run it through the spray system as a flushing agent, then follow with two tanks of clean water to rinse. Do not let vinegar sit in the plastic tanks or hoses for more than an hour, as the acid can degrade seals over time.
Is the spray function covered under warranty?
Bissell’s limited warranty typically covers defects in materials and workmanship for the spray system. However, it does not cover damage from clogs, using improper cleaning solutions, or using water over 140°F. Always check your specific model’s warranty document at the Bissell support site.
How do I find my model number?
Turn the machine off and look for a white or silver sticker. It’s usually located on the back of the cleaner’s main body, near the bottom, or on the underside of the dirty water tank. The number will look like “3952” or “2084”. This is crucial for ordering the correct replacement parts.
What’s the most common irreversible cause of no spray?
Using water that is too hot, which warps the clean water tank. Once the plastic deforms, the tank will never seal properly again. This creates a vacuum leak that no amount of priming or cleaning can fix. The only solution is to purchase a new, genuine Bissell replacement tank.
Before You Go
Start with the physical checks: tank level, handle lock, and nozzle clarity. These solve most problems. When they don’t, the professional pump-priming trick is your next best move. For a Bissell Turboclean Pro that won’t spray water after all that, the issue is almost certainly a failed water pump or a cracked internal hose. At that point, weigh the cost of a service repair against the age and value of your machine. For many, a repair is worthwhile, but for an older unit, it might be the signal to upgrade.