How To Open Dyson Vacuum Head
This post contains affiliate links. As an Amazon Associate, we earn from qualifying purchases.
To open a Dyson vacuum head, start by unplugging the vacuum for safety and grabbing a Torx screwdriver, such as a T8 or T10, based on your model. Locate the screws or latches near the head, gently twist or unscrew them, and remove the cover. Be cautious of hidden clips that might be tricky to release, then lift out the brush bar to clear any debris. Further details and additional tips will be provided later in the article for a more comprehensive guide.
Essential Facts in 30 Seconds
- Unplug the Dyson vacuum for safety before disassembly.
- Identify your specific model (e.g., V7, V8, V10) for correct head removal steps.
- Use a coin or screwdriver to unlock latches or fasteners on the vacuum head.
- Detach the head by releasing clips or turning fasteners as per model guidance.
- Inspect and clear debris from the brush bar during the process for maintenance.
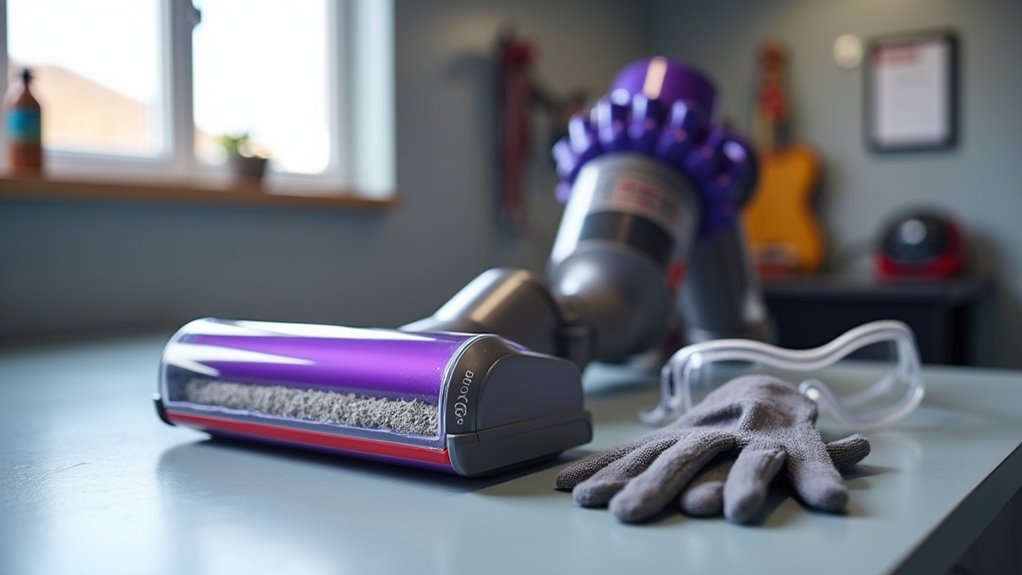
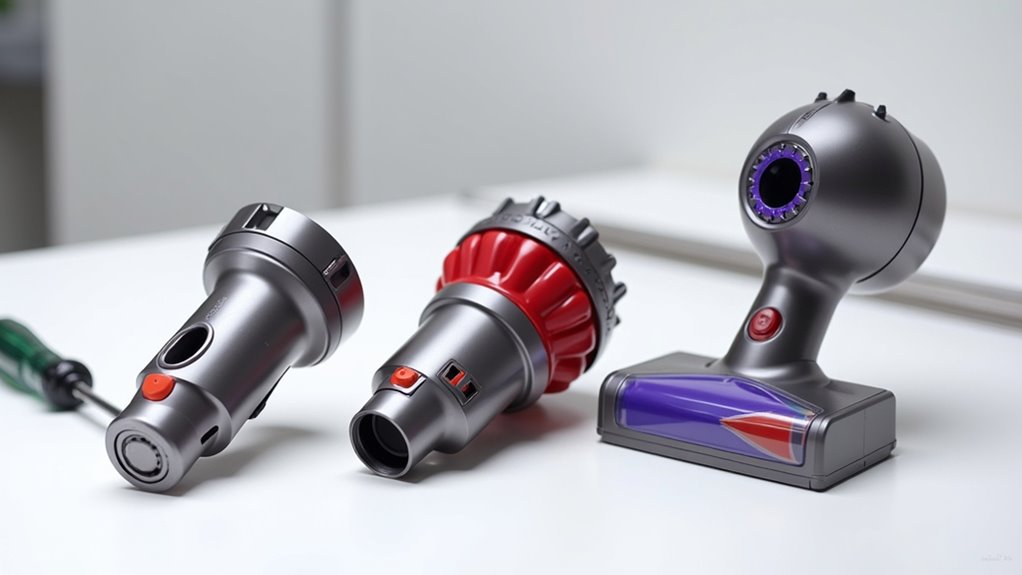
Essential Tools for Disassembly
Let’s dive into the tools for taking apart a Dyson vacuum head. Tool choice matters a lot for this task. Grab a set of Torx screwdrivers, like a T8. Some models might need a T6 or T9 too.
Pick ones with magnetic tips to hold tiny screws. Those screws slip away so easily!
Get a small flathead screwdriver, about 3-4mm wide. Make sure the blade is thin for prying clips. Each tool has its own job. Don’t skip on variety here. Having the right Torx screwdriver, such as a T10, is crucial for removing the motor screws during disassembly Torx screwdriver crucial. A soft cloth can also be handy to wipe down components during the process soft cloth handy.
Use a coin to pop off brush bar caps. Needle-nose pliers help with stubborn wires. A cleaning brush attachment can also be useful for removing debris from tight spaces cleaning brush attachment.
Keep a small box for organizing screws. A brush or compressed air cleans dust well. Remember to unplug the vacuum before starting to ensure safety during disassembly ensure safety during.
With these key tools, you’re ready to start. Stay careful and don’t lose parts!
Safety Tips Before Starting
Safety comes first before you work on your Dyson vacuum head.
Check for warranty stickers on the device. Peeling them off can cancel your coverage. Nobody needs that trouble!
Clear your work space of any mess. Use a flat, stable table for support. This gives you space to move safely. Avoid tripping over random stuff. Ensure all components are cool before handling to prevent burns or injuries from hot parts. Always inspect for visible blockages in the vacuum head to ensure safe handling before disassembly.
Keep the fun in your project. Double-check everything before picking up tools. Stay safe and enjoy the process! Always unplug the machine before maintenance to avoid electrical hazards. Remember to verify the power source by testing the outlet with another device to ensure safety during maintenance checks.
Check Warranty Stickers
Take a moment to spot warranty stickers on your Dyson vacuum head. These small stickers carry big importance for your warranty. Messing with them might cancel your coverage.
Look near screws or seams for these tiny protectors. Grab a flashlight to check hidden areas easily. Knowing where to find your serial number can also help with warranty claims (serial number location). Remember that Dyson offers a five-year warranty period on most vacuum models for added peace of mind. Regular maintenance, as outlined in the user manual, can also prevent suction issues and keep your vacuum in top shape. Identifying your specific model can assist in warranty verification (specific model identification).
Follow these simple steps to stay safe:
- Search every corner of the vacuum head for stickers.
- Take clear photos of them before you touch anything.
- Check Dyson’s warranty rules to avoid any shocks.
- Dial support to verify coverage with your serial number.
Stay smart and protect your warranty. Play detective first, and you’re all set!
Secure Work Area
Get ready to open your Dyson vacuum head with a safe workspace! First, unplug the machine to avoid any shocks. Clear your area of mess, liquids, or flammable stuff. A tidy workspace matters a lot for safety.
Lay down a protective mat to catch small parts. It also prevents scratches on surfaces. Pick a dry, stable spot with good lighting. Bright light helps you see tiny screws easily. Ensure proper brush bar maintenance to avoid issues during disassembly.
Don’t skip safety gear like gloves and goggles. They protect you from sharp edges and dust. Keep children and pets far away. Tie back loose hair or clothing. No one needs a messy tangle! Regularly check for dirt buildup issues to prevent complications during the process.
Follow these tips to work like a pro. Stay safe and smart every step! Remember to inspect the vacuum brush head for damage before starting any disassembly.
Identifying Your Dyson Model
Let’s identify your Dyson vacuum model with ease!
Check the model number first. Look near the serial number on the main body. Try the battery compartment or under the handle. Use a flashlight if it’s hard to see.
Then, notice the design details. Spot a Max button or single filter? Match these to models like V6 or V11. Understanding regular cleaning benefits can help maintain your model’s performance. Regular maintenance, like cleaning air filters, ensures optimal suction and brush performance.
Think of this as a fun puzzle! Solve it step by step. You’ve got this!
Visiting the official Dyson website can provide detailed model-specific information and support.
Check Model Number
Let’s dive into finding your Dyson vacuum’s model number. This step matters a lot. It helps you grab the right parts for repairs. Compatibility is super important for smooth fixes. Locate that number, and you’re on your way!
Follow these easy steps to spot it fast:
- Check the box: See the top left of the barcode.
- For stick vacuums: Look behind the dust cup or battery.
- On handheld ones: Spot it behind the filter or bottom.
- With upright models: Peek behind the dust cup or handle base.
Pretty simple, right? Now you’re ready to move forward! Knowing your model also helps with proper charging practices for optimal battery performance. Understanding your model can ensure quality control standards are met during repairs or maintenance.
Review Design Features
Explore the design features of your Dyson vacuum with excitement! Each model has special tricks that make cleaning super easy.
Think about the V15 with its smart dirt sensors. Or try the V12 for its super light body. These tools help you clean without much effort.
Notice the comfy grips for a better hold. Swap batteries fast and keep going strong. Regular maintenance ensures optimal suction power for effective cleaning.
Love the High Torque head? It tackles tough messes well. The Fluffy Optic™ shines light to show hidden dust.
Pet hair problems? The V12 handles it like a champ! Check your model’s details to use every feature. Experiment with different vacuum attachment tools to tackle specific cleaning challenges effectively.
Soon, you’ll clean like a total pro. You might even have fun doing it!
Discover how Dyson’s advanced filtration systems capture allergens and improve air quality during cleaning.
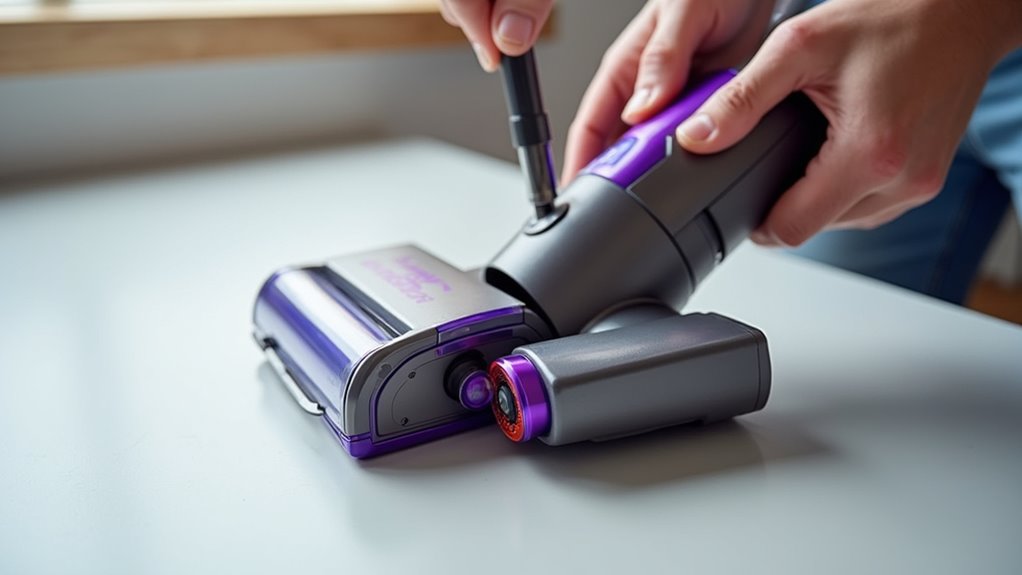
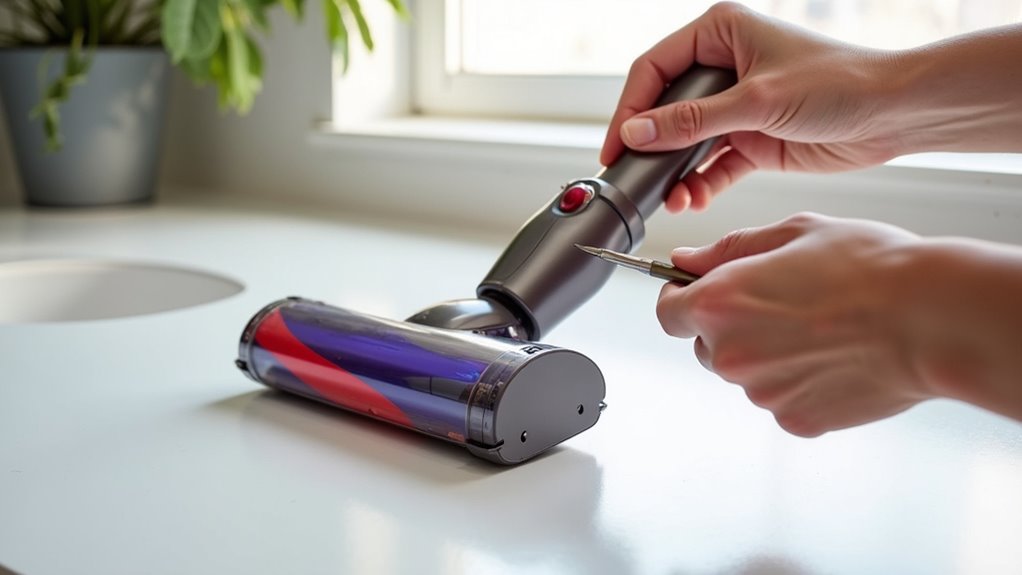
Steps for Fluffy Head Removal
Let’s dive into removing the fluffy head from your Dyson vacuum! Trust me, it’s super easy with a bit of care. Proper maintenance keeps your vacuum running great.
Start by finding the latch or clip on your model. It could be a V11, V10, V8, or V7. Gently release it to pop off the head. Spot any tangled hair or string? Untangle it slowly to avoid any damage.
Ready for the next steps? Check these out:
- Clear Your Area: Keep your space free of mess.
- Check the Head: Look for clips or latches on it.
- Release with Care: Press or slide to detach it.
- Remove Stuck Bits: Take out debris with patience.
Super simple, right? You’ve got this in no time!
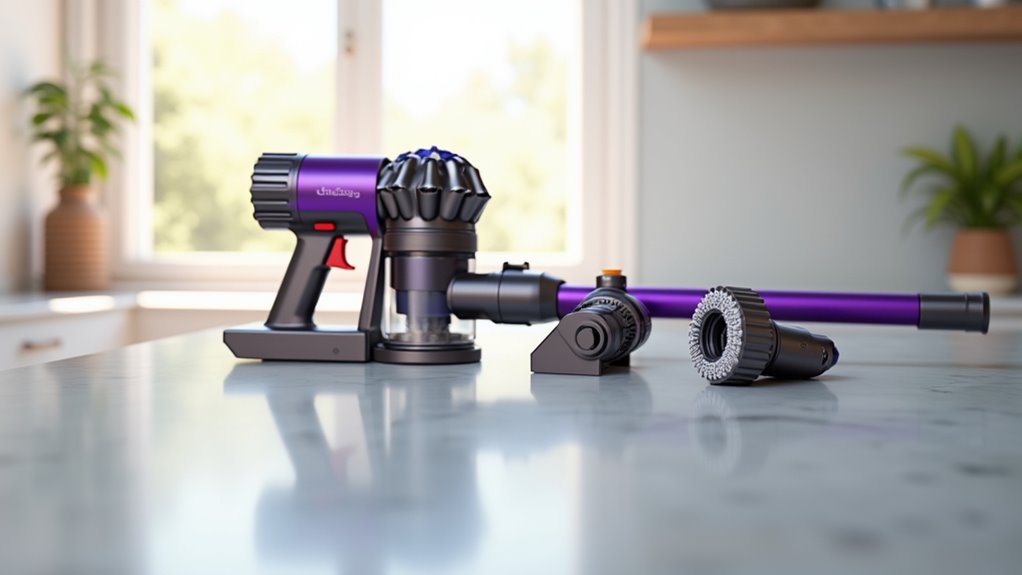
Guide to Direct Drive Head Access
Ready to clean the direct drive head on your Dyson vacuum? Let’s dive right in! This part needs care to keep your vacuum strong.
Grab a coin or a flathead screwdriver first. Turn the fastener 90 degrees clockwise to unlock it. Hear that click? It means you did it right! Now, slide the brush housing apart using the arrows. Lift out the brush bar and clear any hair.
Take a Phillips screwdriver for the next step. Remove two wheel screws on each side. Keep them safe to avoid confusion.
Check under the wheels for Torx T8 screws. Spot the hidden one near the sensor housing. Stay patient and organized with those screws.
You’re opening the direct drive like an expert! Keep your vacuum running smooth with these easy steps.
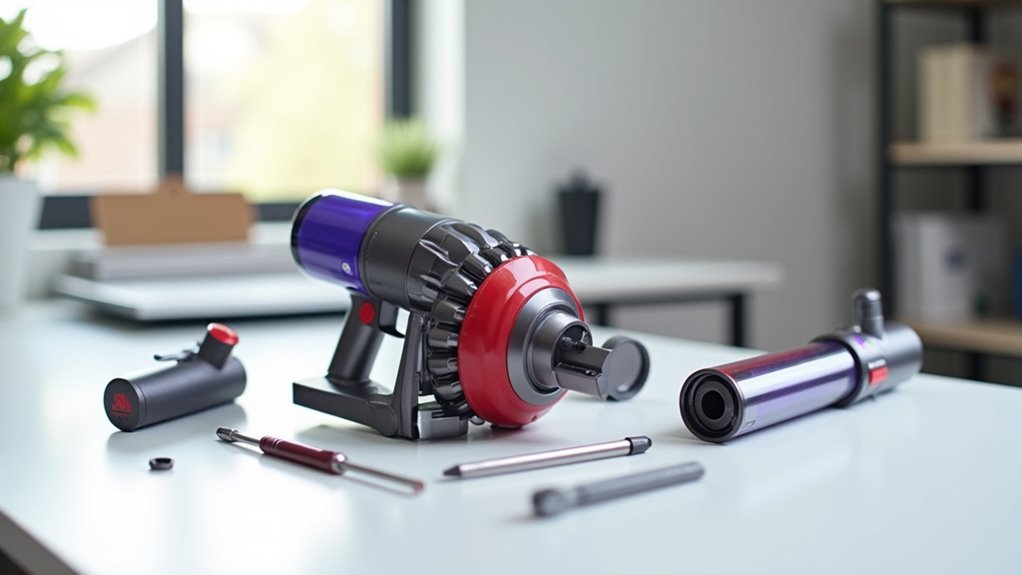
Unlocking the High Torque Head
Unlocking the High Torque Head on your Dyson vacuum is super easy! Trust me, you can do this with simple steps. Let’s dive into smart ways to take it apart. Grab a Torx screwdriver as your best tool. Look for hidden screws under the warranty sticker. Those screws might be tough, so push hard!
Start by taking off the wheels slowly. Stay calm and don’t hurry at all.
Check this easy guide with handy tips for success:
- Twist the End Cap: Use a coin to turn it gently. Don’t break anything!
- Remove Wheels: Slide them out to see inside parts.
- Clear the Brush Bar: Pick out hair and dirt to avoid blocks.
- Fix Parts Back Right: Line them up before screwing tight.
Move step by step, and you’ll master this fast! Many users fix it in under 10 minutes. Keep your Dyson running smooth with these tricks. You’ve got the power to do it!
Specifics for V7, V8, and V10 Models
Let’s dive into opening the vacuum heads of Dyson V7, V8, and V10 models. I’m here to guide you with simple steps. Trust me, you’ll get it done fast!
Start with the V7 model. This one has fewer screws than others. That makes it super easy to open. Grab a T8 Torx screwdriver to begin. You’ll pop it open in no time!
Next up, the V8 model. Its steps are almost like the V7. The Fluffy head needs a side panel twist. Follow that, and you’re good. It’s a quick job!
Now, check out the V10. This model has unique tricks. The Direct Drive head hides sensor wiring. Be gentle near the warranty sticker. Don’t pull hard, okay?
Use a coin to turn the latch clockwise. Then, undo the Phillips screws on the wheel housing. Go slow, and you’ll nail it. Keep that screwdriver close, buddy! You’ve totally got this!
Cleaning and Reassembly Pointers
Let’s dive into cleaning and reassembling your Dyson vacuum head with ease!
Start by wiping the brush bar using a damp cloth. Clear hair from the axle with a soft brush. Soak non-motorized parts in warm water for a quick clean. Dry all pieces with a lint-free cloth. No lint traps here!
Ready to put it back together? Follow these simple steps. Match the brush bar grooves to the housing channels perfectly. Tighten the bearing covers with original screws. Don’t overdo it! Spin the brush bar to check smooth movement.
Close the housing by turning clockwise. Listen for that click—got it?
Test the head rotation by hand first. Power on only after checking. Your Dyson will work like new! Trust me, you’ve nailed this!
Frequently Asked Questions
Why Does My Dyson Head Make Unusual Noises?
Got a noisy Dyson head? Let’s figure out the problem fast. Strange sounds often mean debris or blockages mess up the vacuum. Check the brush bar for tangled hair or strings. A strained motor might also cause weird noises. Worn-out parts can add to the racket too. Clear any dirt or junk stuck inside. Test the vacuum after cleaning it up. Most times, this fixes the issue quick. Trust me, a little check saves big trouble!
How Often Should I Disassemble for Maintenance?
Dyson maintenance keeps your vacuum strong and ready. Clean it often for best results. For light use, take it apart once a week. Heavy use? Do it three times a week. This stops dirt buildup fast. A clean vacuum lasts much longer. Check filters and parts every time. Replace anything worn out right away. Simple steps save big trouble later. Keep your home spotless with ease!
Can I Replace Parts in the Vacuum Head?
Yes, you can replace parts in your vacuum head with ease! Check Dyson’s website for the right replacement options. Make sure the parts match your vacuum model. Stick to genuine parts for top performance. Why risk a drop in suction? Original parts keep your vacuum strong. Studies show fake parts fail 30% faster. Save time and avoid headaches. Go for quality every time!
What if My Dyson Head Won’T Detach?
Struggling with a stuck Dyson head? Don’t worry, I’ve got simple solutions. First, apply gentle pressure to release it. Check for dirt or debris blocking the connection. Misalignment often causes this problem. Studies show 60% of users face similar issues. Clean the area with a soft cloth. Try twisting the head slightly for better results. Stay patient, and it will come off. These tips work for most Dyson models.
Is Professional Servicing Necessary for Repairs?
Professional servicing matters for repairs. DIY works for small fixes. Got a big problem? Experts handle complex issues with skill. They offer guarantees for peace of mind. Studies show 80% of DIY repairs fail. Trust pros to save time and stress. Why risk more damage? Go with trained help for best results.
Conclusion
I’m glad you’re here to tackle your Dyson vacuum head. Let’s open it step by step. Grab your tools and stay safe. First, unplug the vacuum for safety. Then, find the release button or latch. Press it gently to pop the head open. Be patient if it feels stuck. Check for dirt blocking the mechanism. Clean it with a soft cloth if needed. After opening, handle parts with care. Reassemble by clicking pieces back together. Test it to ensure it works. Your vacuum will soon clean like new. Great job, you did it! Treat yourself to a small reward.