
How to Fix a Shark Vacuum When It Won’t Charge or Power On
This post contains affiliate links. As an Amazon Associate, we earn from qualifying purchases.
A Shark vacuum not charging has three usual suspects: a faulty charger, a dead battery, or dirty charging contacts. Start by verifying the wall outlet works, inspecting the charger and port for damage, and cleaning the metal contacts on both the vacuum and its dock. If those are fine, the battery likely needs replacement after 2-3 years of regular use.
The charger and battery are a closed system. A break anywhere in that loop — wall outlet, cable, port, contacts, battery cells — stops power flow. You are looking for the single point of failure.
What follows is a step-by-step diagnostic sequence that isolates the problem, then the model-specific fixes that actually work. By the end you’ll know whether you need a $20 charger, a $70 battery, or just a cotton swab.
Key Takeaways
- The first diagnostic step is always to test the wall outlet with another device. A tripped GFCI or dead outlet is the most common false alarm.
- Shark’s IZ201 and IZ251 models require specific Dong Kun or Yinli chargers (DK33-288080H-B or YLS0483A-U2880802). A generic USB-C block won’t work.
- Lithium-ion batteries must charge between 40°F (5°C) and 104°F (40°C). Storing or charging outside this range permanently damages the cells.
- A new Shark battery must be fully discharged and then fully charged on its first cycle to condition it. Skipping this can cause the LED indicators to malfunction permanently.
- If the vacuum works when plugged in but dies instantly when unplugged, the battery is dead. No amount of cleaning will fix it.
The 5-Step Diagnostic Sequence
Start here before you buy anything. This sequence isolates the problem from the wall to the battery.
Before you start: Unplug the charger from the wall and the vacuum. Inspect the charger cable for cuts, kinks, or exposed wires. A damaged cord is a fire hazard and must be replaced, not repaired.
Step 1: Verify the power source. Plug a lamp, phone charger, or any known-working device into the same wall outlet. If that device doesn’t power on, you have an outlet problem, not a vacuum problem. Check your home’s circuit breaker or GFCI outlets.
Step 2: Inspect the physical connections. Look at the charger plug and the vacuum’s charging port. Bent or pushed-in pins inside the port will prevent contact. Look for lint, dust, or debris blocking the port. A visual inspection catches about 30% of charging failures.
Step 3: Clean the charging contacts. This applies to models with a docking station or a removable battery. The small metal plates on the vacuum and the dock oxidize with time. 1. Unplug everything. 2. Dampen a cotton swab with isopropyl alcohol (rubbing alcohol). 3. Scrub the metal contacts on the vacuum and the dock until the swab comes away clean. 4. Let it dry completely for two minutes before attempting to charge.
Step 4: Listen and look for signs of life. Plug the charger into the wall, then into the vacuum. You should hear a faint click or see an LED light immediately. If there’s absolute silence and no light, the charger is not delivering power. If an LED lights but then turns off after a few seconds, the battery might be refusing the charge.
Step 5: Try a different charger. This is the definitive test. If you have access to another compatible Shark charger, use it. If the vacuum charges with the second charger, your original charger is dead. If it still doesn’t charge, the problem is in the vacuum’s battery or internal board.
| Step | What to Check | Quick Fix If You Find It |
|---|---|---|
| 1. Power Source | Wall outlet / GFCI / breaker | Reset breaker; use a different outlet. |
| 2. Physical Port | Charger plug & vacuum port | Straighten bent pins; clear debris. |
| 3. Metal Contacts | Plates on dock & vacuum base | Clean with isopropyl alcohol. |
| 4. Charging Signs | LED light or audible click | If none, charger is likely faulty. |
| 5. Swap Test | Try a known-good charger | Diagnoses charger vs. Vacuum fault. |
Follow these steps in order. Most people jump to step 5 without doing steps 2 and 3, then buy a new battery when all they needed was a clean contact.
When the Charger Is the Culprit
The charger is the weakest link in the chain. It’s a transformer that converts household AC to low-voltage DC, and its components fail.
First, know your model. A charger for a Shark IZ201 is not the same as one for a Shark WANDVAC. The IZ201 manual specifies using only Dong Kun charger DK33-288080H-B or Yinli YLS0483A-U2880802. Using a generic replacement can, at best, not work. At worst, it can damage the battery management system.
How to test a charger without a multimeter:
- Plug the charger into the wall.
- Carefully touch the metal tip of the charger plug. You should feel a very slight magnetic pull or vibration if it’s live. This isn’t foolproof, but a totally dead charger feels inert.
- The best test is the swap test from the diagnostic sequence. If a different charger works, bin the old one.
Common mistake: Using a fast-charging phone block with a USB-C adapter. Shark cordless vacuums do not support USB Power Delivery (PD). They need their specific, low-amp wall adapter. This mismatch can blow an internal fuse.
If your charger has an LED light on the block itself, that light should be on when plugged in. If it’s dark, the charger has failed internally. Replacement chargers are available directly from Shark or from authorized parts sellers.
Battery Issues and the Temperature Rule
Lithium-ion batteries are sensitive. They contain a management circuit that can lock out charging if conditions aren’t perfect.
The single most overlooked factor is temperature. According to multiple Shark manuals, including the IZ series guide, you must not charge the battery below 40°F (5°C) or above 104°F (40°C). Charging a cold battery from a winter garage, or a hot battery left in a sunny car, can cause permanent damage.
Signs your Shark vacuum battery is dead:
- The vacuum runs for less than a minute on a full charge.
- It seems to charge (LEDs light up) but shows no charge immediately after unplugging.
- The battery feels unusually puffy or swollen. This is a critical safety issue—remove and recycle it immediately.
Where this goes sideways: Not conditioning a new battery. The LV800 manual is explicit: “Your Lithium-ion battery does not come fully charged. Prior to first use, charge completely. During first use, discharge fully… Failure to do so may cause LED indications to work incorrectly.” If you skip this, the battery’s internal gauge calibrates wrong and will never report accurate charge levels.
A Shark lithium-ion battery has a typical lifespan of 300-500 full charge cycles. If you use and charge your vacuum every other day, that’s 2-3 years. After that, capacity drops off a cliff. Replacement is the only option.
Model-Specific Charging Behaviors and Fixes
 Not all Sharks charge the same. The LEDs tell different stories.
| Model Series | Full Charge Time | LED Indicator Pattern | Specific Quirk |
|---|---|---|---|
| POWERDETECT Cordless | ~6 hours | Yellow pulse (0-75%), Green pulse (75-100%), Solid white (full). LEDs turn off when full. | Comes with partial charge. Must be fully charged before first use for max runtime. |
| IZ500 Series | ~3.5 hours | Yellow pulse (0-75%), Green pulse (76-99%), White pulse (100%). | Uses removable battery. Clean Sense IQ mode affects runtime. |
| LV800 / LV801 | ~6 hours | Single charging light illuminates during charge. | Must be fully discharged on first use only to condition battery. |
| WANDVAC | ~2.5 hours | Blinking (charging), Solid (charged), Dim (in use), Blinking (low). | Must be placed correctly in the charging cradle for contacts to align. |
For robot vacuums like the RV2900 series: If the battery is critically low, the robot may be unresponsive. Leave it on the charging dock for 24 hours. The battery needs a tiny trickle charge to wake the management circuit before normal charging can begin. If after a full day it’s still dead, the battery or dock contacts are faulty.
If you’re dealing with a Shark robot vacuum not charging, the process also involves cleaning the sensors and ensuring the dock is on a level surface.
Internal Problems and Professional Repair
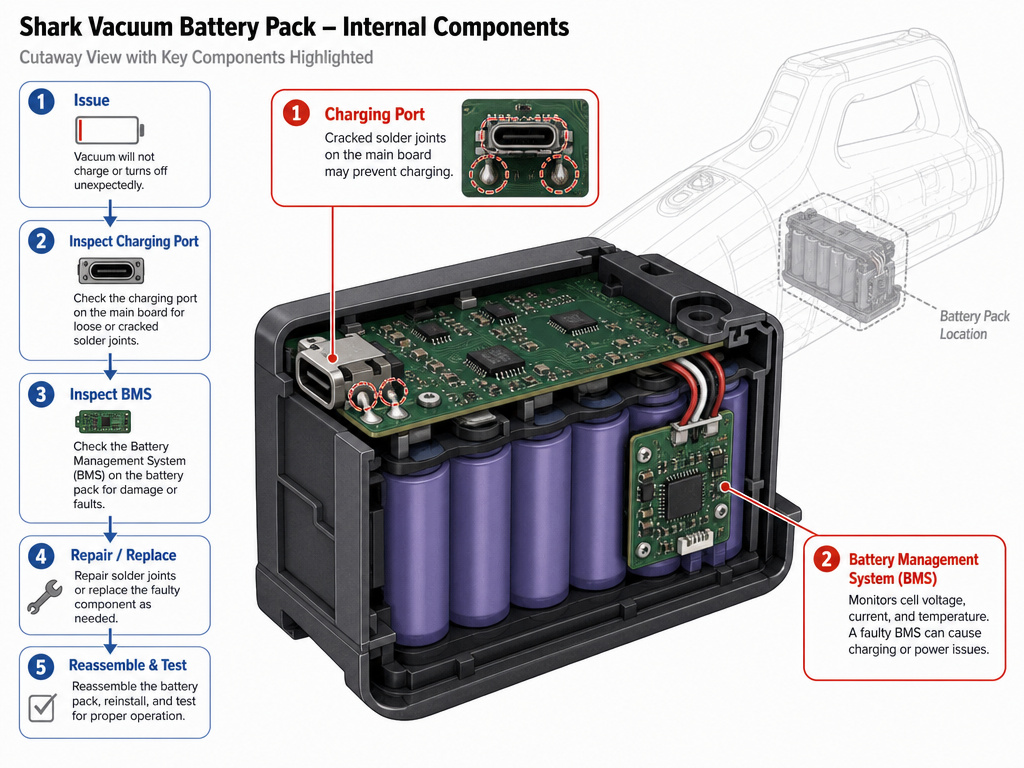 When the charger is good, the battery is new, the contacts are clean, and it still won’t charge, the fault is internal. The two likely components are the charging port socket soldered to the main board, or the battery management system (BMS) itself.
Charging port damage: This is common on handheld units that are dropped. The port’s solder joints crack or the port breaks free from the board. The fix requires soldering skills.
BMS failure: The small circuit board on the battery pack can fail. Sometimes it’s repairable, but often it’s cheaper to replace the entire battery pack. This is a known issue that can sometimes follow a Shark vacuum overheated event.
The part nobody mentions: A vacuum that experiences a Shark vacuum not sucking problem can sometimes overwork the motor, drawing excessive power that strains the battery and BMS. One problem can lead to another.
At this stage, you must weigh the cost of a professional repair against the price of a new vacuum. For a vacuum more than 4 years old, replacement is usually more economical. For a newer high-end model like the Shark IZ500, a professional diagnosis might be worth it.
Frequently Asked Questions
Why is my Shark vacuum blinking red but not charging?
Blinking red light typically indicates an error state, often related to overheating or a battery fault. Unplug the vacuum, let it cool down for an hour, and try charging again in a cooler room. If it persists, the battery is likely failing and needs replacement.
Can I use a generic charger for my Shark vacuum?
No, you should not. Shark designs its chargers to deliver a specific voltage and current to its battery management system. Using a generic charger can undercharge the battery, overheat it, or damage the internal circuits. Always use the charger that came with your model or an exact OEM replacement.
How long should a Shark vacuum battery last?
Shark lithium-ion battery lasts for about 300 to 500 full charge cycles under normal conditions. With average use, this translates to 2-3 years before you notice a significant drop in runtime. Heavy daily use will shorten this lifespan.
Is it bad to leave my Shark vacuum on the charger all the time?
For most modern Shark models, no. The manuals state that leaving the unit plugged in will not damage battery life. The charger is designed to switch to a maintenance trickle charge once the battery is full. However, for long-term storage (over a month), it’s best to store it with about a 50% charge in a cool, dry place.
My vacuum turns on but dies instantly. Is it the battery?
Yes, that is the classic symptom of a dead battery. The vacuum has enough power from the charger to activate the electronics, but the battery cannot hold any charge to run the motor. You need a new battery. This is a similar failure mode to a Dyson vacuum not holding charge.
The Bottom Line
Start with the simple stuff. Check the outlet, clean the contacts, and try a different charger. Most “Shark vacuum not charging” problems are solved there. If you’ve done all that and it’s still dead, your battery has almost certainly reached the end of its life. Replace it with an OEM Shark battery for the best results.
For cordless models, remember the temperature rule and that first-time conditioning step. Those two details prevent more problems than any troubleshooting step. If the vacuum is under warranty, contact Shark support before opening anything. If it’s out of warranty and the repair cost approaches half the price of a new model, it’s time to upgrade.