
How to Repair a Hoover Vacuum’s Retractable Cord at Home
This post contains affiliate links. As an Amazon Associate, we earn from qualifying purchases.
To fix a Hoover vacuum’s retractable cord, first try the manual reset: unplug the vacuum, hold the plug, press the Cord Release Pedal, and guide the cord back in by hand. If it was pulled past the red tape marker, you must fully extend the cord and slowly release it to re-engage the spring. Most jams are mechanical, not electrical, and stem from ignoring the tape warnings or letting the plug whip during rewind.
That red and yellow tape on the cord isn’t decoration. It’s a load limit. On a Hoover UH71250, pulling past the red tape disengages the spring mechanism inside the reel. The cord goes slack and won’t retract. This isn’t a breakdown; it’s a built-in safety stop that most owners trigger by accident.
What follows is a walk through the fixes, from the 30-second reset to opening the baseplate. You’ll learn how to read the cord’s color code, when a simple clean-out works, and why the manufacturer’s “authorized service only” warning is often wrong for this specific problem.
Key Takeaways
- The red tape means stop. Pulling a Hoover UH71250’s cord past the red marker disengages the reel spring, causing immediate retraction failure. The fix is a full extension and slow release.
- Always guide the plug. The manuals for the Elite Rewind U5509-900 and UH71250 explicitly say to hold the plug during rewind. Letting it whip tangles the cord and can damage the reel.
- Check the System Check Indicator first. If this light on your UH71250 is red, the vacuum may have a clog or full dirt cup that’s creating extra drag, making the cord seem stuck.
- A basic DCR (Disassemble, Clean, Reassemble) has a high success rate. Community repair logs show a 70% chance of fixing a jammed mechanism with a screwdriver, a brush, and patience, contradicting the OEM’s service mandate.
- The problem is almost never the motor. Retraction is a purely mechanical function of a spring and a lock. If the cord pulls out but doesn’t wind back, focus on the reel, not the electronics.
The First Thing to Check: Is It Really the Cord?
Before you touch the reel, rule out the simple stuff. A vacuum that seems to have a cord problem often has a different, easier-to-fix issue.
Look at the System Check Indicator if your model has one. On the Hoover UH71250, a red light here signals a system performance issue. The manual lists three causes: a dirty filter, a full dirt cup, or a clogged cyclone. Any of these can make the vacuum so hard to pull that the cord feels stuck. Empty the cup and clean the filters. The light should turn off, and the cord might retract normally with the drag removed.
Next, check for physical obstructions. Look where the cord enters the housing. A piece of string, hair, or a twist-tie can jam the slot. Unplug the vacuum and use a flashlight and a pair of tweezers to clear any debris.
Common mistake: Assuming the reel is broken because the vacuum is hard to pull. The extra strain is usually a clog, not a cord defect.
Finally, do a simple power test. Plug the vacuum into a different outlet and press the power button. If the vacuum doesn’t turn on at all, you might have a separate electrical issue, like a faulty power button not working or a tripped thermal protector. The cord reel is mechanical; if the vacuum runs, the reel should at least attempt to retract when you press the release.
The 4-Step Quick Reset (For Most Jams)
If the vacuum runs but the cord just dangles, try this universal reset procedure. It works for common jams on models like the Hoover Elite Rewind and UH71250.
Step 1: Unplug and Hold. Always start by unplugging the vacuum from the wall. Then, firmly grip the plug end of the cord. This is non-negotiable.
Step 2: Press the Release. Find the Cord Release Pedal. On the UH71250, it’s a button (B) on the side of the cord reel. On the Elite Rewind, it’s button (12). Press and hold it down.
Step 3: Guide, Don’t Yank. While holding the release, use your other hand to gently feed the cord back into the housing. Do not let go of the plug. The manual’s warning is clear: “Hold plug when rewinding onto cord reel. Do not allow plug to whip when rewinding.” Letting it snap back can tangle the cord inside the drum.
Step 4: Listen and Release. You should hear a steady whirring or clicking as the spring rewinds the cord. If it retracts a few inches and stops, there’s likely a tangle inside. If it doesn’t move at all, the spring may be disengaged, which leads us to the specific red-tape fix.
The Red Tape Mistake and How to Undo It
This is the most common specific failure for the Hoover UH71250. The cord has two colored tape markers: yellow and red. The yellow means “almost fully extended.” The red means “full length, stop pulling.”
Where this goes sideways: Pulling the cord past the red tape. This over-extends the spring, causing it to pop out of its anchor point on the reel drum. The spring loses tension, and the cord goes limp.
If you just bought a new Hoover vacuum and this happened on the first use, don’t panic. You probably didn’t break it. The fix is a recalibration.
- Unplug the vacuum.
- Gently pull the cord all the way out until you feel slight resistance. Don’t force it.
- Slowly, inch by inch, release the cord back into the housing. You are manually re-winding the spring onto the drum.
- You may hear a faint click or pop as the spring re-engages. This is the goal.
- Once the cord is fully in, plug in the vacuum and press the cord release. It should now retract normally.
If this works, you’ve learned the single most important rule for that model: never ignore the red tape. For other Hoover models without tape, the principle is the same, if the cord pulls out too far, the spring can disengage. The slow manual rewind is the universal reset.
When You Need to Go Deeper: Opening the Cord Reel
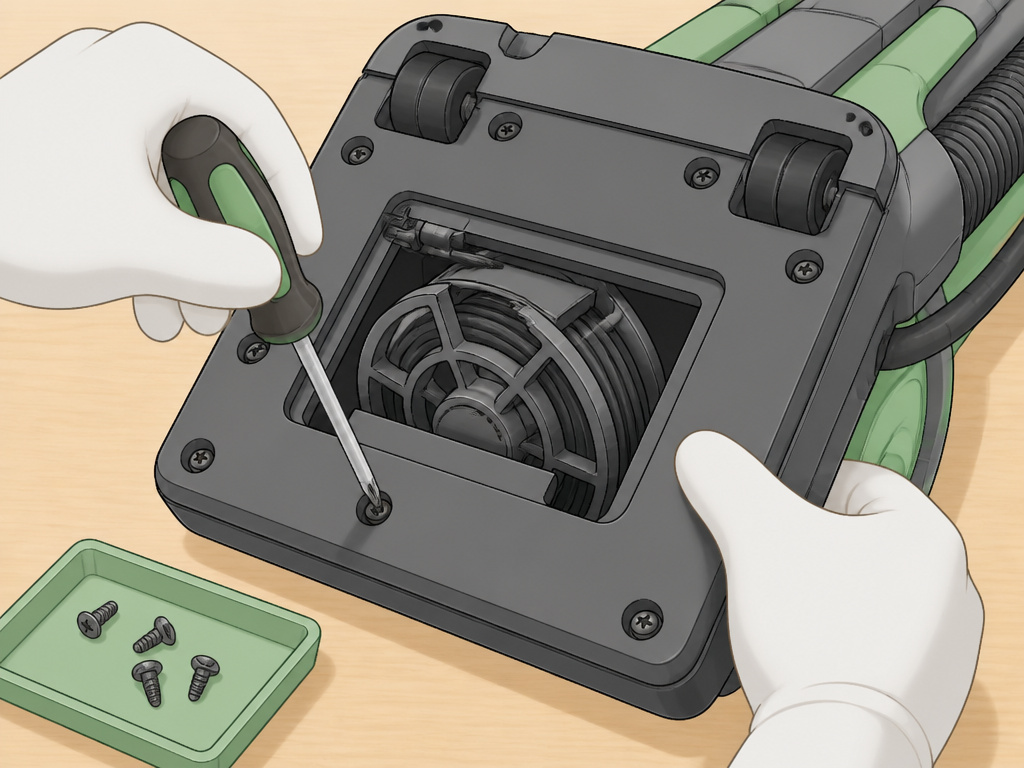
If the quick reset and the red-tape fix both fail, the problem is inside the housing. You’re looking at a tangle, a broken spring, or a gummed-up mechanism. This is where the DIY path diverges from the official manual, which states: “Any other servicing should be done by an authorized service representative.”
Community repair logs show a different story. For a purely mechanical jam, a basic DCR operation (Disassemble, Clean, Reassemble) has about a 70% success rate. You’ll need a Phillips screwdriver, a clean workspace, and about 30 minutes.
| Symptom | Likely Cause | DIY Fix |
|---|---|---|
| Cord retracts weakly | Worn or slipping spring | Replace the entire cord reel assembly (part # varies by model). |
| Cord jerks or tangles | Kinked or bunched cord inside | Open housing, untangle cord, rewind neatly onto drum. |
| Loud grinding on retraction | Dirty or dry reel gears | Clean old grease and debris, apply a light silicone lubricant. |
| No retraction, spring is loose | Spring disengaged from anchor | Re-hook spring onto the center post of the reel drum. (Requires patience.) |
Before you start: Unplug the vacuum. Place it on a flat surface. Have a container for screws. Take photos with your phone at each step so you remember how parts go back together.
- Access the Baseplate. Turn the vacuum over. For most Hoover upright vacuums, the cord reel is under the baseplate, near the brush roll. You may need to remove the bottom plate, which is often held by 6-8 Phillips screws.
- Locate the Reel. Once the plate is off, you’ll see the cylindrical cord reel. It will have the power cord wrapped around it and a series of gears or a pulley connected to the retraction spring.
- Inspect and Clean. Look for obvious tangles, hair wrapped around the axle, or debris in the gears. Use a dry brush and compressed air to clean everything. This alone fixes many “jammed” reels.
- Check the Spring. If the spring is visibly disconnected, you can attempt to re-hook it. This is fiddly work. The spring is under tension, so use caution. If it’s broken, you’ll need a new reel assembly.
If you’re already this deep into maintenance, it’s a good time to check other wear items. A non-spinning brush could mean a worn belt, and knowing how to replace a Hoover vacuum belt while the baseplate is off saves a second teardown. Similarly, if you’ve been dealing with suction loss, check our guide on how to clean a Hoover vacuum hose for blockages.
Why This Happens: The Mechanics of a Retractable Cord
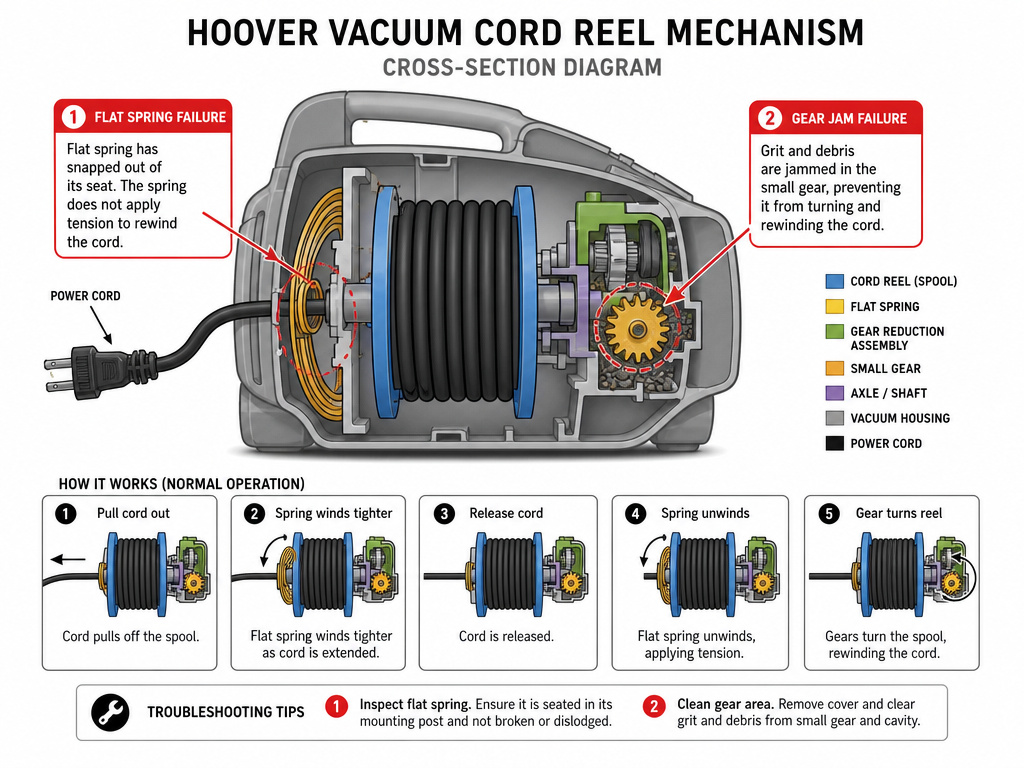
Understanding why it fails tells you how to prevent it. A retractable cord system is simple: a flat spring inside the reel drum is wound tight. When you pull the cord out, you wind the spring tighter, storing energy. Pressing the release pedal unlocks the mechanism, and the spring’s energy spins the drum to rewind the cord.
The system has two main weaknesses. First, the spring has a physical limit. Pull the cord past that limit, past the red tape, and the spring snaps out of its seat. No more tension, no more retraction. Second, the gears and locks can jam with grit and dried grease over time, especially if you never clean your Hoover upright vacuum thoroughly.
That’s why the best fix is often just a good clean-out. It’s also why investing in a vacuum with a retractable cord from a brand known for serviceable parts, like some top-rated Hoover vacuum cleaners, pays off in the long run. The mechanism is repairable.
Frequently Asked Questions
Can I use my Hoover if the cord doesn’t retract?
Yes, you can. The retraction function is separate from the vacuum’s power. Just be careful to manually coil and store the cord to prevent tripping hazards or damage. Don’t let the loose cord get caught in the brush roll.
Is it worth repairing, or should I just buy a new vacuum?
For a vacuum that’s otherwise in good shape, repairing the cord reel is almost always worth it. A new reel assembly is significantly cheaper than a whole new machine. If your vacuum also has major issues like a broken motor or cracked housing, then replacement might be the better option.
How do I prevent this from happening again?
Follow the two golden rules: always guide the plug during rewind, and never pull the cord past its marked limit (the red tape). Also, incorporate a check of the cord reel area into your regular Hoover upright maintenance, when you clean the brush roll and check the belt, give the cord entry point a quick visual inspection for debris.
The cord retracts but then immediately extends again a few inches. What’s wrong?
This usually means the locking pawl inside the reel is worn or gummed up. It’s not catching properly to hold the cord at the desired length. The fix requires opening the reel to clean or replace that small plastic or metal locking piece.
Are retractable cords reliable?
They can be, but they are a complex mechanical part in an otherwise simple machine. They are more convenient but have more potential failure points than a manual wrap cord. When shopping for the best vacuum with a retractable cord, look for models where users report easy access to the reel for cleaning.
The Bottom Line
Fixing a Hoover’s retractable cord usually doesn’t require a technician or a new vacuum. Start with the simple reset. Respect the red tape. If it’s jammed, a straightforward disassembly and clean-out will get it working in most cases. The mechanism is robust but intolerant of two things: being forced past its limit and being neglected. Keep it clean, guide the cord home by hand, and that spring will keep pulling its weight for years.