
Guide to Cleaning the Filter on Your Dyson Cordless Vacuum
This post contains affiliate links. As an Amazon Associate, we earn from qualifying purchases.
To clean a Dyson cordless vacuum filter, wash it monthly with tap water, use the “fill and shake” method until water runs clear, and let it dry completely for at least 24 hours before reinstalling. A damp filter will damage the motor. Dyson’s five-layer filtration captures 99.99% of particles as small as 0.3 microns, but that performance drops when the filter is clogged or wet.
The 24-hour dry time isn’t a suggestion. It’s the minimum for the dense, multi-layered material to shed every molecule of water. Put a filter back at 23 hours and the remaining moisture gets sucked into the motor assembly, where it meets electronics and fine dust. That’s how you get a repair bill that costs more than a new filter.
What follows: the exact wash steps from Dyson’s 2025 manuals, the reason the water-temperature advice conflicts between their own pages, the two filter types that need different handling, and the specific error codes a wet or dirty filter triggers. By the end, you’ll know how to read your machine’s alerts and extend its life by years.
Key Takeaways
- Dry the filter for a full 24 hours in moving air. Using it damp is the single fastest way to kill the motor.
- Use the “fill and shake” method with warm water. Filling the filter cavity and shaking dislodges deep clay and fine dust that rinsing alone misses.
- Match your filter type. Models like the SV23 have separate pleated paper and foam elements; you must wash the paper first, pointing the foam down.
- Tap out loose dust over a trash can before washing. This keeps the worst grit out of your drain and makes the rinse faster.
- Keep a spare filter. While one dries, you can keep vacuuming with the other, avoiding the temptation to reinstall a damp filter.
Why a Clogged Filter Chokes Your Vacuum
Dyson cordless vacuums use whole-machine filtration. Every bit of air pulled into the machine must pass through the filter before it exits. This system captures 99.99% of particles as small as 0.3 microns, bacteria, pollen, and fine dust.
That design has one vulnerability: airflow resistance. A clean filter has a precise balance of pore size and material density. As dust loads the pores, the air path narrows. The motor has to work harder to pull the same volume of air. You hear the pitch rise and feel the suction drop.
Dyson cordless vacuums are tested to the EN 60312-1 CL5.11 standard for filtration. This verification means the sealed system doesn’t leak dust back into your home, but it also means a blocked filter has nowhere else to push the air. The motor strains against the blockage.
The fix isn’t more power. It’s clearing the path. A monthly wash resets the filter’s porosity. Skip it, and you’re not just losing suction. You’re forcing the digital motor to run at high resistance for extended periods. Overheat warnings and premature wear follow.
The 7-Step Filter Wash & Dry Process
Follow this sequence every time. Deviating on drying or shaking is how filters fail.
Step 1: Remove and tap. Twist the filter counter-clockwise to unlock it from the machine. Hold it over a trash can and tap the side firmly. This knocks out the loose, dry debris that would otherwise turn to mud in the sink.
Step 2: Identify your filter type. Look inside. Most Dyson filters are a single cylinder of layered material. Some, like the one for the SV23 model, have a distinct pleated paper element backed by a black foam ring. If you see both, note the orientation, the foam faces down during washing.
Step 3: Initial rinse under running water. Use cold or warm tap water. Dyson’s own advice conflicts here: their US support page says cold, while their UK page and all printed manuals say warm. Warm water dissolves greasy household dust slightly better. Neither will damage the filter. The key is water pressure, not temperature.
Step 4: The “fill and shake” deep clean. This is the step most people skip. Plug the filter’s bottom opening with your hand, place it under the tap, and fill the internal cavity with warm water. Cover the top with your other hand and shake vigorously for 10 seconds. The water will turn grey or brown. Dump it out and repeat until the water runs completely clear. This agitation forces water through the layered material, flushing out the fine, packed dust that surface rinsing leaves behind.
Step 5: Shake out excess water. Hold the filter over the sink and swing it downward firmly several times. You’re not trying to dry it. You’re removing the bulk water that would otherwise extend drying time by hours.
Step 6: Dry for at least 24 hours. Place the filter in a warm, well-ventilated spot. Next to a fan or an open window is ideal. The internal layers are dense and hydrophobic; they trap moisture deep inside. Ambient drying takes a full day.
Step 7: The touch test before reinstalling. After 24 hours, feel the inside of the filter cavity and the outer surface. If any part feels cool or damp, give it another 12 hours. Only a completely dry filter should be twisted back into the machine.
Common mistake: Assuming a filter is dry because the outside feels dry. The core material holds moisture long after the exterior seems ready. Reinstalling it then pulls that moisture into the motor’s air path, where it condenses on electronics.
Tools and Setting You’ll Need
- A sink with running tap water.
- A well-ventilated, warm drying area (not a cupboard).
- A spare Dyson filter (highly recommended).
- Anti-bacterial soap for your hands after handling the dirty filter water.
What Most People Get Wrong About Drying
The 24-hour rule exists because of physics, not caution. Dyson filter material is a compressed, multi-layered stack. Water wicks into the microscopic gaps between fibers. Air drying is a slow process of evaporation from the outside in.
Put that slightly damp filter back in the machine. The motor’s suction pulls room-temperature air through the wet material. This evaporative cooling drops the temperature of the air stream. When that cooler, moist air hits the warmer motor assembly, water condenses inside.
| Drying Method | What Happens | Time to Damage |
|---|---|---|
| 24-hour air dry | Complete evaporation from all layers | Safe |
| 12-hour air dry | Outer layers dry, core remains damp | Motor moisture within 10 mins of use |
| Tumble dryer | Melts glue, deforms plastic cage | Immediate |
| Microwave | Warps material, creates hot spots | Immediate |
| Near heater | Outer crust forms, traps inner moisture | Motor moisture within 30 mins |
Condensation inside the motor housing is a direct path to corrosion on electrical contacts and a slurry of dust and water on the fan blades. This is why Dyson manuals explicitly state that a damp filter “could damage the motor.” It’s not a maybe. It’s a guarantee on a long enough timeline.
If your Dyson won’t start after a filter wash, a damp filter is the first place to look. The machine’s protection circuit may detect abnormal moisture or resistance.
Cold Water or Warm? Decoding Dyson’s Mixed Signals
You’ll find two official recommendations. Dyson.com (US) says “cold tap water.” Dyson.co.uk (UK) and every user manual (SV57, SV23) say “warm tap water.” The “fill and shake” method always specifies warm.
The discrepancy is about clarity, not chemistry. Cold water works fine. Warm water works slightly better at dissolving the organic, greasy component of household dust. Neither will harm the filter materials. The takeaway: don’t stress over it. Use whichever is comfortable. The mechanical action of shaking matters more than a few degrees of temperature.
Where temperature does matter is in drying. A warm room (around 70°F or 21°C) with moving air is the target. Avoid direct sunlight or placing the filter on a radiator, as this can bake the exterior and trap moisture inside.
Your Filter Type Changes the Wash Order
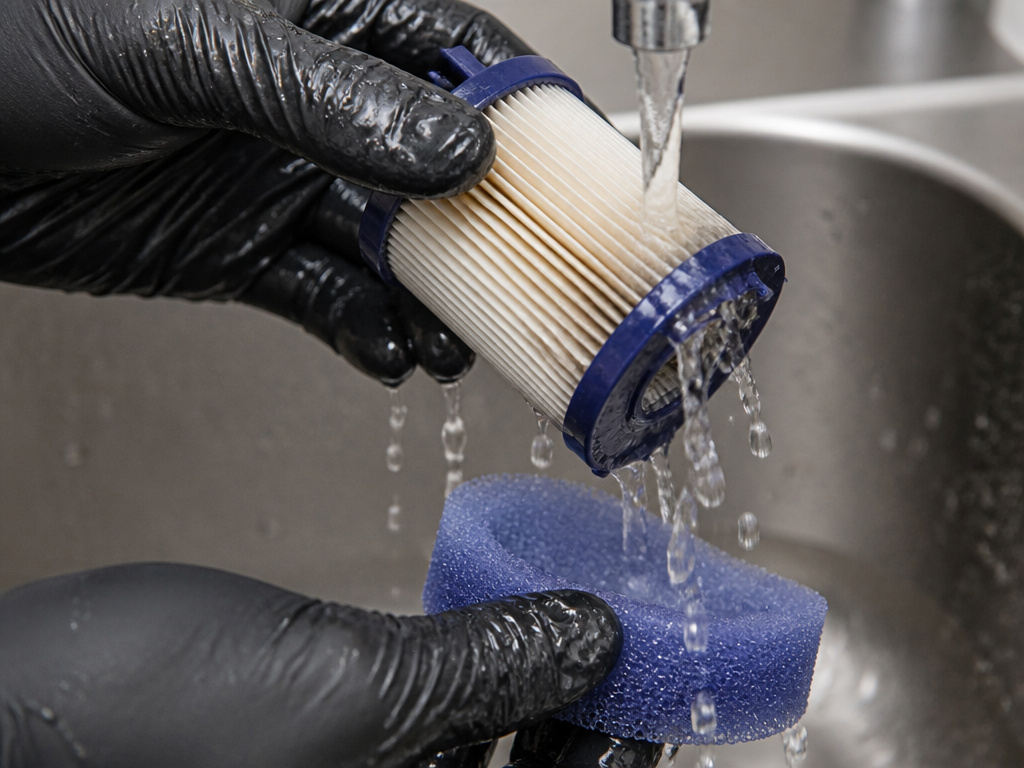
Most Dyson cordless filters are a single unit. Newer models, like those for the Gen5detect (SV23), use a two-part filter: a pleated paper element and a separate foam pre-filter.
The SV23 manual has specific instructions: 1. Wash the pleated paper element first, under warm running water, with the foam element facing downwards. This prevents debris from the paper from washing into the foam. 2. Then, wash the foam element, still pointing downwards.
This order matters. The pleated paper is the primary filter. The foam is a pre-filter that catches larger particles. Washing them together in the wrong order just drives dirt deeper.
Where this goes sideways: Washing a two-part filter as one unit. The paper and foam have different densities. Soaking them together traps dirt between the layers, and the foam never gets truly clean. You’ll see a filter warning light within a few uses because airflow remains restricted.
After washing this type, reassemble the parts while they’re wet, foam ring onto the paper element, and dry them as a single unit. This ensures they seat properly when dry.
The Error Codes Connected to Filter Problems
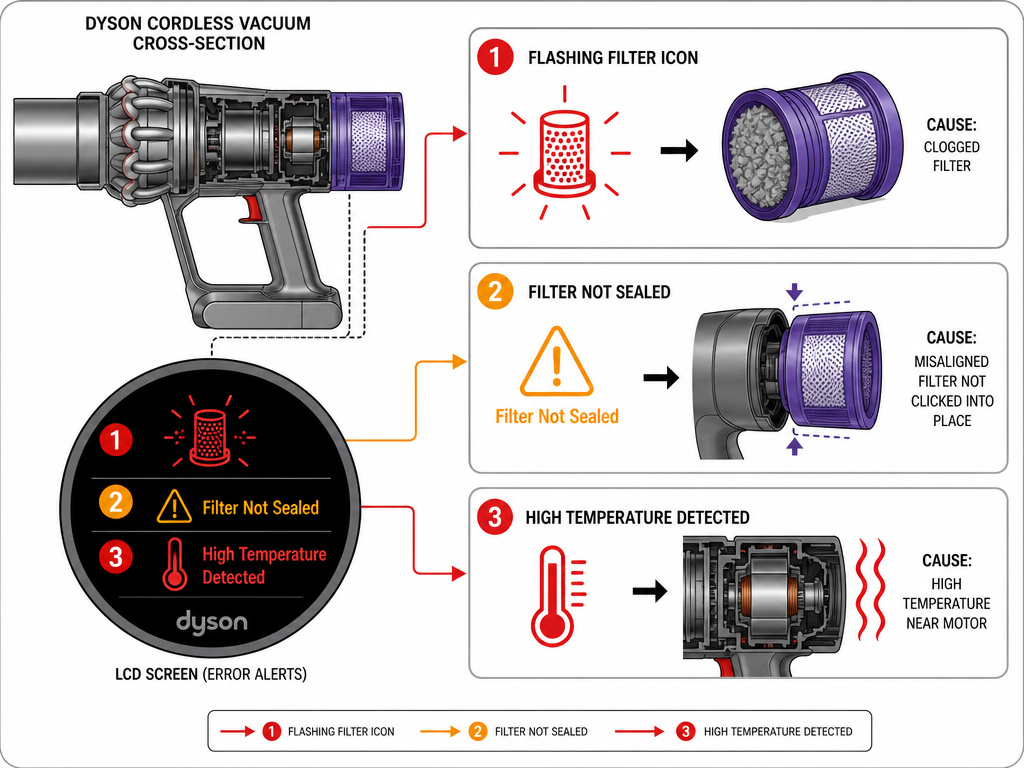
A dirty, wet, or misinstalled filter triggers specific alerts on your machine’s LCD. Knowing them saves a troubleshooting call.
- Flashing Filter Icon / “Clean Filter” Alert: The machine detects high airflow resistance. Your filter is clogged and needs washing. Ignoring this can lead to the vacuum keeps stopping and starting as the motor overheats and resets.
- “Filter Not Sealed” Alert: The filter isn’t locked in all the way. Twist it clockwise until it clicks. A broken seal bypasses the filtration system, blowing dust back into the air and the motor. Our guide on fixing a filter not sealed error walks through reseating it.
- “High Temperature Detected” or “Machine Too Cold”: These aren’t directly filter errors, but a dirty filter forces the motor to work harder, raising internal heat. Store the machine in a temperate place.
If you see persistent Dyson cordless error codes after a proper filter clean and dry, the issue may be deeper. But always rule out the filter first.
When to Replace Instead of Wash
Washing has limits. Look for these signs: – The filter material is torn or the plastic cage is cracked. – After a proper wash and 24-hour dry, suction is still weak and the clean filter alert returns immediately. – The filter has an odor that won’t rinse out (common with pet hair and deeply embedded organic matter). – You’ve owned the vacuum for over two years and the filter has been washed monthly. The material eventually loses its electrostatic charge and porosity.
Using only genuine Dyson filters is non-negotiable for machines under warranty. Third-party filters may not match the exact pore size or sealing gasket, which can void your coverage and let dust into the motor.
For models like the Dyson V7 Motorhead, the filter process is identical, but accessing it might require removing the bin first. Always consult your specific manual.
Frequently Asked Questions
Can I use soap or detergent to clean my Dyson filter?
No. Never use soap, detergent, or any cleaning chemical. These leave residues that clog the microscopic pores in the filter material. Residue also disrupts the electrostatic charge that helps capture fine particles. Water and mechanical agitation are all you need.
Can I speed up the 24-hour dry time with a hair dryer or fan?
Fan pointed near the filter is excellent, it moves air and speeds evaporation. A hair dryer on the filter is a hard no. The concentrated heat can melt the internal glue, warp the plastic cage, or create a hard crust on the filter surface that seals in moisture. Use moving air, not hot air.
Why does my Dyson keep saying to clean the filter right after I washed it?
Two likely reasons. First, the filter is still damp. A wet filter restricts airflow as much as a dirty one. Let it dry fully. Second, you didn’t perform the “fill and shake” deep clean. Surface rinsing leaves a layer of impacted dust that still blocks air. If it’s dry and you did a thorough wash, you might have a filter maintenance indicator that needs a manual reset (often done by holding the power button).
How often should I clean the filter if I rarely use my vacuum?
Clean it at least once every two months, regardless of use. Dust and ambient humidity can settle in the filter, and material can degrade over time. Regular washing prevents the layers from compacting permanently.
Is it okay to have two filters and rotate them?
It’s the best practice. With a spare, you can install a dry filter immediately after washing. This eliminates any temptation to shortcut the dry time and keeps your vacuum always ready. It’s a small investment that protects your larger investment.
The Bottom Line
Cleaning a Dyson cordless vacuum filter is about patience, not power. The steps are simple: tap, rinse, fill and shake, and dry. The 24-hour dry is the whole game. Everything else is prep work for that.
Keep a spare filter. Follow the wash order for your specific type. And read your machine’s alerts, they’re telling you exactly what’s wrong. This routine maintains the 99.99% filtration Dyson engineered and keeps the motor from eating itself. Your machine’s lifespan is measured in filter cycles. Handle them right.