
How to Clean Hoover Vacuum Bag | The 24-Hour Drying Rule
This post contains affiliate links. As an Amazon Associate, we earn from qualifying purchases.
You don’t clean a Hoover vacuum bag, you replace it. Paper filter bags are single-use. The real maintenance involves the reusable pre-motor and final HEPA filters, which must be washed and dried for a full 24 hours before reinstalling to prevent mold and motor damage.
That 24-hour drying time isn’t a suggestion. It’s printed in the Hoover HUSHTONE commercial manual because a damp filter blocks airflow, overheats the motor, and turns your vacuum into a paperweight. The bag itself is a consumable part designed to be swapped when it’s two-thirds full or when its pores clog with fine dust.
What follows is the breakdown most guides skip: the difference between what gets replaced (the bag) and what gets cleaned (the filters), the specific part numbers for your model, and the exact consequences of getting the sequence wrong.
Key Takeaways
- Hoover paper filter bags are not cleanable. Replace them when they are two-thirds full or when suction drops.
- Wash the reusable blue HEPA and yellow pre-motor filters every 3 months. They must air-dry completely for up to 24 hours before going back in the vacuum.
- Very fine dust like drywall powder or fireplace ash can seal a bag’s pores and kill suction long before the bag looks full.
- Always use genuine Hoover replacement bags like the HEPA Type Y (Part #902419001) or the Standard Filtration pack (AH10143) for your model.
- Operating the vacuum without both filters in place can send debris directly into the motor, causing immediate and expensive damage.
The Short Answer: You Don’t (And What to Do Instead)
The paper bag in your Hoover is a filter. Its job is to trap dirt while letting air pass through thousands of tiny pores. Once those pores are blocked with fine dust, grease, or hair, no amount of shaking or tapping will reopen them effectively. Trying to clean and reuse a paper bag risks tearing it, which sends unfiltered dust straight into the motor and the exhaust air back into your room.
The filter bag is not reusable. Discard the used filter bag. Do not vacuum without a filter bag in place. . Hoover HUSHTONE User Manual
Your job is to monitor the bag and replace it at the right time. For most household use, that’s when the bag is two-thirds full. On models with a check bag indicator, the window will show red. If your suction has noticeably faded but the bag doesn’t look full, you’re likely dealing with a pore clog from fine material. Change the bag anyway.
The Real Maintenance: Your Hoover’s Filters
While the bag is disposable, your Hoover has at least one, often two, reusable filters that require regular cleaning. These are the workhorses that protect the motor and clean the exhaust air. Neglecting them is the single biggest cause of lost suction and premature motor failure.
Most upright models have a yellow pre-motor filter (often called the inlet filter) and a blue final HEPA filter. Canister and older models may have variations, but the principle is the same: these are washable.
Here is the cleaning ritual that keeps a Hoover running for years:
- Unplug the vacuum. This is non-negotiable. You are reaching into compartments with electrical contacts.
- Remove the bag and set it aside for disposal.
- Locate and remove the filters. The yellow pre-motor filter is usually in the bag compartment or behind a grill at the base. The blue HEPA filter is typically in a housing at the top or back of the vacuum.
- Tap loose dust outside over a trash can.
- Rinse under lukewarm water. Use low pressure. For the HEPA filter, Hoover specifically instructs to rinse with the open side facing up to avoid forcing dirt deeper into the pleats.
- Air-dry completely. This is the step that breaks most vacuums. Place filters on their side in a well-ventilated area. Do not use heat. The Hoover manual states this may take up to 24 hours.
- Reinstall only when bone-dry. A single damp spot can restrict airflow and create a musty smell.
Skipping the dry step invites mold growth inside the filter media. The restricted airflow then makes the motor work harder, overheating it and triggering the thermal protector. Your vacuum will shut off unexpectedly and won’t restart until it cools down, a cycle that eventually burns the motor out.
When “Two-Thirds Full” Doesn’t Apply: The Fine-Dust Rule

The standard rule works for everyday dirt, pet hair, and crumbs. But some materials are so fine they act like plaster, sealing the bag’s pores into a solid, air-blocking sheet.
Very fine materials, such as face powder, cornstarch, fireplace ashes or fireplace soot, may seal the filter bag and may cause it to burst even though it is only partially full of dirt. . Hoover Owner’s Manual
If you’ve vacuumed drywall dust, baking flour, powdered cleaning agents, or fireplace ash, assume the bag is compromised. Your suction will drop dramatically within minutes. In this case, replace the bag immediately after the job, don’t wait for it to fill. You’ll also need to clean the reusable filters right away, as this ultra-fine dust bypasses the bag and coats them too.
The same logic applies to new carpet. Those loose fibers aren’t heavy, but they’re numerous. They can fill a bag’s capacity without triggering a mechanical fullness indicator on some models. After installing new carpet, check the bag visually after each use for the first week.
| Scenario | Bag Action | Filter Action |
|---|---|---|
| Normal household dirt | Replace at 2/3 full or when indicator is red | Wash every 3 months; replace annually |
| Fine dust (drywall, ash) | Replace immediately after use | Wash immediately after use |
| New carpet fibers | Check visually after each use; replace often | Wash monthly during initial shedding period |
| Sudden loss of suction | Replace bag first (likely clogged pores) | Check and wash filters if bag change doesn’t help |
Finding and Using the Right Replacement Bag
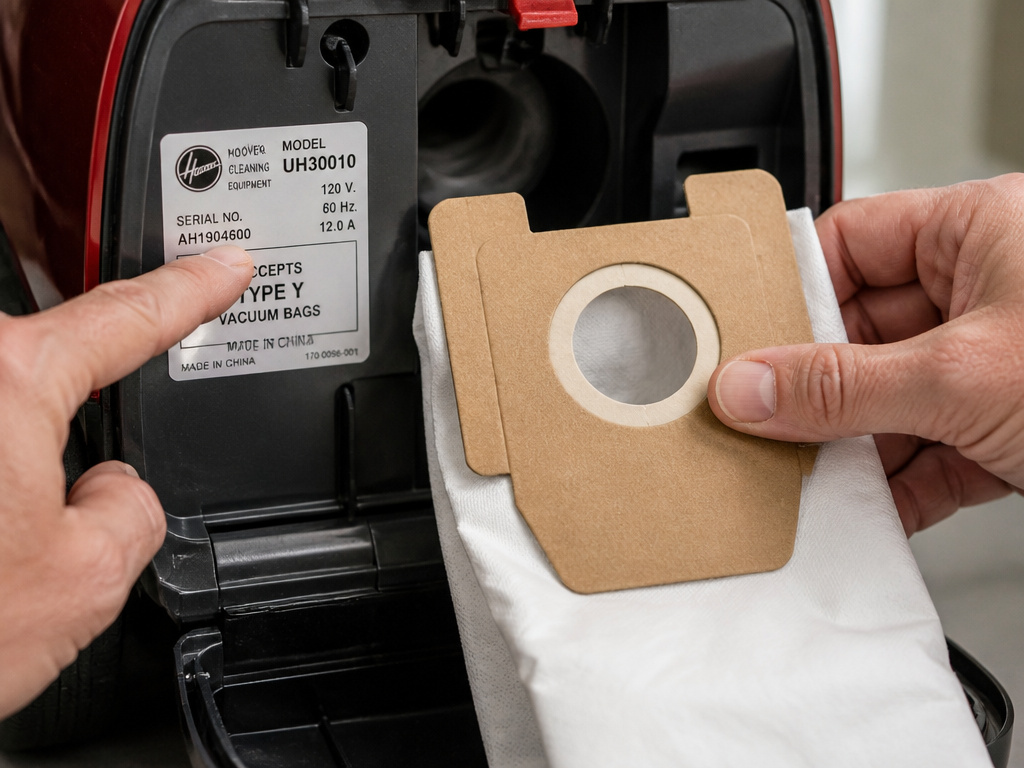
Using a generic or wrong-sized bag is a shortcut to poor performance and potential damage. An ill-fitting bag can leak dust into the motor chamber or fail to seal, allowing dirt to bypass the filtration system entirely.
First, identify your model number. It’s on a sticker on the back or bottom of the vacuum. Then, match it to one of these common Hoover bag types:
- For many upright models: The Hoover HEPA Type Y Bag (Part #902419001) or the Carbon HEPA Type Y Bag (Part #902481001).
- For HUSHTONE Commercial Uprights (CH54013, CH54113, etc.): Standard Filtration 10-pack (Part No. AH10143) or Allergen Filtration 10-pack (Part No. AH10243).
- For Wide-Area Vacuums (e.g., CH86000): Filter Bag, 10 Pack – Part Number 440001304.
When you install the new bag, make sure the cardboard collar is seated firmly and evenly on the intake tube inside the bag door. Tuck the bag material neatly into the compartment so it doesn’t interfere with the door seal. A crumpled bag blocking the door is a common cause of suction loss right after a change.
For most homes, a standard bagged vacuum cleaner is a reliable choice, but knowing you need the right bag is what keeps it reliable. If you’re comparing, our guide to the best vacuum cleaner with a bag breaks down why fit matters more than price.
The 7-Step Bag Replacement & Filter Check
Follow this sequence every time you change the bag. It turns a simple swap into a full system check that prevents 90% of common problems.
Before you start: The vacuum must be unplugged. The motor can start if the switch is bumped, and you’ll be handling fine dust that can irritate lungs and eyes.
- Unplug the power cord from the wall outlet.
- Open the bag compartment door. This is usually a latch or button on the front or top of the vacuum.
- Remove the full bag. On many models, you simply grasp the cardboard collar and pull it off the intake tube. Some have an orange release tab for hands-free disposal.
- Inspect the empty compartment. Look for any obvious clogs in the intake tube or debris caught around the seal. Use a flashlight.
- Remove the reusable filters (yellow and blue). Tap them out to dislodge loose dust.
- Install the new bag. Slide the cardboard collar onto the intake tube until it feels secure. Tuck the bag material into the space so the door can close flat.
- Close and latch the door. Listen for a definitive click. An unlatched door breaks the vacuum seal and the machine will have zero suction.
If your model is a Hoover central vacuum system, the process is different, you’re emptying a central vacuum bag from a wall canister, not the portable unit. The same goes for a Hoover commercial vacuum cleaner, which uses heavier-duty bags.
Frequently Asked Questions
Can you wash and reuse a Hoover vacuum bag?
No. Hoover paper filter bags are designed for single use. Washing them destroys the paper’s integrity, likely causes tears, and will not reopen the clogged pores that reduce suction. Always discard the used bag and install a new one.
How do I know when my Hoover bag is full?
There are three signs: a noticeable loss of suction power, visible dirt being left on the floor after vacuuming, or the “Check Bag” indicator window (on models that have one) turning from green to red. Do not wait until the bag is packed solid.
Why does my vacuum have no suction even with a new bag?
New bag with no suction usually points to a clog elsewhere or a damp filter. First, check for a blockage in the hose, wand, or cleaner head. If those are clear, your reusable filters are likely still damp from washing. Remove them and allow another 12-24 hours to dry completely.
How often should I replace my Hoover filters?
Hoover recommends replacing both the pre-motor and final HEPA filters once per year under normal use. If you have pets, allergies, or a lot of fine dust, consider replacing them every 6-9 months. Washing them every 3 months extends their life.
Can I use off-brand bags in my Hoover?
It’s not recommended. Genuine Hoover bags are engineered to match the airflow and sealing requirements of your specific model. Non-genuine bags can leak dust, reduce suction, and in some cases, void the warranty. The cost difference is minimal compared to a motor repair.
Before You Go
Forget about cleaning the bag. Your focus should be on a timely bag replacement and a strict filter-cleaning schedule with a 24-hour drying period. Stock up on the correct genuine Hoover bags for your model, whether it’s the common Type Y or a commercial HUSHTONE pack. When suction fades, your first move is always to change the bag, then hunt for clogs. That sequence alone solves most problems. For a deeper look at which models make this routine easiest, see our roundup of the best Hoover vacuum cleaners built to last.