
The Correct Way to Empty Your Hoover Central Vacuum System
This post contains affiliate links. As an Amazon Associate, we earn from qualifying purchases.
To empty a Hoover central vacuum, shut off and unplug the power unit, locate the dirt canister, and remove its base or top lid. Dump the debris into a bag outdoors, then remove and clean the cloth or foam filter by shaking or washing it. Let the filter dry completely before reinstalling it, ensuring it’s properly seated in its groove to avoid voiding the warranty.
The step most owners miss is checking and cleaning the filter every single time. Running the unit with a clogged filter doesn’t just drop suction, it forces the motor to work against a blockage, overheating the windings and cutting its lifespan in half. This isn’t a maybe; it’s the primary failure mode for central vacuum motors returned for service.
What follows: the exact steps for your model type (bottom-empty or top-empty), the specific tools that make it cleaner, the electrical safety rules you cannot bend, and the two maintenance tasks, filter care and annual pipe cleaning, that separate a 15-year system from a 5-year headache.
Key Takeaways
- Empty the dirt canister when it’s half to three-quarters full. A completely full canister chokes airflow and risks motor damage.
- Clean the internal filter every time you empty the canister. A dirty filter is the leading cause of lost suction and motor burnout.
- Never use an extension cord with the power canister. It requires a dedicated 120V, 20A grounded circuit as per the Hoover manual.
- Ensure the cloth filter is fully seated in its groove after cleaning. An unseated filter can come loose during operation and void the warranty.
- Schedule a full system pipe cleaning once a year with maintenance sheets to clear hidden debris and restore peak suction.
What You’re Actually Maintaining (It’s Not Just a Bin)
A Hoover central vacuum isn’t a single appliance. It’s a system: a power unit mounted in your garage or basement, a network of pipes behind your walls, inlet valves in each room, and a hose you carry around. When we talk about emptying it, we’re focusing on the power unit’s dirt collection point. But suction depends on every link in that chain being clear.
The power unit itself has a simple job. Its motor creates suction, pulling dirt-laden air through the pipes and hose into the canister. Inside, a cyclone action or a filter separates the heavy debris from the air. The clean(er) air then passes through a final filter before being exhausted. The central vacuum system is efficient only when this airflow path is unobstructed.
A clogged filter turns the power unit’s canister into a sealed box. The motor strains to pull air through the blockage, drawing more electrical current and generating excess heat. This thermal stress degrades the motor’s insulation and lubricants, leading to premature failure.
That’s why “emptying” is never just about dumping dirt. It’s about restoring the system’s ability to breathe. Neglecting the filter is like revving a car engine with the tailpipe plugged.
The 5-Step Dirt Canister Emptying Process
The exact method depends on whether your Hoover model empties from the bottom or the top. Most modern units are bottom-emptying, with a removable base.
Step 1: Safety First – Disconnect Power
Always unplug the power unit from its dedicated outlet before you touch anything. Don’t just turn off a switch on the wall. Physically pull the plug. This is non-negotiable. The unit operates on a 120V, 20A circuit, and you are reaching into a compartment that houses electrical connections.
Before you start: The motor and electrical components can hold a charge even when unplugged. Never handle the internal filter or any parts with wet hands. Work in a dry, well-lit area like a garage.
Step 2: Locate and Remove the Dirt Canister
The power canister is a large, usually cylindrical, unit. The dirt container is the lower section. For bottom-emptying models, look for a latch or a twist-lock mechanism securing the base. Turn or release it and lower the base down. For top-emptying models (less common), you’ll unclip or unscrew a lid on the top of the unit.
Step 3: Empty Debris and Handle the Filter
Take the entire canister or base outside. Dump the debris directly into a trash bag.
- If you have a cloth filter: It’s a bag-like fabric sleeve hanging inside the canister. Place a plastic bag over its bottom, hold the top, and shake it vigorously to dislodge fine dust. Do not wash this cloth filter unless the manual specifies it’s washable, shaking is usually sufficient.
- If you have a foam or mesh filter: Remove it according to your manual. Foam filters can typically be rinsed under lukewarm water until the water runs clear. Never use soap. Mesh filters can be tapped clean or gently vacuumed with another vacuum.
Step 4: The Critical Reassembly Check
This is where warranties are voided. Before putting the base back on, ensure the cloth filter is fully seated in its circumferential groove at the top of the canister. If it’s crooked or popped out, it can get sucked into the motor fan when you turn the unit back on. The Hoover manual explicitly states this can void your warranty.
Snap or twist the base back into place firmly. You should feel a positive lock with no gaps.
Step 5: Restore Power and Test
Plug the unit back in. Go to a wall inlet, connect your central vacuum hose, and turn the system on. Listen for a smooth, powerful motor sound, not a strained whine. Feel for strong suction at the hose end. If suction is weak, you likely have a blockage in the hose or pipes, or the filter wasn’t fully dry.
What Happens If You Don’t Empty It?
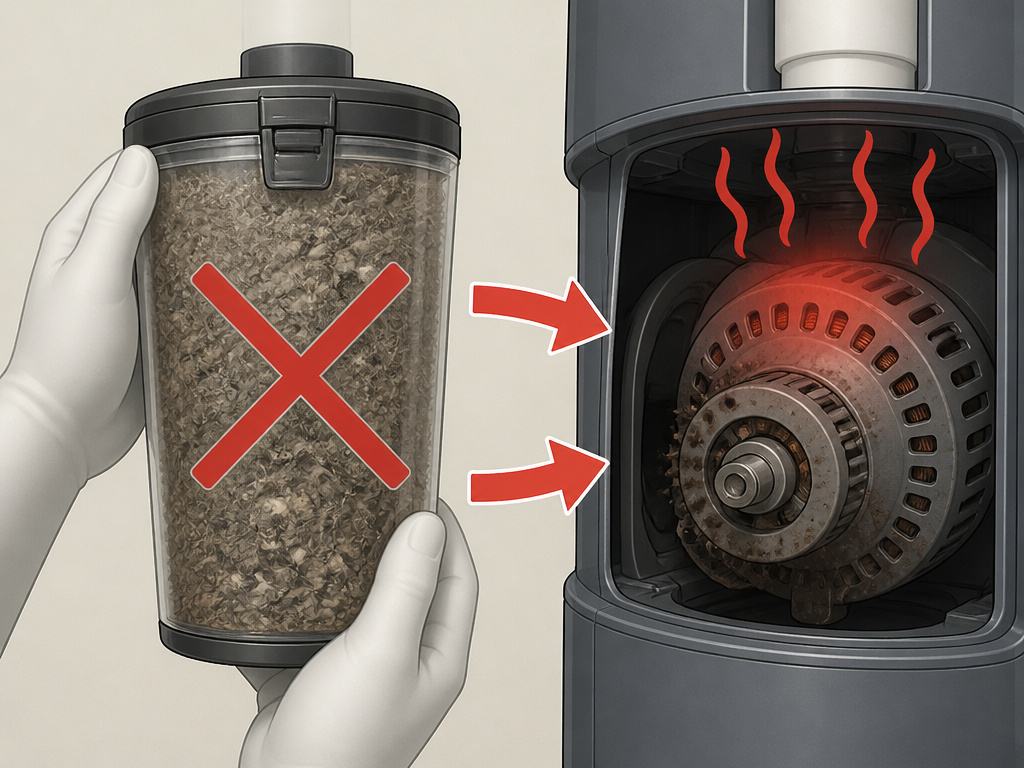
The consequences follow a predictable timeline. Ignoring a full canister doesn’t just make the vacuum less effective; it actively breaks it.
| Stage | Symptom | Internal Damage | Timeline |
|---|---|---|---|
| Early | Noticeable drop in suction power. Debris isn’t picked up as well. | Airflow is restricted. The motor draws more amps to maintain suction, running hotter. | Within 2-3 uses of a full canister. |
| Mid | Motor sounds strained or high-pitched. Unit may shut off automatically from thermal overload. | Sustained heat degrades motor windings and bearing lubricant. Carbon motor brushes wear down faster. | Several weeks of poor maintenance. |
| Late | Burning smell, permanent loss of power, or motor failure. The unit won’t turn on. | Motor insulation fails. Windings short or burn out. The control board may also be damaged by electrical stress. | 3-6 months of severe neglect. |
The fix for a late-stage failure isn’t emptying a canister, it’s a costly central vacuum system repair or a full motor replacement. That’s a repair that can approach the cost of a new central vacuum cleaner.
Filter Care: The Real Maintenance Work
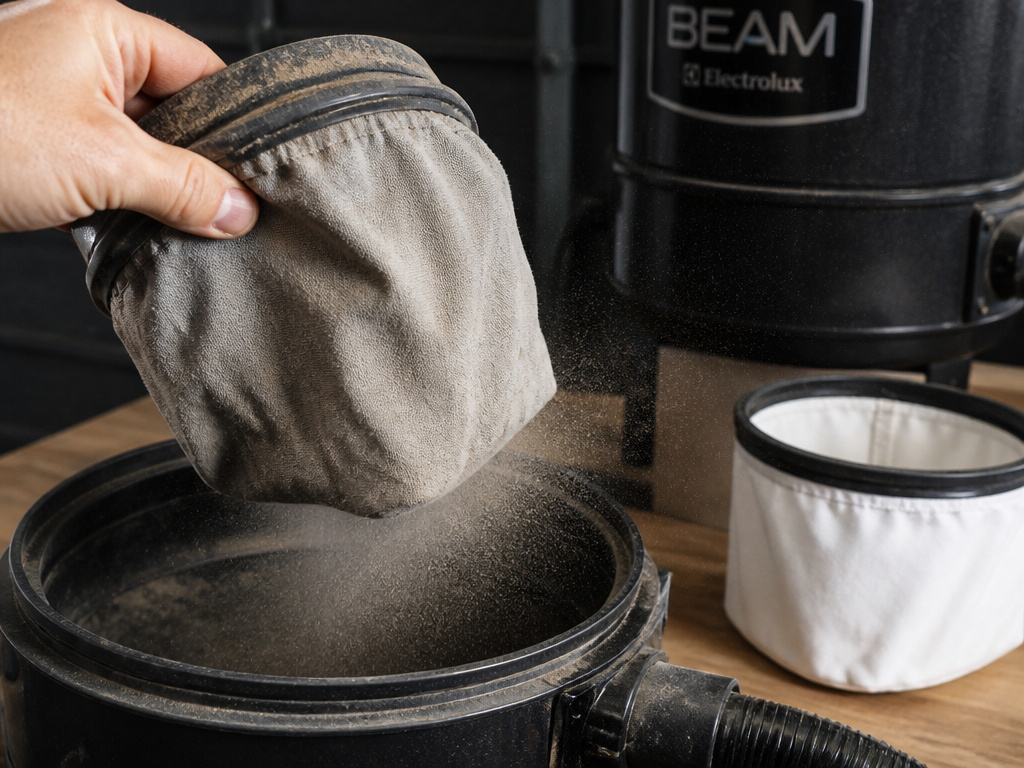
The filter is the gatekeeper. Its condition dictates system health more than anything else. Here’s how to manage the different types you might encounter.
- Cloth (Fabric) Filter: The most common. Clean it by shaking at every canister empty. Replace it if it develops holes, becomes brittle, or if suction doesn’t improve after cleaning. A good cloth filter lasts years.
- Foam Filter: Often found on older or specific models. Rinse with water only and let it air dry for at least 24 hours, never reinstall it damp. A damp foam filter will mold and cause a musty smell that gets blown through your house.
- Disposable Bags: Some top-emptying models use bags. Replace the bag when it’s three-quarters full. Don’t wait for it to be packed solid.
Where this goes sideways: Washing a non-washable cloth filter. Water ruins its filtering properties and can cause it to shrink or tear. You’ll end up blowing fine dust past the filter and into the motor, or the filter will disintegrate on the next start-up.
For a deep dive on this specific component, see our guide on how to perform a central vacuum filter replacement.
Beyond the Canister: System-Wide Upkeep
Emptying the canister is core maintenance, but three other tasks keep the whole system humming. Think of this as the annual service schedule.
- Annual Pipe Cleaning: Once a year, run Free Flow Central Vacuum Maintenance Sheets through the piping. You insert one into a wall inlet and let the suction pull it through. It scours out the fine, packed dust that settles in pipe elbows and improves airflow dramatically.
- Inlet Valve Inspection: Check the plastic inlet valves in your walls. Over time, the flap inside can crack or the seal can wear out, causing an air leak that kills suction at that port. If an inlet is broken, you need to replace the hose connection point entirely, parts for individual inlets are rarely sold.
- Brush and Hose Check: Every few months, inspect the ends of your hose and the rotating brush on your power nozzle. A Hoover vacuum brush not spinning is often due to a tangled thread or hair wrap, not a motor issue. Clear it promptly.
If you hear a high-pitched noise from the power unit that isn’t solved by emptying and cleaning, the motor bearings or brushes may be failing. That’s a sign to call a pro.
Hoover Central Vacuum Troubleshooting: Empty But No Suction?
You’ve emptied the canister and cleaned the filter, but the vacuum still has weak pull. The problem is now elsewhere in the system. Diagnose in this order:
- Check the Hose: Detach it from the inlet and the power nozzle. Look through it for a blockage. Try sucking on one end (yes, really) to feel for airflow. A clog is common.
- Check the Power Nozzle: Disconnect the hose and see if suction is strong directly from the wall inlet. If it is, the blockage is in your hose or nozzle.
- Inspect the Inlet: Debris can get lodged in the wall inlet itself. Shine a flashlight in and use needle-nose pliers to remove any obstructions.
- Consider a Pipe Blockage: If multiple inlets have weak suction, the main pipe line or a central elbow may be clogged. This often requires professional central vacuum system troubleshooting with specialized tools.
For persistent hose issues, from cleaning to full replacement, our resources on how to clean the hose and how to replace the hose walk you through the process.
Frequently Asked Questions
How often should I empty my Hoover central vacuum?
Empty the dirt canister when it’s between half and three-quarters full. For an average household, this might be every 1-3 months. Never let it fill completely.
Can I wash the cloth filter?
Only if your specific owner’s manual states it is washable. Most Hoover cloth filters are designed for dry cleaning by shaking. Washing can damage the fabric’s filtering ability and cause it to shrink, leading to improper seating and potential warranty issues.
Why does my vacuum smell musty after I empty it?
Musty smell almost always comes from a damp foam filter that was reinstalled before being completely bone-dry. It can also come from mold or debris deep in the piping. Remove and fully dry the foam filter, and consider using annual maintenance sheets to deodorize the pipes.
Is it okay to use an extension cord with the power unit?
No. The Hoover owner’s manual explicitly warns: “UNDER NO CIRCUMSTANCES SHOULD AN EXTENSION CORD BE USED.” The power canister requires a dedicated 20-amp circuit; an extension cord can overheat, cause a voltage drop, and damage the motor.
What should I do if the motor runs but there’s absolutely no suction?
You have a complete blockage. The most likely culprit is a full canister with a packed filter, a clogged central vacuum hose, or an object lodged in the main pipe directly after the power unit. Follow the troubleshooting steps above, starting with a full inspection of the hose and inlet.
The Bottom Line
Emptying a Hoover central vacuum is straightforward: unplug, open, dump, clean the filter, and reassemble correctly. The stakes are in the details. That cloth filter must be seated perfectly. The canister must never sit completely full. And you must never, ever plug it into an extension cord.
Do those three things, plus an annual pipe cleaning, and the motor will likely outlast its 5-year warranty. Skip them, and you’re shopping for a new central vacuum unit or expensive repairs long before you should be. The system is built to last, but only if you give it the air it needs to run.