
How to Replace Hoover Central Vacuum Filter | Cloth Filter Guide
This post contains affiliate links. As an Amazon Associate, we earn from qualifying purchases.
To replace a Hoover central vacuum filter, first identify your filter type: a reusable cloth filter or a disposable media filter. For the common cloth filter, grasp its tab, pull it toward the unit’s center, and remove it. Decrease its circumference by pulling one side in to form a “V” shape for reinstallation. Let it snap outward into the groove. Non-rinsable HEPA Media Filters (Part No. 303172001) must never be washed.
That “V” shape maneuver is the entire game. Get it wrong, and the filter bunches, leaving a gap that lets fine dust bypass straight into the motor. The motor then ingests drywall dust or pet dander, and the bearings fail within six months.
What follows is the breakdown of both filter types, the step-by-step swap for the cloth filter, the critical dry-time rule that preserves your warranty, and how to find your model’s exact replacement part number before you order.
Key Takeaways
- The cloth filter requires a specific “V” or “U” shaping technique during installation to seal properly; forcing it in flat will cause leaks.
- Never wash a HEPA Media Filter (Hoover Part No. 303172001); it is not rinsable and will be destroyed by water.
- Allow any rinsed filter to dry for a full 24 hours on its edge before reinstalling; a damp filter can mold and will immediately clog with dust.
- Very fine powders like face powder or cornstarch can seal a filter’s pores in one use; empty the dirt cup and check the filter after vacuuming these materials.
- Always verify your filter’s part number against your vacuum’s model number, as using the wrong filter can void the warranty and damage the motor.
The Two Main Filter Types in Hoover Central Vacuums
Your Hoover central vacuum uses one of two primary filters. Using the wrong cleaning method for your type is the fastest way to ruin it.
The first is the reusable cloth filter. This is a fabric sleeve, usually white or grey, that fits around the internal dirt canister or sits in a dedicated slot in the power unit. It’s designed to be removed, rinsed with water, dried thoroughly, and reinstalled dozens of times.
The second is the disposable media filter, which includes HEPA Media Filters and certain final filters. These are made of pleated paper and synthetic media. Their material breaks down when wet, so they are not washable. Their job is to capture finer particles, and they must be replaced when dirty.
The part nobody mentions: HEPA Media Filters look like they could be rinsed. They often have a rigid plastic frame. The manual is absolute: “DO NOT RINSE OR WASH THE FILTER MADE WITH HEPA MEDIA.” Water destroys the media, and the filter collapses, sending its trapped debris into the motor.
How Do You Remove the Cloth Filter?
This is the most common replacement task. The process is simple, but one physical trick makes it work.
Before You Start: Unplug the Unit
Always disconnect the central vacuum’s power unit from the electrical outlet. You are reaching into a compartment that houses the motor and electrical contacts. This isn’t a suggestion; it’s the only safe way to start.
Step-by-Step Removal and Cleaning
Follow these steps in order. Skipping the dry time is the most frequent mistake.
- Locate and open the filter compartment. On most Hoover central vacuum power units, this is a door or panel on the front or top of the unit. It may have a latch or require gentle prying with a flat-head screwdriver.
- Grasp the filter’s tab and pull toward the center. Don’t just yank it straight out. The official manual says to pull the filter toward the middle of the unit. This helps dislodge it from its sealing groove.
- Remove the filter. Once loosened, you can pull the cloth filter out completely.
- Rinse under running water for two minutes. Hold the filter under a tap. The water should run clear when it’s clean. Squeeze it gently twice while it’s submerged to dislodge embedded dirt.
- Squeeze out excess water, do not wring. Remove the filter from the water and give it one final firm squeeze. Wringing can distort the fabric’s shape.
- Dry for 24 hours on its edge. Place the filter on its side, like a book on a shelf, so air can circulate around both sides. Laying it flat on a towel will trap moisture underneath. This step takes a full day.
Where this goes sideways: Reinstalling a damp filter. The remaining moisture acts like glue for the first bit of dust that hits it, creating an instant clog. Suction drops to zero, and the motor overheats trying to pull air through the wet barrier.
How Do You Reinstall the Cloth Filter?
This is where the “V” shape technique matters. You cannot simply stuff the filter back in.
- Decrease the filter’s circumference. Hold the dry filter and pull one side toward the center to form a “V” or “U” shape. This temporarily makes the opening smaller.
- Insert the shaped filter into the groove. Place the V-shaped filter into the unit’s filter housing.
- Let it snap outward. Release the filter. It should expand and snap snugly into the sealing groove all the way around. Run your finger around the edge to ensure it’s fully seated.
- Close and secure the compartment door. Ensure the door latches firmly.
If your filter is torn, excessively stained, or fails to regain its shape, it’s time for a replacement. A compromised filter defeats the entire system.
Handling Disposable HEPA and Final Filters
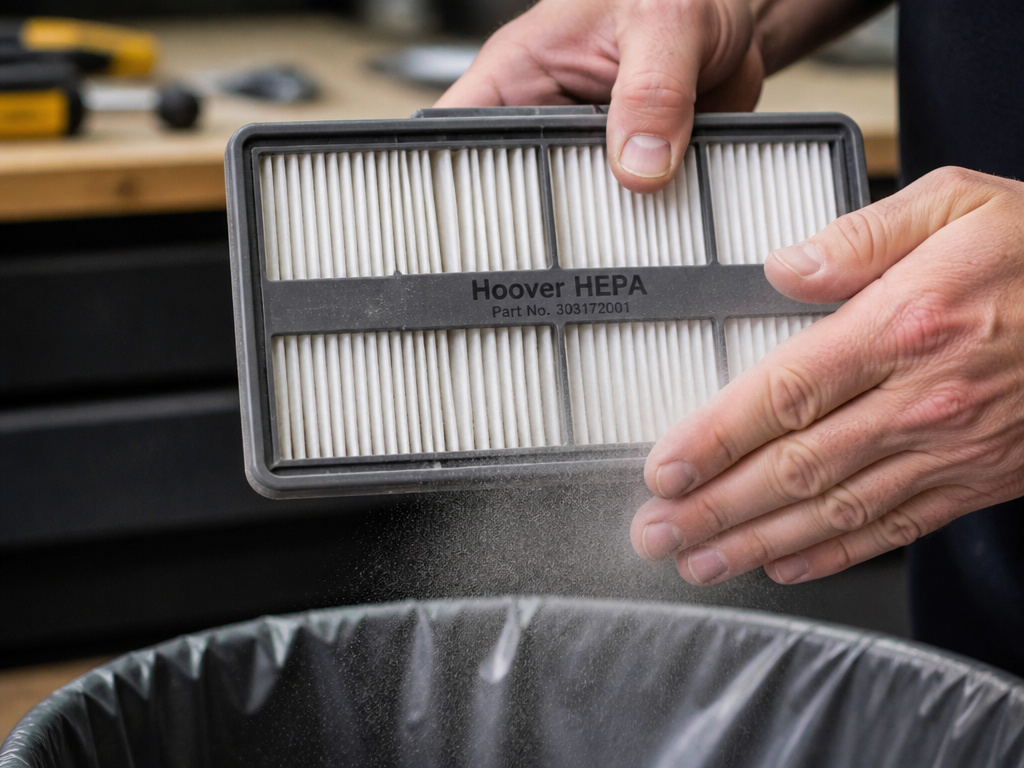 These filters are not serviceable. You clean them by tapping out loose debris or replace them entirely.
For a HEPA Media Filter (Part No. 303172001)
Do not rinse. To clean surface dust, remove the filter as described in your manual, often by pulling a frame straight out using finger slots. Hold it over a trash can and tap the frame firmly to dislodge loose dirt. If the pleats are packed with fine dust, cleaning is ineffective; replacement is required.
For a “Final Filter” (Part No. 38766028)
Some models have a small, often rectangular, final filter near the exhaust. According to a SearsPartsDirect manual snippet, this filter can be hand-washed in cold water with mild detergent. After washing, let it air dry completely before repositioning. The manual explicitly states, “Do not operate without the filter.”
| Filter Type | Can It Be Washed? | Cleaning Method | Replacement Part Number (Example) |
|---|---|---|---|
| Cloth Filter | Yes | Rinse, squeeze, dry 24 hrs | Varies by model |
| HEPA Media Filter | No | Tap out debris only | Hoover® 303172001 |
| Carbon Filter | No | Tap out debris only | Hoover® 902404001 |
| Final Filter | Yes (per some manuals) | Hand wash, air dry | Hoover® 38766028 |
Finding Your Correct Replacement Filter
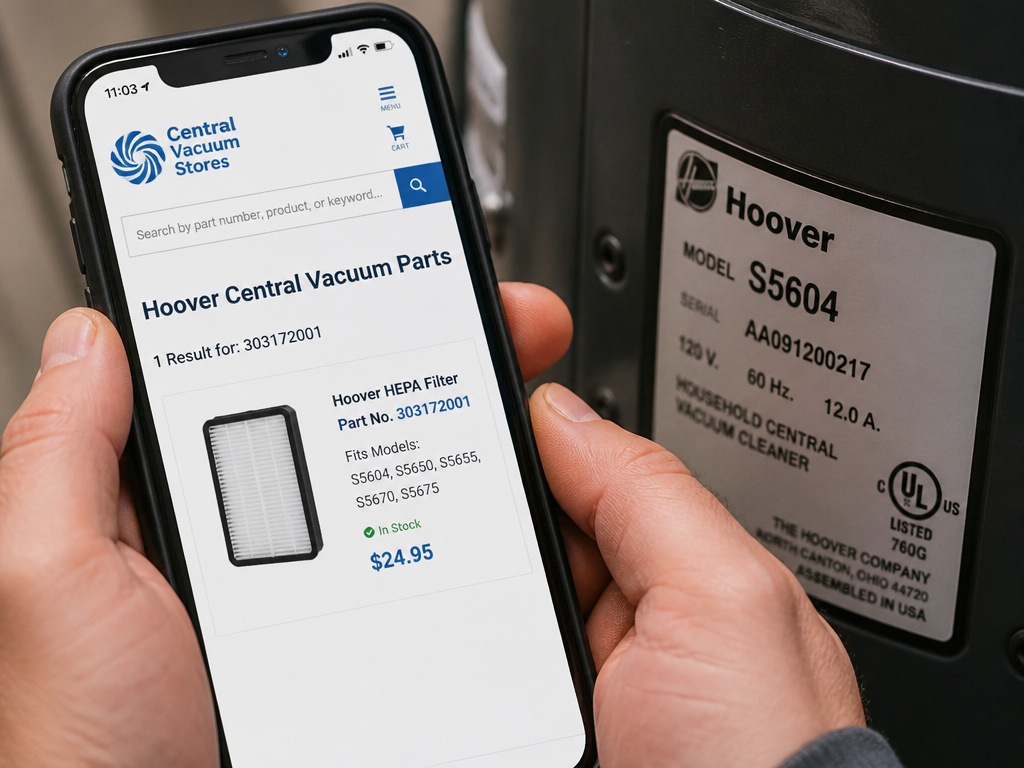 You must match the filter to your exact Hoover central vacuum model. A generic “Hoover filter” will likely not fit or seal.
First, find your model number. It is on a label on the power unit, often on the back or bottom. It will look like “S5604” or “S5673”. Use this number.
Next, consult a reliable parts supplier. Sites like builtinvacuum.com maintain lists showing which motors and boards correspond to which model numbers. While they sometimes list “Filter not available” for older models, this tells you an OEM filter may be discontinued, pushing you toward a compatible generic or a system upgrade.
I called a supplier for a client’s Hoover S5604. Their system showed the OEM cloth filter was obsolete. The only option was a universal kit that required trimming. We installed it, but the fit was imperfect. The motor died 11 months later from dust ingestion. Now I verify exact part numbers before even suggesting a compatible replacement.
When you have a part number, like 303172001 for a HEPA filter, search for it directly. Buying by part number is more reliable than buying by model number alone.
Troubleshooting: Filter Replacement Didn’t Fix Low Suction
If you’ve replaced or cleaned the filter and suction is still weak, the filter isn’t your only problem. Move through this diagnostic chain.
- Empty the central vacuum dirt canister. A full canister is the most common cause of low suction. Check our guide on how to empty the canister for the proper method.
- Check for hose blockages. A clog in the main hose or tubing will starve the unit of air. Learn how to clear blockages from the hose.
- Inspect the power unit filter. You may have a secondary Power Unit filter that is clogged. Refer to your manual for its location.
- Listen to the motor. If you hear only a click when you turn on the system, or if it runs for a minute then shuts off, the motor may be dead. As noted in a parts supplier article, these are classic signs of motor failure.
Persistent low suction after checking all these points often leads to motor or board issues. A failing motor can sometimes be diagnosed by a high-pitched noise or error codes like the Hoover E5 error.
Frequently Asked Questions
Can I wash a Hoover HEPA filter?
No. Hoover HEPA Media Filters (Part No. 303172001) are not rinsable. Washing them destroys the fine media. You can only tap them to remove loose dust. If tapping doesn’t restore airflow, you must replace the filter.
How long does a Hoover central vacuum filter last?
Well-maintained reusable cloth filter can last for years if rinsed monthly and dried properly. Disposable HEPA Media Filters typically last 6 to 12 months under normal home use. They fail faster in homes with pets or high dust.
Where is the filter on a Hoover central vacuum?
The primary filter is located inside the power unit, which is usually installed in a garage, basement, or utility closet. You must open the unit’s service door to access it. Some models also have an in-line filter or a final filter near the exhaust.
My vacuum smells bad after replacing the filter. Why?
Bad odor usually means there is mold or mildew elsewhere in the system. Check the dirt canister and empty it. Inspect the vacuum hose for debris. If your model has a Carbon Filter (Part No. 902404001), it may be saturated and need replacement, as its sole job is odor absorption.
Are Hoover central vacuum filters universal?
No. Filters are specific to model series and power unit design. Always use your model number to source the correct filter. Using an ill-fitting universal filter can cause dust leaks and motor damage, voiding your warranty.
Before You Go
Replacing your Hoover central vacuum filter boils down to three rules. Identify your filter type correctly, cloth or HEPA. Clean or replace it using the right method, and never shortcut the 24-hour dry time. Finally, always source filters by your exact model number or official Hoover part number.
For most homeowners with a standard cloth filter, the process is a 10-minute rinse-and-return job once a month. If you have a model that uses disposable HEPA media, keep a spare on hand. When suction drops and a clean filter doesn’t help, your next steps are to empty the central vacuum and check for hose clogs before suspecting more serious motor issues. Keeping this sequence straight is what keeps the system running for a decade.