
Why Your Dyson Upright Vacuum Is Overheating & How to Fix It
This post contains affiliate links. As an Amazon Associate, we earn from qualifying purchases.
A Dyson upright vacuum overheats and shuts off when a blockage in the airflow path, most often in the hose, wand, or cleaner head, causes the motor to overwork and trip the built-in thermal cut-out. The fix is to unplug the vacuum, let it cool for 1-2 hours, then find and clear the obstruction. The manual for models like the UP20 and DC41 explicitly states that clearing blockages is not covered by the 5-year warranty.
That cool-down period isn’t a suggestion. The motor housing holds heat, and restarting a hot machine can damage the thermal cut-out itself. The 1-2 hour wait is printed in the manual for a reason.
What follows: the three specific blockage points where 90% of overheating cases start, the step-by-step order to check them, and the one maintenance task most owners skip that guarantees the problem will come back.
Key Takeaways
- The thermal cut-out is a safety switch that shuts the motor off to prevent fire or burnout. It resets automatically after the vacuum cools for 1-2 hours.
- Overheating is almost always a symptom, not the problem. The root cause is a restriction in airflow, forcing the motor to work harder.
- Clearing blockages is explicitly excluded from Dyson’s 5-year warranty. Performing the checks below yourself is the fastest, cheapest solution.
- Washing the two main filters (Filter A and Filter B) monthly is non-negotiable. A clogged filter is an invisible blockage that mimics every other symptom.
- If your vacuum is stored or used in a garage below 3°C (37.4°F), the cold can cause plastic components to contract and temporarily restrict airflow until the machine warms to room temperature.
How the Thermal Cut-Out Actually Works
Your Dyson doesn’t have a temperature gauge. It has a simple bimetallic strip near the motor windings. When the air inside the motor chamber gets too hot from overwork, that strip bends, breaks the electrical circuit, and the vacuum dies. No lights, no warning beep, just silence.
The appliance is fitted with an automatically resetting thermal cut-out. If any part becomes blocked the appliance may overheat and automatically cut-out. Switch ‘OFF’ and unplug. Leave to cool down for 1-2 hours before checking filters or for blockages. Dyson DC41 Operating Manual
The “automatically resetting” part is key. You don’t need to press a reset button. Once the internal temperature drops, the strip bends back, the circuit closes, and the vacuum will turn on again. But if you haven’t removed the blockage, the cycle repeats within minutes.
This is a protective feature, not a defect. A motor that runs too hot for too long will cook its own insulation, melt nearby plastic housings, and eventually fail. The cut-out is there to give you a chance to fix the real problem.
The 3 Most Common Blockage Points
Overheating follows airflow. Suction pulls debris from the floor, through the cleaner head, up the hose, into the wand, and finally into the clear bin. A jam at any of these three choke points will back up the system.
1. The Cleaner Head & Brushbar
This is the first and most visible checkpoint. Long hair, string, and carpet fibers wrap around the brushbar axle, creating a dense plug that blocks the intake.
How to check: Unplug the vacuum and lay it on its back. Manually spin the brushbar with your hand. It should rotate freely. If it’s stuck or you see a thick mat of material wound around the ends, you’ve found your blockage. * Consequence if ignored: The trapped debris creates drag. The motor strains to turn the brushbar, drawing excess current and heating up rapidly. You’ll often hear a loud ratcheting noise from the cleaner head on models like the DC14 or DC07 as the drive belt slips.
2. The Hose and Wand
The hose’s flexible corrugations and the wand’s internal diameter are perfect for capturing larger objects: Lego pieces, socks, crumpled paper, or dense clumps of pet hair.
How to check: Disconnect the hose from both the cleaner head and the main body. Stretch it out fully and look through it toward a light. Detach the wand from the handle and look through it as well. * Consequence if ignored: A partial blockage here acts like a kink in a garden hose. The motor works at full power, but suction at the cleaner head drops to almost nothing. The motor moves less cooling air over itself and heats up in under five minutes of runtime.
3. The Cyclone & Bin Inlet
This is where smaller, heavier debris like sand, fine dust, or spilled cereal can pack into the entry port where the wand connects to the clear bin unit.
How to check: Remove the cyclone and clear bin assembly by pressing the release button on the carry handle. Look into the port on the cyclone where the wand attaches. Shine a light inside the clear bin’s inlet. * Consequence if ignored: This creates a direct, high-resistance barrier. The motor sounds like it’s straining even when the hose is detached. This is the most common cause of a vacuum that seems to run fine for 30 seconds, then overheats consistently.
| Blockage Point | Common Culprits | Tell-tale Sign |
|---|---|---|
| Cleaner Head / Brushbar | Hair, yarn, carpet fibers | Brushbar won’t spin; loud ratcheting noise |
| Hose or Wand | Socks, paper, small toys, packed dust | Weak suction at cleaner head; visible object when stretched |
| Cyclone / Bin Inlet | Sand, kitty litter, fine powder | Motor strain noise; debris visible in bin entry |
Where this goes sideways: Jumping straight to the hose without checking the brushbar first. A locked brushbar will overheat the machine every time, even with a perfectly clear hose. Clear the head first.
Step-by-Step Diagnostic: Find the Blockage in 10 Minutes
Follow this order. It moves from the easiest, most common fixes to the more involved ones.
Before you start: Unplug the vacuum. Leave it upright in a cool room for at least 90 minutes if it has recently cut out. Touching internal components before the thermal cut-out resets is pointless.
- Empty the Clear Bin. This seems obvious, but an overfilled bin compacts debris against the cyclone inlet, creating an instant blockage. Empty it, even if it’s only half-full.
- Inspect and Clear the Brushbar. Lay the vacuum on its back. Use scissors or a seam ripper to cut away hair and fibers wound around the brushbar ends. Manually spin it to ensure free rotation.
- Detach and Inspect the Hose. Press the release button where the hose meets the cleaner head and again where it meets the main body. Stretch it out, look through it, and use a long, flexible object like a broom handle to gently push out any obstruction.
- Check the Wand. Remove it from the handle. Look through it. A common clog point is right at the bend where it connects to the hose.
- Examine the Cyclone Inlet. With the clear bin removed, look into the dark plastic port on the cyclone unit. Use a flashlight. A long, narrow pair of pliers can extract packed debris here.
- Verify Both Filters. This is critical. A clogged filter is a system-wide blockage.
- Filter A is behind the handle on the cyclone. Release the catch, swing the handle back, and pull the foam filter out.
- Filter B is inside the ball housing. Turn the central locking dial counter-clockwise, lift the cover, and turn the filter a quarter-turn to release it.
- Hold each under cold running water until the water runs clear. Squeeze out excess water and let them air-dry for a full 24 hours before reinstalling.
If you clear a blockage but the vacuum still overheats, the filter drying period is the usual suspect. A damp filter restricts airflow as effectively as a sock in the hose.
Why Filter Maintenance Is Non-Negotiable
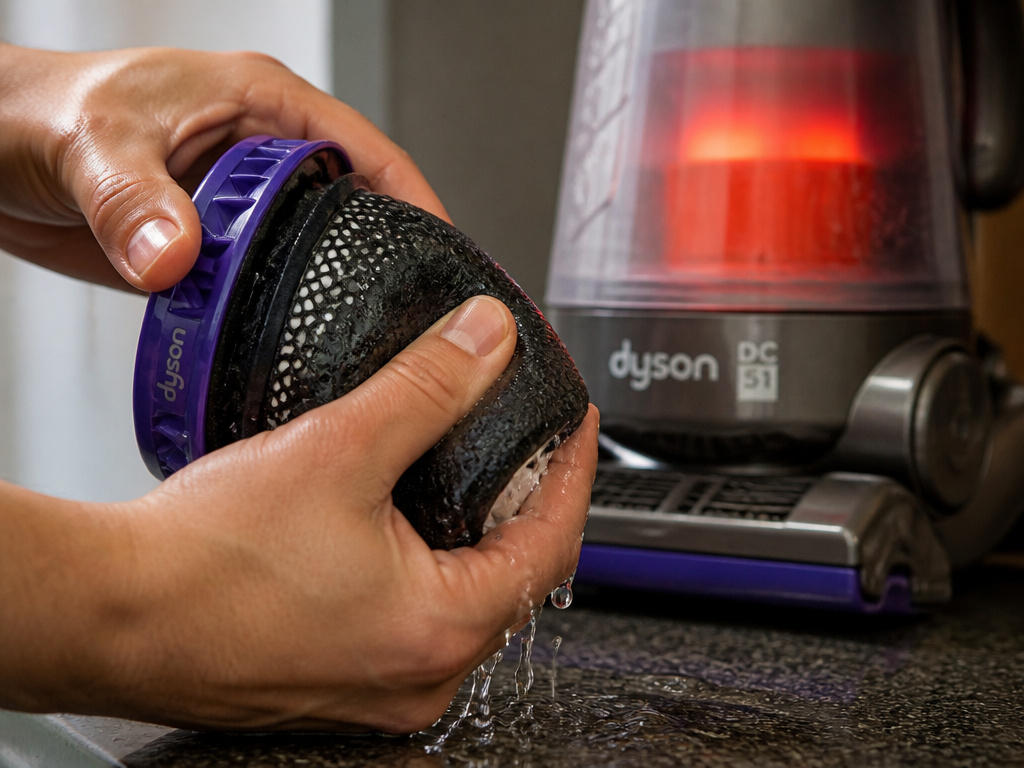 Think of Filter A and Filter B as the vacuum’s lungs. Their job is to catch microscopic dust before it reaches the motor. As they load up with fine powder, the air has to fight to get through.
Common mistake: Washing filters and putting them back in damp. The foam holds water, which blocks airflow. The motor strains, overheats, and you’re back to square one with a new “mystery” blockage.
The Dyson DC51 manual directs you to wash filters monthly. For homes with pets or high dust, make it every three weeks. This isn’t about cleanliness, it’s about maintaining the air volume the motor needs to stay cool.
If your Dyson upright vacuum has a history of frequent overheating, the first question isn’t “where’s the clog?” It’s “when did you last wash and fully dry both filters?”
When Overheating Points to a Bigger Problem
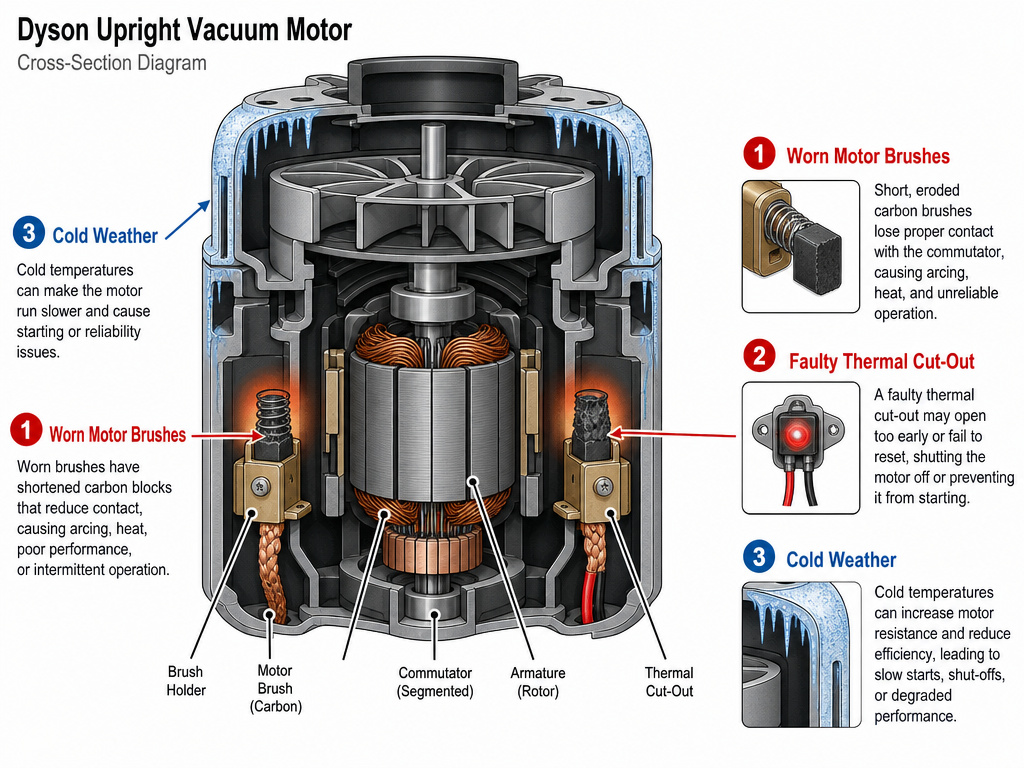 Sometimes the blockage isn’t physical. Other issues can mimic the symptoms and trip the thermal cut-out.
- Worn Motor Brushes: In older models (DC14, DC07), the carbon brushes that deliver power to the motor armature wear down over years. When they get too short, contact becomes erratic, causing high electrical resistance and heat inside the motor itself. This isn’t a user-serviceable part.
- Faulty Thermal Cut-Out: Rare, but possible. If the unit cuts out almost immediately every time, even with all airways confirmed clear and dry filters, the cut-out itself may be failing and triggering too early. This requires a motor or cut-out replacement.
- Cold Weather Operation: The manuals for the UP20, UP19, and UP13 state the machine should not be used or stored below 3°C (37.4°F). Cold plastic can become brittle and contract, potentially jamming moving parts or altering clearances just enough to strain the motor.
If you’ve performed a full clearance check and the problem persists, your next step is the Dyson Helpline. Have your model and serial number ready. For older models now out of warranty, a vacuum repair specialist is often more cost-effective than Dyson’s flat-rate service fee.
Prevention Beats the Cut-Out
A few habits will keep the thermal cut-out from ever engaging.
- Pre-Vacuum Visual Sweep: Pick up loose strings, hair ties, and paper scraps before you start.
- Mind the Temperature: Don’t store or use the vacuum in a cold garage. If you must, let it sit at room temperature for an hour before turning it on.
- Filter Schedule: Set a calendar reminder to wash Filter A and Filter B every month. Dry for 24 hours.
- Listen for the Ratchet: That loud noise from the cleaner head is a warning, not normal operation. Stop immediately and clear the brushbar.
The goal is to keep air moving freely. A Dyson motor is powerful, but it’s designed to move air, not fight against a sealed system. Every overheating event is it telling you it’s fighting that exact battle.
Frequently Asked Questions
Why does my Dyson vacuum keep overheating every time I use it?
Repeated overheating cycle almost always means you haven’t found the primary blockage. The most likely culprit is a clogged and still-damp filter. Ensure both Filter A and Filter B are bone dry (24-hour air dry). The second most common cause is a partially cleared brushbar; a single thread still binding the axle can be enough.
Is a Dyson vacuum overheating dangerous?
The thermal cut-out exists specifically to make it not dangerous. It prevents the motor from reaching temperatures that could melt components or pose a fire risk. The danger is in ignoring the symptom. Continuously resetting a hot vacuum without fixing the blockage can eventually cause the cut-out to fail, allowing the motor to overheat to the point of permanent damage.
How long does it take for a Dyson vacuum to cool down and reset?
For most upright models (UP20, DC41, UP30), the manual specifies 1-2 hours. For older models like the DC14 and DC07, the guidance is at least 60 minutes. The variance accounts for different motor housing designs and insulation. When in doubt, wait the full two hours in a cool room.
Will Dyson fix an overheating vacuum under warranty?
No. Dyson’s 5-year warranty covers defects in materials and workmanship. The manuals for the DC41, DC14, and others explicitly state: “Clearing blockages is not covered by your guarantee.” If the overheating is caused by a verified motor defect (not a blockage), that would be covered. But the first step a technician will take is the same clearance check outlined above, and you’ll be billed for it if the cause is a clog.
My Dyson is clear and the filters are dry, but it still overheats. What now?
You’ve ruled out the common causes. The next possibilities are a failing motor (often accompanied by a burning smell or unusual noise) or a faulty thermal cut-out switch. At this point, professional diagnosis is needed. Contact the Dyson Helpline or a local repair shop that specializes in Dyson vacuum repair.
The Bottom Line
A Dyson upright vacuum overheating is a traffic light, not a breakdown. The thermal cut-out is flashing red, telling you airflow has stopped. The fix is almost always mechanical, not magical: find the clog, clear it, and keep the filters clean.
Start with the brushbar, move to the hose, and finish with the filters. That sequence solves ninety percent of cases. The other ten percent require a professional to look inside the motor housing, a job the warranty was designed to cover, provided you haven’t simply been fighting the same clog for months.