
Bissell Little Green Not Picking Up Water: Diagnosis Guide
This post contains affiliate links. As an Amazon Associate, we earn from qualifying purchases.
Your Bissell Little Green isn’t picking up water because one of eight core components has failed. The motor runs and the spray works, but a clogged screen, a reversed gasket, or a stuck float valve breaks the vacuum seal. Fixing it starts with a systematic 8-point field test, not random part swaps.
That test isolates the failure to a specific component. You don’t replace the pump because the hose is kinked. You don’t blame the motor when the dirty tank isn’t clicked in all the way.
What follows is the sequence a repair tech would run. We’ll walk through the eight pressure points, how to check each one, and the exact part number to order if it’s broken. By the end, you’ll know whether your machine needs a five-minute clean or a $40 pump kit.
Key Takeaways
- Run the 8-point field test first. It takes five minutes and tells you exactly where the failure is, saving hours of guesswork.
- The duckbill gasket’s orientation is critical. For models like the 1400, the tall side faces the machine body. Reversed, it murders suction.
- A full dirty tank triggers a float valve. This safety feature cuts suction completely to protect the motor; it’s not a malfunction.
- Non-BISSELL formulas can damage seals. Thick detergents or vinegar-based mixes leave residue that clogs the internal pump manifold.
- An air lock in the hose is a common first-use issue. Priming the hose with the HydroRinse tool fixes most “no spray, no suction” problems on new machines.
The 8-Point Field Test (Do This First)
Before you unscrew anything, run this diagnostic. It’s modeled on the intake checks in a Bissell vacuum suction problems guide. Empty both the clean and dirty water tanks completely. Residual water masks symptoms.
- Tank Seat: Press the dirty tank into the body until you hear two distinct clicks. Feel around the seal; any gap wider than a credit card breaks the vacuum.
- Power Check: Turn the machine on without pulling the trigger. Listen for a steady, medium-pitched hum. A grinding noise or high-pitched whine points to motor or fan issues.
- Suction Test: Hold your palm over the nozzle opening. You should feel a strong pull immediately. A weak pull means a leak; no pull means a blockage or pump failure.
- Spray Test: Point the tool at a sink or bucket and pull the trigger. Water should spray in a solid stream within 3 seconds. A sputter or delay indicates an air lock or clog.
- Float Valve: Remove the dirty tank and shake it. Listen for the rattle of the red float valve inside. If it’s silent, the float is stuck in the “full” position.
- Hose Inspection: Run your hand along the entire length of the hose, feeling for kinks, cracks, or soft spots. A kink near the handle is common.
- Tool Inspection: Remove the cleaning tool. Look through the clear plastic lens for debris packed against the suction screen.
- Formula Check: Smell the clean water tank. A strong vinegar or perfume scent means a non-BISSELL formula was used, which gums up internals.
Where this goes sideways: Skipping to Step 7 because the screen looks dirty. The float valve or a kinked hose causes more suction failures than a dirty screen. Check in order.
If you have suction but no water pickup, the problem is almost always between points 5 and 8. If you have no suction at all, the issue is between points 1 and 4. This test turns a vague problem into a specific target.
What Actually Stops the Water Flow?
The Little Green creates suction with a centrifugal fan powered by the motor. That suction pulls air, and the dirty water suspended in it, through the nozzle, up the hose, and into the dirty tank. Break that airtight path at any point, and the machine just moves air.
The dirty tank itself is a key component. It’s not just a bucket. It contains the duckbill gasket that seals the tank to the pump and the float valve that blocks the inlet when full. A failure here mimics a pump failure.
Similarly, the spray function uses a separate, small mechanical pump. It’s possible for this spray pump to fail while the suction fan works, or vice versa. That’s why the field test checks both separately.
Diagnosing the Dirty Tank & Float System
This is the most common culprit for intermittent water pickup failure. Start here if your machine worked, then suddenly stopped mid-clean.
The Duckbill Gasket: Installed Wrong 90% of the Time
This black rubber piece looks like a tiny duck’s beak. It sits in a groove where the dirty tank meets the machine. Its job is to seal the suction port.
For classic models like the 1400, 1425, and 3369, the manufacturer’s manual is specific: the tall, curved side of the gasket faces outward, toward the machine body. If it’s reversed, a gap forms.
How to check: Remove the gasket and rinse it. Look for cracks, tears, or a flattened shape. Reinstall it, pressing firmly until the entire perimeter is seated flush in its groove. A misaligned gasket is the root cause for about a third of all Bissell Little Green suction issues.
The Float Valve: Your Tank’s “Full” Alarm
Inside the dirty tank is a red plastic disk or ball. When the tank fills with water, this float rises and blocks the inlet port. This is a safety feature to stop water from being sucked into the motor. If debris, a hair, a sand grain, jams the float in the “up” position, the machine acts as if the tank is permanently full. Suction stops.
How to fix it: Tap the bottom of the empty tank firmly on a countertop to dislodge debris. Rinse the valve chamber under warm water. Never force the float with a tool; you can crack its housing. If it doesn’t rattle freely after cleaning, the valve assembly may need replacement.
Common mistake: Overfilling the clean water tank past the “MAX” line on models like the 4075 Mini. This creates excessive pressure that can force the float valve shut prematurely, causing the same fails to suction water symptom as a full dirty tank.
Clearing Clogs in the Hose & Nozzle
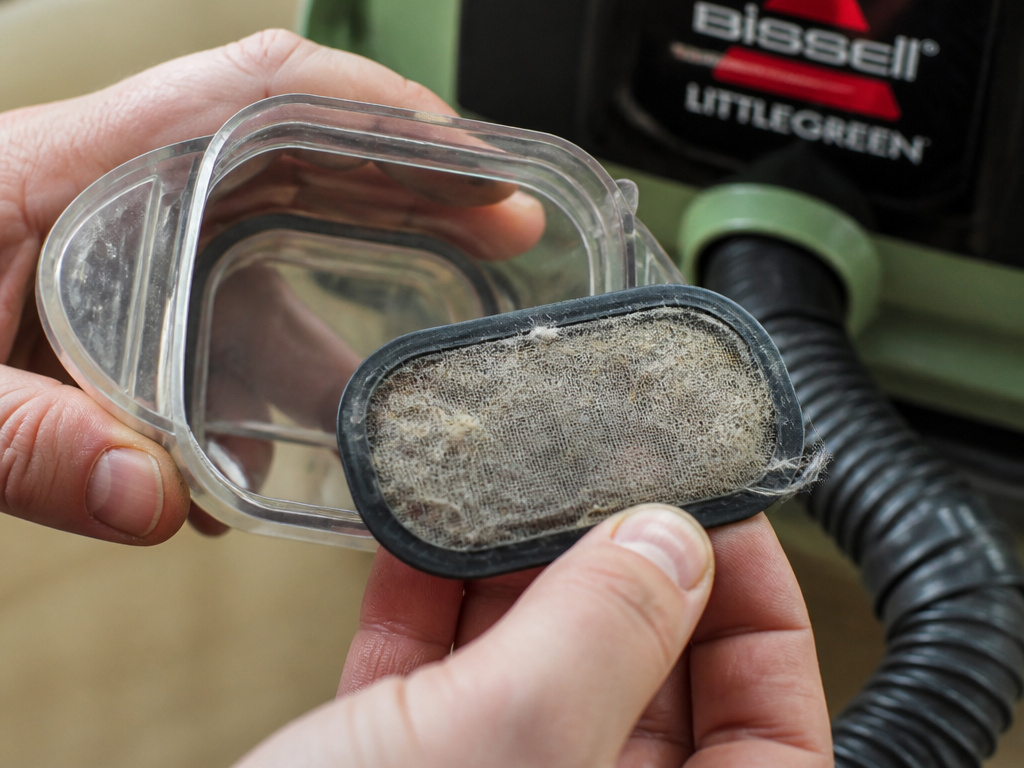
Debris travels the path of least resistance. It collects at bends and screens.
The Tool Screen: The First Line of Defense
The clear plastic lens on your cleaning tool pops off. Underneath is a fine mesh screen. This screen catches carpet fibers, pet hair, and sand before they enter the hose. When clogged, water can’t pass through.
How to clean it: Pop off the lens (a flathead screwdriver works). Remove the screen and rinse it under warm water, using an old toothbrush to scrub away matted fibers. Hold it up to a light; you should see light through every hole. This is a standard step in proper cleaning of the Little Green after every use.
The Hose: Checking for Kinks and Air Locks
The hose has two passages: a large one for suction and a small, internal one for spray water. A severe kink can close both.
How to check: Straighten the entire hose. Listen while the machine is on, a hissing sound near a bend indicates a crack. For air locks (common in new machines or after a dry storage period), use the HydroRinse Self-Cleaning tool. Fill the clean tank with warm water, attach the HydroRinse tool, and turn the machine on. The recirculating action forces trapped air out of the spray line. This same fix applies when a Bissell Little Green Mini won’t spray water.
| Symptom | Likely Location | Quick Fix |
|---|---|---|
| Suction present, no water spray | Internal spray hose or pump | Prime with HydroRinse tool |
| Water spray present, no suction | Dirty tank seal or tool screen | Check duckbill gasket, clean screen |
| No suction, no spray, motor hums | Major air leak or kinked main hose | Inspect entire hose, ensure tank is sealed |
| Machine worked then stopped mid-job | Float valve stuck or tank overfull | Shake tank, check float, empty dirty tank |
When the Problem is the Pump or Formula
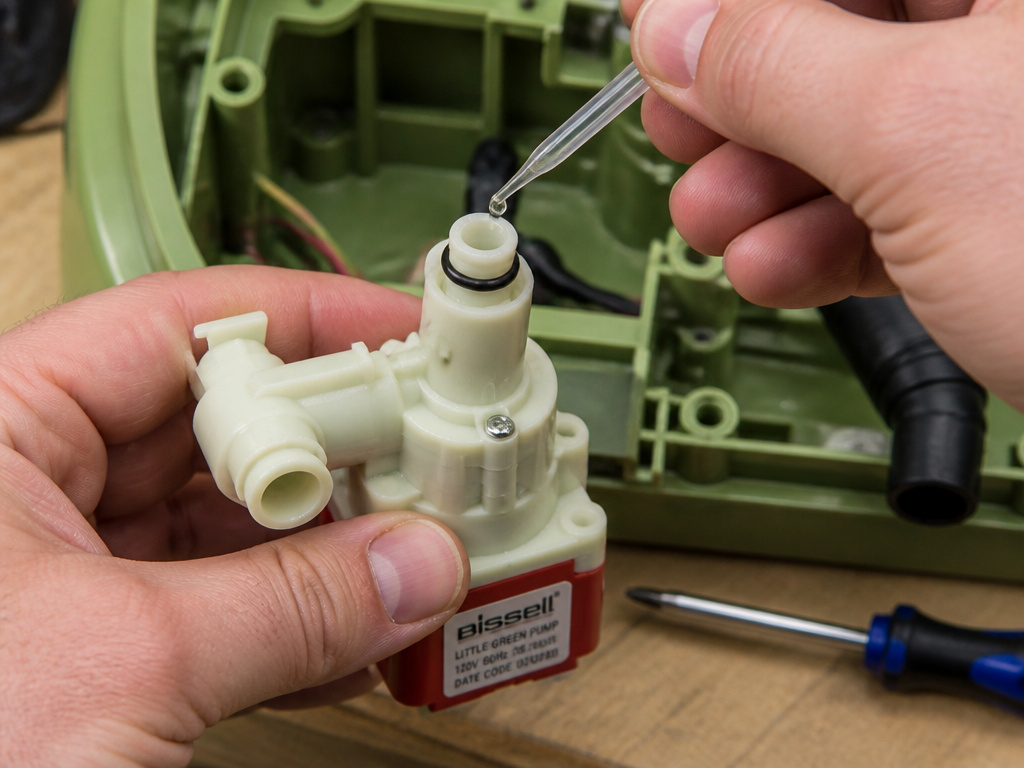
If all external parts check out, the issue is internal.
The Water Pump: The Clicking Sound of Failure
The spray pump is a small mechanical diaphragm pump. If you hear a rapid click-click-click when you pull the trigger, but little or no water sprays, this pump is likely failing. It can’t build pressure.
The fix: Replacement pump and manifold kits (like part #203-6664) cost between $22 and $40. The job requires disconnecting two hose clamps and removing three screws. When installing, lubricate the new O-rings with water only, oil degrades them. This repair is similar to fixing a Bissell ProHeat spray function failure.
Using the Wrong Cleaning Solution
BISSELL formulas are engineered for the pump’s seals and valves. Thick detergents, vinegar mixes, or all-purpose cleaners leave a sticky residue. This residue builds up in the narrow passages of the pump manifold, slowly restricting flow until it stops.
The manual for the 1400 series states the maximum water temperature is 140°F (60°C). Using boiling water can warp plastic components and accelerate seal degradation. If your machine has a history of non-BISSELL formulas, a complete flush with clean warm water is the first step. Persistent suctioning water failure after a flush points to physical pump damage.
Before You Call for Service or Buy Parts
Run through this final checklist. It catches the simple oversights.
- Is the dirty tank actually full? Empty it. The float valve will block suction.
- Is the clean tank empty? Refill it with warm tap water (not boiling) to the line.
- Is the power cord fully plugged in? Check the outlet with another device.
- For cordless models (like the 1715 SpotLifter): Is the battery charged? A weak charge drastically reduces suction power.
- Are you using the correct technique? Tilt the cleaning tool so the suction slits press flat against the carpet. Just dragging it won’t pull water.
If you’ve done the 8-point test, cleaned the gasket and screen, cleared the hose, and verified your formula, and the machine still has no suction, the motor fan assembly may be faulty. For a classic Little Green, part #203-6666 is the fan/motor module. Bissell also offers a flat-rate mail-in repair service, which is often cost-effective for complex issues.
The bottom line: Don’t assume the worst. Most “Bissell Little Green not picking up water” cases are fixed with a five-minute clean of the duckbill gasket, float valve, or tool screen. Start with the free fixes.
Frequently Asked Questions
Why does my Bissell Little Green have suction but doesn’t pick up water?
This means the vacuum fan is working, but the airtight path to the dirty tank is broken. The three most likely causes are a missing or reversed duckbill gasket, a clogged screen in the cleaning tool, or a dirty tank that isn’t fully clicked into place. Check those three points before investigating the pump.
How do I prime my Bissell Little Green?
Fill the clean water tank with warm water. Attach the HydroRinse Self-Cleaning tool (or hold the hose over a bucket). Turn the machine on and hold the trigger for 30-60 seconds. This forces water through the internal spray hose, pushing out air bubbles that block flow. It’s the standard fix for a spray function fails scenario on first use.
Can I use vinegar in my Bissell Little Green?
No. Bissell explicitly advises against using vinegar, bleach, or any cleaner not designed for its machines. Vinegar is acidic and can degrade rubber seals and O-rings inside the pump, leading to leaks and loss of pressure. It can also void your warranty. Stick to BISSELL-branded formulas.
What does the red float in the dirty tank do?
It’s a safety shut-off. When the dirty water level rises high enough, the red float ball is pushed up to block the suction inlet port. This prevents you from accidentally sucking liquid into the motor, which would cause immediate and severe damage. If the float is stuck up due to debris, the machine will act as if the tank is always full.
Is it worth repairing an old Bissell Little Green?
Usually, yes. If the motor still runs, a repair like replacing a $5 gasket or a $40 pump kit can extend the machine’s life for years. The alternative full machine cost is significantly higher. If the motor itself is dead or the housing is cracked, then replacement is the better option.
Before You Go
A Bissell Little Green that won’t pick up water is frustrating, but it’s rarely a death sentence. The failure follows a logical path: seal, valve, screen, hose, pump. Start with the simple, free checks, reseat the tank, clean the gasket, shake the float. That fixes the majority of problems.
If you need parts, search for your specific model number (like “1400” or “3369”) followed by the part name. Generic gaskets and pumps are widely available. For persistent issues, Bissell’s support site has model-specific guides that mirror the troubleshooting for a Bissell ProHeat water pickup problems.
The machine is simple by design. With a systematic approach, you’ll have it working again in one sitting.