
Bissell PowerClean Pro Not Picking Up Water – Air Leak Fixes
This post contains affiliate links. As an Amazon Associate, we earn from qualifying purchases.
A Bissell PowerClean Pro not picking up water is almost always an air leak. The vacuum creates suction by moving air; if air gets in through a cracked hose, a loose tank lid, or a wet filter, the pressure equalizes and the machine can’t pull liquid. Start by verifying the tank lid clicks shut and the pre-motor filter is bone dry.
That seal is the whole game. A wet-dry vac is a pump, and every pump needs an airtight path from the intake to the exhaust. A single hairline crack in the hose or a filter that’s 90% dry is enough to break that path. The machine will sound like it’s working, but it won’t move water.
What follows is a five-point seal check, ordered from most to least common. It covers the tank, the filters, the hose, and two electrical gremlins that mimic suction loss. By the last step, you’ll know whether you need a five-minute fix or a replacement part.
Key Takeaways
- The tank lid must click into place on all sides. If the top separates from the bottom when you lift the handle, the seal is broken and suction is zero.
- The pre-motor filter must be completely dry, 24 hours of air-drying after washing. A damp filter blocks airflow and kills suction within seconds.
- A cracked or kinked hose is a direct air leak. Inspect the entire length, especially where it connects to the machine and the wand.
- Suction power varies by mode: Turbo mode for maximum liquid pickup, Eco for extended dry vacuuming. Using Eco on a wet mess will look like a failure.
- Blockages happen past the brush roll. Check the wand, hose, and the inlet where the hose meets the dirty tank.
The 5-Step Diagnostic: Check the Seal
Follow this sequence. Each step answers one question: is the air path sealed? Skipping to step three because step one seems obvious is how you waste an hour reassembling a clean machine that still doesn’t work.
Before you start: Unplug the machine. Empty the dirty tank. Work on a flat, dry surface. You’ll be handling filters and possibly dirty water residue.
Step 1: The Tank Lid & Air Seal
This is the number one failure point. The tank lid doesn’t just cover the tank; it forms the top of the sealed vacuum chamber.
Open the lid and look at the rubber gasket that runs around its underside. Wipe it clean with a damp cloth. Any grit or pet hair stuck there will let air slip through. Now close it. You should hear and feel a distinct click on both sides. Don’t just push the center, press down on the left and right latches until they snap into place.
Common mistake: Assuming the lid is shut. If the top of the tank separates from the base when you lift the machine by its handle, the latches aren’t engaged. The seal is broken, and the machine will have no suction.
The test: After closing the lid, try to gently lift just the top section. If it comes away from the base, the latch has failed. On many PowerClean Pro models, the latch mechanism itself can crack. If the lid won’t stay shut, you need a replacement tank or lid assembly.
Step 2: The Filter Cage & Pre-Motor Filter
If the tank is sealed, the next barrier is the filter system. This is where most “I cleaned it and now it doesn’t work” stories start.
The filter assembly has two parts: a pleated fabric filter on top of a foam filter, both housed in a plastic filter cage. This cage sits between the dirty tank and the motor.
| Filter Component | Function | What Goes Wrong |
|---|---|---|
| Pleated Filter | Catches fine dust before air reaches the motor. | Clogs with fine powder (drywall dust, baking soda). Must be replaced every 6 months. |
| Foam Filter | Provides a final barrier and dampens sound. | Degrades over time, can tear. |
| Filter Cage | Holds the filters in the correct orientation. | Misassembled—pleated filter must be on top. |
Disassemble and inspect:
- Remove the filter cage from the machine.
- Separate the pleated filter from the foam filter.
- Rinse both under lukewarm water until the water runs clear. Do not use soap or scrub the pleated filter, you’ll damage it.
- Shake off excess water and let them air dry for a full 24 hours. A hair dryer on a cool setting can speed this up, but do not apply heat.
Where this goes sideways: Reinstalling a damp filter. A wet filter blocks airflow completely. The motor strains, you get a high-pitched whine, and zero water moves. If you washed the filter yesterday and put it back in this morning, it’s probably still wet inside the pleats.
Reassembly is critical. The pleated filter goes on top of the foam filter. The filter cage’s tabs must align with the slots inside the machine. When you push it in, it should click securely. If it’s loose, air is leaking around it.
Step 3: The Hose & Inner Cyclone Path
Air leaks don’t just happen at the tank. A cracked hose is a direct pipeline for air, equalizing pressure before it ever reaches the liquid.
Detach the hose from both the machine and the wand. Straighten it out and visually inspect its entire length. Look for: * Cracks or splits, especially near the connection ends. * Pinholes or worn, thin spots. * Internal blockages. If you see debris, use a long, flexible object like a broom handle to gently push it through.
For models with a removable inner cyclone (the plastic spiral inside the dirty tank), take it out and rinse it. A clogged cyclone reduces airflow long before the filters. Let it dry completely before reinstalling.
Easy to miss: The connection points. Push the hose fittings firmly onto their ports. A loose connection here is as bad as a crack in the middle of the hose. If the fit is sloppy, the hose may need replacement.
Step 4: Power Modes & Brush Roll Blockages
The PowerClean Pro has multiple power modes that affect suction. If you’re in Eco mode (up to 40 min runtime), you’re using the lowest suction setting. For picking up water, you need Turbo mode (up to 12 min runtime). Check the mode button, in Turbo, all indicator lights usually pulse.
If the mode is correct and the seals are good, a physical blockage is next.
Check the air path in reverse:
- Remove the brush roll. Clear any wrapped hair, string, or carpet fibers.
- Look up into the suction foot. Can you see light through the opening? If not, there’s a clog in the foot itself.
- Detach the wand from the hose and the foot. Shine a flashlight through. A stuck clump of hair or a small toy can lodge here.
- Finally, check where the hose enters the dirty tank. Debris can build up at this inlet.
Step 5: Electrical Checks That Mimic Suction Loss
If the machine passes the seal test but still seems weak, the problem might not be suction at all.
- Post-Motor Filter: This is a small filter near the exhaust vent. It’s not washable. If it’s dirty, wipe it with a dry cloth or replace it. A clogged post-motor filter makes the motor work harder and sound strained.
- Battery & Mode Logic: On cordless models, a weak battery delivers weak power. The machine may run, but the motor won’t reach full RPMs, resulting in poor suction. Try a full recharge on the official charger.
Why the PowerClean Pro Loses Suction: The Air Pressure Equation
Suction isn’t magic. It’s the result of a motor fan creating low pressure inside a sealed container. Atmospheric pressure (the weight of the air around us) then pushes water into that low-pressure zone. Break the seal, and the pressure equalizes. The push stops.
A wet filter is the classic example. Water in the filter fibers blocks the tiny air passages. The motor can’t pull air through, so no low-pressure zone forms. The equation fails. This is also why a tiny hose crack is fatal, outside air rushes in through the crack, equalizing the pressure instantly. The machine sounds normal because the motor is spinning, but it’s moving air from the crack to the exhaust, not from the floor to the tank.
This principle is why checking seals is methodical. You are proving each segment of the pressure vessel is intact.
When to Look Beyond Basic Troubleshooting
 Most suction problems die at step one or two. A few require looking deeper.
The motor duct gasket screen is a mesh screen between the dirty tank and the motor housing on some models. If it’s covered in matted debris, airflow is choked. Accessing it usually requires removing the tank and a few screws, consult your model’s manual.
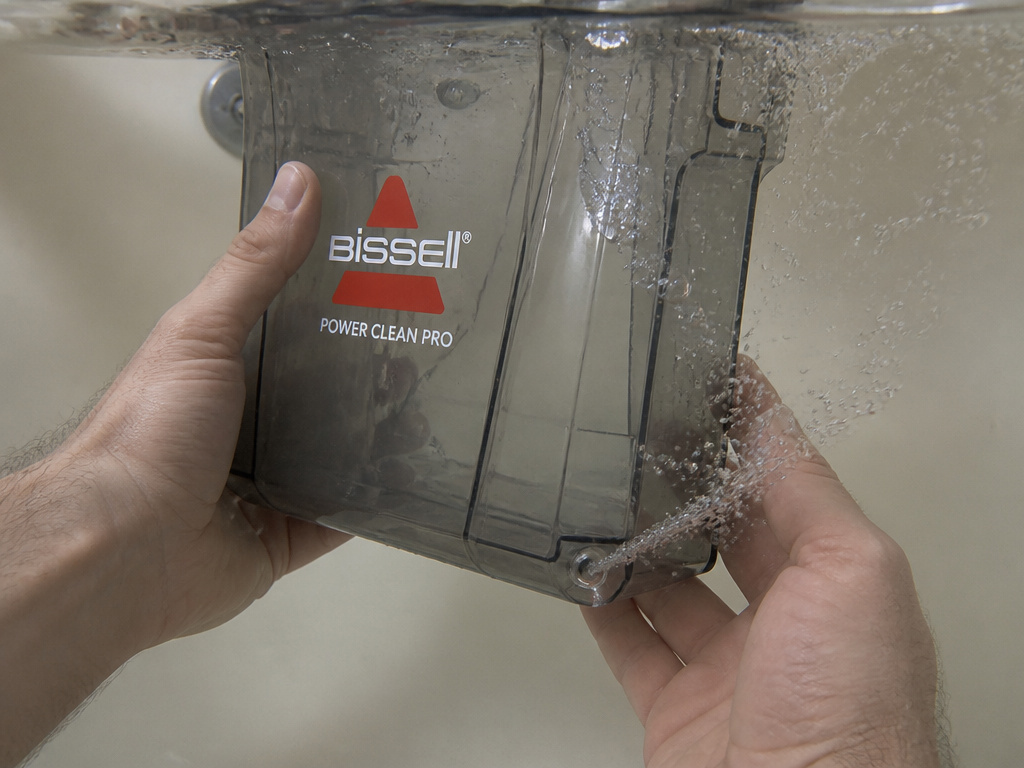
A damaged tank itself can leak. Submerge the empty tank (without the lid or electronics) in a bathtub and look for a stream of bubbles. Cracks often form near the handle mounts or bottom corners.
If you’ve done the full five-step check and the machine is still under warranty, contact Bissell. If it’s out of warranty and the motor is dead (no sound, or a burnt smell), the repair cost often approaches a new machine. For persistent issues with newer models, a Bissell ProHeat or Bissell Little Green uses a similar suction principle, and their failure modes often overlap.
Frequently Asked Questions
Why did my PowerClean Pro stop picking up water after I washed the filter?
You reinstalled a damp filter. The filter’s pores are blocked with water, not dirt. Air cannot pass through. Let the filter dry for a full 24 hours in a well-ventilated area. This is the most common fix.
Is it worth replacing the filters, or should I just clean them?
Clean them regularly, but replace the pleated pre-motor filter every six months. The foam filter can last longer unless it’s torn. A clogged filter you can’t clean fully forces the motor to work harder, which can lead to premature suction failure. Using genuine Bissell filters ensures the correct fit and filtration.
Can a full dirty tank cause no suction?
Yes, but usually reduced suction, not a total loss. The machine has a float valve or a max-fill line. If the tank is overfilled, the system shuts off suction to prevent liquid from being pulled into the motor. Empty the tank and try again.
The machine runs but sounds high-pitched and weak. What is that?
This is classic motor strain. The motor is spinning but can’t move air. The causes, in order of likelihood: a wet filter, a clogged hose or brush roll, or a severely clogged post-motor filter. It is not typically a sign of a failing motor on its own.
How do I know if my hose is cracked?
Visual inspection is first. Next, run the machine and feel along the hose with your hand. You’ll feel air being sucked in at the crack. You can also listen closely, a leak often has a faint whistling or hissing sound.
Before You Go
Start with the lid seal and the filter. Ninety percent of “no suction” cases live there. Remember the drying time, 24 hours isn’t a suggestion. If the hose is cracked, replacements are model-specific; get the right part number. For everything else, the five-step check is your map. It turns a frustrating mystery into a series of simple yes-or-no questions.