
Troubleshoot Your Deebot Vacuum Not Charging With These Steps
This post contains affiliate links. As an Amazon Associate, we earn from qualifying purchases.
When your Deebot vacuum isn’t charging, the root cause almost always fits into one of three buckets: a physical misstep (switch is off, dirty contacts), a power supply failure (faulty dock or adapter), or a fully discharged battery requiring a manual reactivation cycle outlined in the DX5G manual. Jumping to a battery replacement without checking these three is a $50 mistake.
That reactivation clause from the manual, “Place DEEBOT on the Docking Station by hand, remove after charging for 3 minutes, repeat 3 times”, is the critical pivot point. It separates a battery that’s asleep from one that’s dead. The rest of your troubleshooting flows from there: verifying the dock’s 20V output, cleaning the nickel-plated contacts weekly, and making sure a dock designed for one model isn’t frying the logic board of another.
What follows is a stripped-down flow chart in prose form. We’ll walk through the literal switch you missed, the cleaning routine most owners skip, the voltage you need to measure, and the exact point where you call Ecovacs instead of buying parts you don’t need.
Key Takeaways
- The tiny power switch on the Deebot’s underside must be ON for it to charge. The D35 model specifically needs you to toggle it OFF, dock manually, wait three hours, then turn it ON.
- A “deeply discharged” battery needs a manual wake-up: hand-place it on the dock, pull it off after exactly 3 minutes, and repeat that cycle three times before a normal charge.
- Charging docks have two parts: the station and its power adapter. The adapter for a Deebot 500 (DK18-190060H-U) outputs 19V, while a DX5G dock (CH1822) needs 20V, mixing them can cause a no-charge or a dead robot.
- Deebot batteries are not user-replaceable without soldering; attempting it voids the warranty and risks damaging the motherboard. Ecovacs classifies this as a “skilled persons” task.
- If the robot charges but dies in under 20 minutes, the problem is almost certainly the battery. If it won’t charge at all, the problem is usually the dock, adapter, or power switch.
Why Won’t My Deebot Accept a Charge?
The robot beeps, flashes a red light, or just sits dark on its dock. Before you assume the worst, run this five-point physical check. These are the culprits in about 70% of cases, and they cost nothing to fix.
First: locate the power switch. It’s a small slider on the bottom of the robot, usually near the serial number label. It must be in the ON position. If it’s already on, try the D35-specific trick: switch it OFF, place the Deebot on the dock by hand, wait three hours, then turn it back ON.
Second: inspect the dock’s power. Is the wall outlet live? Try a lamp. Is the dock’s power brick firmly plugged into both the wall and the dock itself? Look for a solid light on the dock, if it’s out, the problem is upstream.
Third: check alignment. The robot must be seated so the charging contacts on its rear touch the dock’s pins. Even a slightly bumped dock can misalign. Reposition the dock against a wall.
Fourth: clean the contacts. The robot’s charging contacts and the dock’s pins are nickel-plated. They oxidize. Use a dry cotton swab or a pencil eraser to scrub them until they shine. Do this weekly if you run your Deebot daily.
Where this goes sideways: Owners clean the robot’s contacts but forget the pins on the dock. Oxidation builds there too, and the circuit never completes. You’ll see a red charging light blink for a few seconds then give up.
Fifth: the 3-minute reactivation. If the battery is deeply drained (the robot shows zero life), the DX5G manual prescribes a specific restart: place it on the dock by hand, let it charge for exactly 3 minutes, remove it. Repeat that two more times. Then dock it normally. This pulses the battery management system awake.
If all five points check out and the dock light is on, but the robot shows no sign of life after 15 minutes, the problem moves from “simple” to “specific.” The next section is a flowchart in paragraph form.
The 3-Minute Reactivation for a Dead Battery
A lithium-ion battery that drops below its minimum voltage threshold enters protection mode. It refuses to accept a charge to prevent a fire risk. The Deebot’s battery management system (BMS) needs a gentle nudge to re-engage.
The Ecovacs DX5G manual’s procedure is non-negotiable: 1. Ensure the dock is powered and the robot’s switch is ON. 2. Physically place the Deebot onto the docking pins. Don’t let it drive on. 3. Start a timer. After 3 minutes, pick the robot straight up off the dock. 4. Set it aside for 10 seconds. 5. Repeat steps 2 through 4 two more times (three cycles total). 6. Finally, dock it normally. A true deep discharge might need 4-6 hours to reach full capacity.
I won’t recommend this as a regular fix. It’s a recovery tactic for a robot left off the dock for months. If you find yourself doing this monthly, the battery is failing and won’t hold a charge for a full cleaning cycle.
Why three minutes? It’s long enough for the BMS to receive a stable voltage and reinitialize its internal circuits, but short enough to avoid tripping the protection again if there’s a serious cell imbalance. It’s a diagnostic step as much as a repair.
| Symptom | Likely Cause | Immediate Action |
|---|---|---|
| No lights, no sound, dead screen | Power switch OFF or deeply discharged battery | 1. Check/cycle power switch. 2. Perform 3-minute reactivation. |
| Red light blinks briefly then stops | Dirty charging contacts or misaligned dock | Clean robot contacts AND dock pins with dry cloth. |
| Dock light is OFF | Faulty wall outlet, unplugged adapter, or dead adapter | Test outlet with another device. Check adapter connections. |
| Robot sits on dock but never indicates charging | Bad dock, incorrect voltage adapter, or failed motherboard | Measure adapter output voltage. Try a known-good dock. |
Step-by-Step: From Dead to Dock
Follow this sequence. It’s designed so each step either solves the problem or eliminates a category of failure. Jumping to step 5 because step 2 seems obvious is how you replace a $15 power adapter when you needed a $2 cotton swab.
Step 1: Power Cycle the Basics.
Turn the Deebot’s underside switch OFF. Unplug the docking station’s power adapter from the wall for 60 seconds. Plug it back in. Listen for a faint transformer hum from the adapter. Turn the robot’s switch ON. Place it on the dock manually. Watch for any indicator light on the robot within 10 seconds. If nothing, proceed.
Step 2: The Adapter & Dock Check.
Your dock is just a plastic shell with metal pins. The real work happens in the power adapter (the brick on the cord). Adapters are model-specific. The Deebot 500 uses a DK18-190060H-U adapter outputting 19V. The DX5G uses a dock expecting 20V from its adapter. If you’ve mixed them, the robot might not charge, or it could fry. If you have a multimeter, set it to DC volts (20V range). Touch the probes to the inner and outer conductors of the dock’s plug (center positive). You should see 19V or 20V. No voltage means a dead adapter.
Step 3: Contact Scrub.
Power everything down. Use a pencil eraser on the robot’s two rectangular charging pads. Scrub until the metal is bright. Use a dry cotton swab dipped in a tiny bit of isopropyl alcohol to clean the dock’s spring-loaded pins. Let it dry for one minute. This isn’t a cosmetic clean; it’s restoring electrical connectivity.
Step 4: The Hard Reset.
Some models, like the D35, respond to a deeper reset. With the robot OFF the dock, press and hold the main Clean/Power button for 10-15 seconds. You might hear a beep. This clears temporary software glitches that can block charging. It’s the software equivalent of step 1.
Step 5: Isolate the Failure.
You need a known-good component. If you have a friend with a compatible Deebot, try your robot on their dock, and their robot on your dock. If your robot works on their dock, your dock is bad. If their robot fails on your dock, your dock is definitely bad. If both robots fail on your dock, but your robot works on theirs, your dock is bad and your robot is fine. This test is conclusive.
Common mistake: Swapping a dock from a different model series. A CH1822 dock (for older models) might physically connect to an N10 Plus, but the N10 Plus requires the CH1918 dock with different communication protocols. The robot will sit there, confused.
If you’ve reached step 5 and identified a bad dock or adapter, your next move is replacement. Order the exact model from Ecovacs or a reputable parts supplier. For battery issues, the path is different.
When the Problem Is Actually the Battery
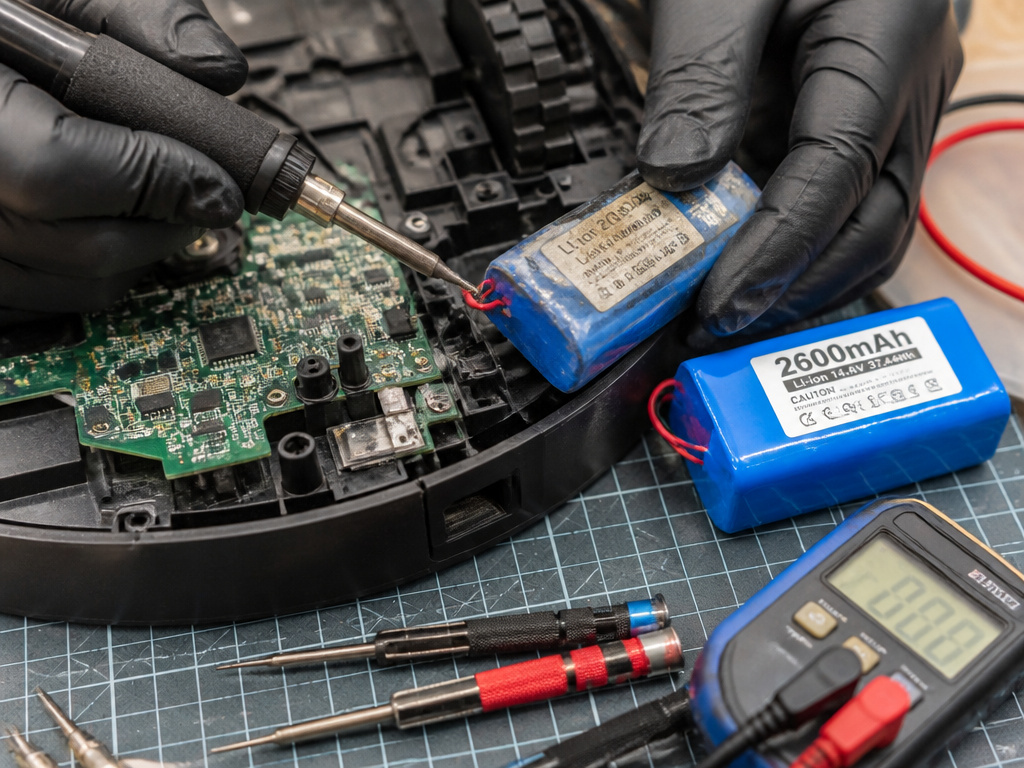 A Deebot that charges but dies abnormally fast, say, under 20 minutes on a standard floor, has a failing battery. The 2600 mAh lithium-ion pack degrades with every cycle. Heat from continuous use or storage in a hot garage accelerates this.
How to confirm it’s the battery:
- Let the Deebot run until it dies and auto-returns to the dock (or manually dock it when the low battery alert sounds).
- Time how long it takes to reach a full charge (solid green light). A healthy battery takes 3 to 5 hours.
- Start a cleaning cycle immediately. Use a stopwatch.
- If it quits and docks for a recharge in less than 60 minutes on a basic cleaning run, the battery can’t hold capacity.
Replacing a Deebot battery isn’t like swapping AA cells. Ecovacs manuals state the battery is “replaceable by skilled persons.” This means it’s soldered to the motherboard. The iFixit community has guides for specific models, like the D35, but it involves disassembly, desoldering, and resoldering new cells. One wrong move and you short the motherboard.
Your options are: * Official Service: Contact Ecovacs support. This preserves any remaining warranty. * Third-Party Repair Shop: Find a reputable electronics repair service experienced with robot vacuums. * DIY (Advanced Only): Follow a detailed guide like the Deebot D35 Battery Replacement Guide on iFixit. You’ll need tools, the correct battery (search by your model’s FCC ID), and confidence with a soldering iron.
For most owners, the soldering requirement makes a professional repair the practical choice. The cost should be weighed against the age and overall condition of the Deebot vacuums. If the robot is older and also has weak suction or a faulty wheel, a new Ecovacs Deebot might be the better long-term investment.
Contact Cleanliness & Long-Term Storage
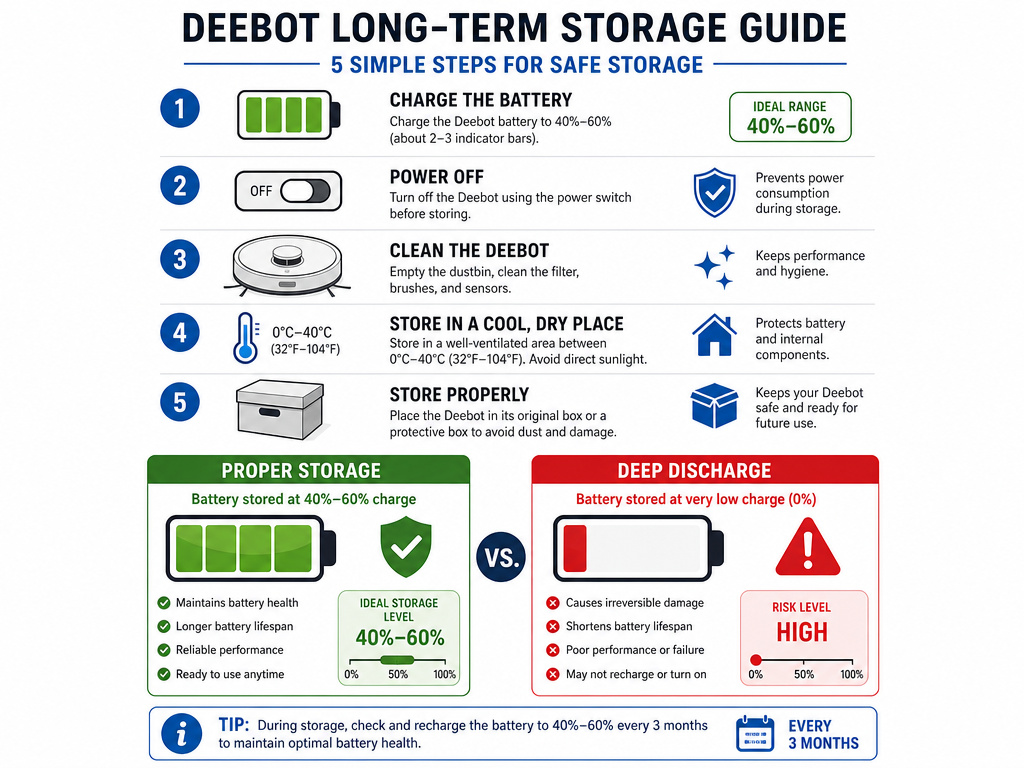 Weekly contact maintenance prevents most charging issues. The nickel plating wears thin over time, exposing the underlying copper which oxidizes faster. Once a week, during bin emptying, wipe the contacts.
Long-term storage (a month or more) requires a specific routine: 1. Fully charge the Deebot. 2. Turn the power switch OFF. 3. Unplug the docking station. 4. Store the robot in a cool, dry place. 5. Every 1.5 months, plug in the dock, turn the robot ON, and let it charge to full before switching it OFF again.
This keeps the battery from self-discharging into a deep-discharge state that requires reactivation. Storing it on a dead dock guarantees you’ll need the 3-minute wake-up procedure when you finally use it again.
Troubleshooting Other Robot Vacuum Charging Issues
The principles here apply broadly. A Shark robot vacuum not charging often suffers from the same dock-contact oxidation. Similarly, diagnosing a Dyson stick vacuum not charging starts with verifying the voltage output of its wall adapter. The common thread is isolating the faulty component: battery, charger, or internal electronics.
If your problem is rapid power loss after a full charge, a Dyson vacuum not holding a charge, the diagnosis shifts to battery age and health, similar to the Deebot battery section above. For other brands, like an Ionvac cordless vacuum not charging or a Hoover vacuum battery not working, always download the official manual first. The manufacturer’s reset sequence or required voltage might differ.
Frequently Asked Questions
Why does my Deebot charge for a few minutes then stop?
This is classic dirty contact behavior. The connection is just good enough to start the charging handshake, but the voltage sags under load due to resistance from oxidation, and the system errors out. Clean both the robot’s pads and the dock’s pins thoroughly.
Can I use a different brand’s charging dock?
No. The physical pin layout, voltage, and communication protocol are proprietary. Using a Shark robot charger on a Deebot won’t work and could damage both units. Stick to the dock that came with your model.
How long should a Deebot battery last?
With normal use (a few cycles per week), expect 2-3 years before noticeable runtime decline. Heavy daily use or exposure to heat can shorten that to 18 months. A battery that dies in under an hour after 2 years is due for replacement.
My dock has power but the robot won’t align. What now?
Check for debris blocking the dock’s infrared sensors or the robot’s corresponding receivers. Also, ensure the dock is on a level, hard surface. Carpet can tilt it slightly, causing misalignment. Repositioning the dock often solves this.
Is there a way to test the dock without a multimeter?
Without tools, your best test is substitution. Try your robot on a known-good dock of the exact same model. If it charges, your original dock is faulty. This is the most reliable consumer-level test.
Before You Go
Start with the physical: the switch, the plug, the alignment. Move to the chemical: scrub those contacts until they shine. If the battery is dead, not just sleepy, follow the 3-minute manual reactivation to the letter, three cycles, no shortcuts. Only after exhausting these free fixes should you move to measuring voltage or hunting for a replacement dock.
Remember, a charging dock is a system: the wall outlet, the adapter, the dock body, and the pins. A fault in any one link breaks the chain. Isolate the link before you buy a new part. And if it is the battery, know that opening the chassis and soldering is the real job, call a pro unless you have the guides, tools, and steady hands.