
iHome Vacuum Won’t Turn On | 5 Checks That Fix 90% of Cases
This post contains affiliate links. As an Amazon Associate, we earn from qualifying purchases.
An iHome vacuum won’t turn on because of one of five issues: a dead battery, an incorrect charging setup, a system error signaled by flashing lights, a blocked infrared sensor on robot models, or a need for a factory reset. Cordless stick vacs like the iHSV1 require a full 4-hour charge first; robot vacs like the Nova S1 need a 5-hour initial charge on their specific base.
That list is your starting point. It’s not a mystery, it’s a diagnostic sequence. Every one of those failure points has a specific, documented fix.
What follows is a walk through each of those five problems, in the order you should check them. You’ll learn how to read the vacuum’s own lights, where to find the hidden reset button on your model, and the one mistake with robot docks that stops a $400 machine cold. By the end, you’ll either have a running vacuum or a clear next step for service.
Key Takeaways
- The iHome iHSV1 stick vacuum needs a full 4-hour initial charge (per its 2024 manual), and its LEDs will show four solid lights when ready, anything less means it’s in standby mode and won’t power on.
- For iHome Nova or Luna robot vacuums, the charging base must be plugged directly into a wall outlet, not a power strip, GFCI outlet, or switched outlet, or the robot will never achieve a full charge.
- A flashing red power button on a Nova or Luna robot is a system error, not a dead battery. Check the “Device Notifications” bell icon in the iHome Clean app for the specific maintenance alert.
- Always clean the infrared sensor strip on the front of a robot vacuum if it won’t dock or turn on; a single smudge blocks the homing signal.
- The master reset for a frozen iHome robot involves holding the power button for 5–7 seconds to reboot, then performing a full “Remove/Unbind device” in the app’s settings, this clears software glitches that mimic a hardware failure.
The First Five-Minute Checklist
Before you dive into model-specific quirks, run through this universal list. These four checks solve the majority of “won’t turn on” reports for any iHome cordless model, from the stick vacs to the robots.
- Is it actually charged? The most common culprit is a depleted battery. For a stick vacuum, plug it into its wall charger or dock and wait. The iHome iHSV1 manual states the battery may require up to 4 hours for a full charge from empty. For a robot like the Nova S1, the official FAQ mandates a 5-hour charge prior to first use. Don’t trust the “it’s been plugged in” feeling, trust the indicator lights.
- Is it off the charger? This sounds backwards, but it’s critical. According to the iHSV1 manual, “While charging, the vacuum enters standby mode. Remove from charging to operate.” If your vacuum is seated on its dock, the circuit that lets you press the power button might be disabled. Lift it off the charging contacts and try the button again.
- Are the charging contacts clean? Look at the metal pins on the vacuum and the dock. Dust, pet hair, or corrosion can block the connection. A vacuum that seems to be charging (lights on) might only be receiving a trickle, not enough to boot. Wipe the contacts with a dry cloth.
- Is the outlet live? Plug a lamp or phone charger into the same outlet your iHome dock or charger uses. If the lamp doesn’t turn on, you’ve found the problem. Try a different outlet, and check your home’s circuit breaker.
Where this goes sideways: Assuming a robot vacuum’s dock is correctly powered. The iHome Nova Pro FAQ explicitly warns not to plug the charging base into outlets tied to a light switch, GFCI switch, or power strip. The dock needs a constant, clean power feed. Plugging it into a switched outlet means it loses power when you turn the lights off, and the robot never finishes its charge cycle.
If all four of these basics check out, your problem is model-specific. The next step depends on what type of iHome vacuum you own.
Stick Vacuum Specifics: iHSV1 and SV6 Models
IHome stick vacuums like the iHSV1 Cordless Multi-Use and the SV6 have simpler electronics than robots. Their failure modes are usually physical: the battery, the charger, or the button itself.
The iHSV1 has a clear charging language. Its owner’s manual details the LED system: “Charging status LEDs are located on top of the vacuum. Four LEDs will remain lit solid when fully charged.” If you see fewer than four solid lights, it’s not ready. If you see no lights at all when docked, the dock isn’t getting power or the contacts aren’t aligned. The manual recommends mounting the dock so the vacuum doesn’t touch the floor, ensuring the contacts seat properly.
The SV6 and similar models have a documented 40-minute runtime and a 4-hour charge time. If your vacuum runs for 2 minutes and dies, that’s a battery problem. If it won’t turn on after a full charge, the issue could be the battery management circuit.
Here’s a quick diagnostic flow for these models:
| Symptom | Likely Cause | Immediate Action |
|---|---|---|
| No lights when placed on charger | Dead outlet / faulty charger | Test outlet with another device. Try a different charger cable if possible. |
| Lights show charging, but vacuum won’t turn on | Vacuum is in standby mode on charger | Remove vacuum from the charger, then press the power button. |
| Turns on for a second then dies | Failed battery | After confirming a full charge, the battery likely needs replacement. |
| Power button feels mushy/unresponsive | Mechanical button failure | Contact iHome support; this requires internal repair. |
For a Bissell PowerClean Pro won’t turn on, the process is similar, check the charger, the battery contacts, and the thermal fuse. But iHome models lack that fuse, so your diagnosis is narrower.
The bottom line for stick vacs: Charge fully off the dock, inspect the contacts, and believe the LED indicators. If it still won’t power on, the battery is the prime suspect.
Robot Vacuum Hurdles: Nova S1, Luna Pro, and Auto-Dock Models
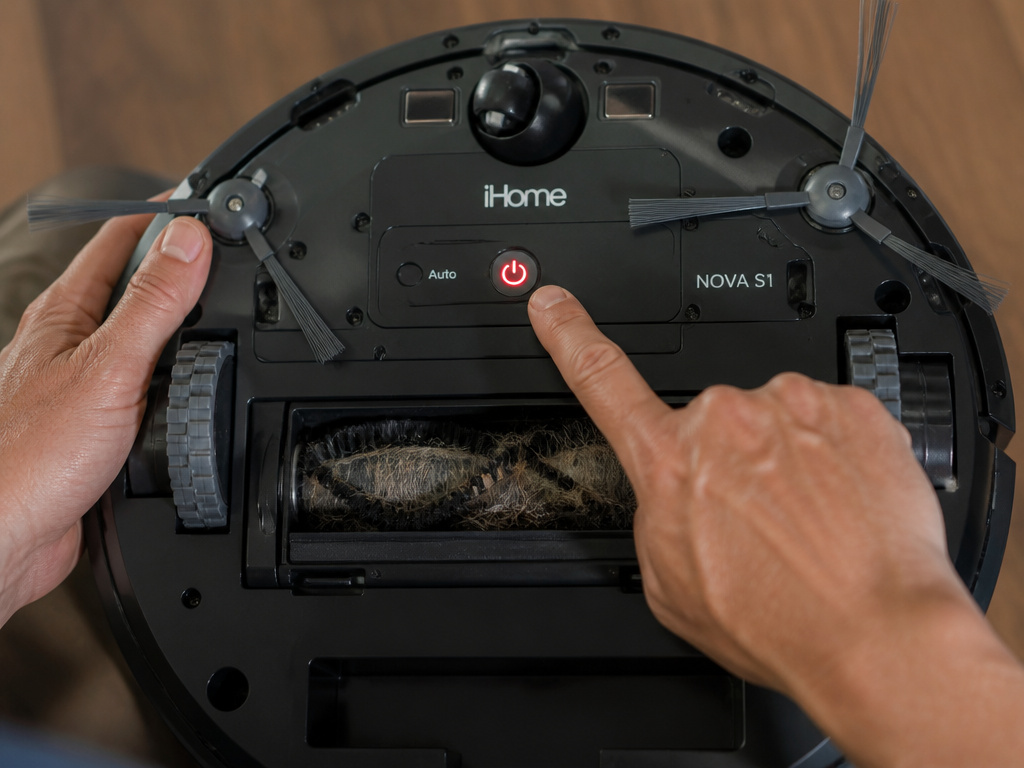
When an iHome robot vacuum won’t turn on, the problem is rarely just the robot. It’s the ecosystem, the dock, the app, the sensors, and the software working together. A failure in any link breaks the chain.
The first start is a ritual. For the Nova S1 and Luna Pro, the official procedure is non-negotiable. You must press and hold the power button for about 5 seconds until the display lights up. A quick tap won’t do it. Then, you place the robot 3 to 5 feet in front of its Auto Empty Charging Base and press the Home button. The display flashes green when docking, then turns solid green when fully charged. Skipping any part of this, especially the 5-hour initial charge, means the robot may not have the software map or battery calibration to start.
A robot vacuum stuck on its dock is not necessarily charging. The infrared homing signal can be blocked by a stray sock, a dark throw rug, or even bright sunlight hitting the sensor.
Dock placement is a science. The Luna Pro manual is explicit: “Ensure that there is a clear space in front and both sides so that your AUTOVAC can return to Base.” It also warns against placing the base on the edge of carpet, which can create a small cliff the robot can’t climb. The dock must be on a hard, level surface with the included parking plate.
When the Power Button Flashes Red
This is your robot crying for help in a specific way. A flashing red power button on a Nova or Luna model is a system error. It’s not a suggestion; it’s a code.
Here’s what to do, straight from the iHome Nova S1 FAQ: 1. Open the iHome Clean app. 2. Tap on your robot’s icon. 3. Tap the “Device Notifications” icon (it looks like a bell) in the top-right corner. 4. Read the error message.
Nine times out of ten, the error is maintenance-related: “Clean main brush,” “Empty dustbin,” “Check side brush,” “Clean filter.” The robot has shut itself down to prevent damage. It’s the equivalent of a Dyson vacuum loses power when its filter is clogged, a protective measure.
The fix is usually physical. Remove the robot from the dock, turn it over, and clear any hair or debris wrapped around the main brush roller. Empty the dustbin and tap out the HEPA filter. Reinstall everything securely. The error should clear, and after a reboot (hold power for 5-7 seconds), the robot should power on normally.
The iHome Factory Reset That Revives a Frozen Robot
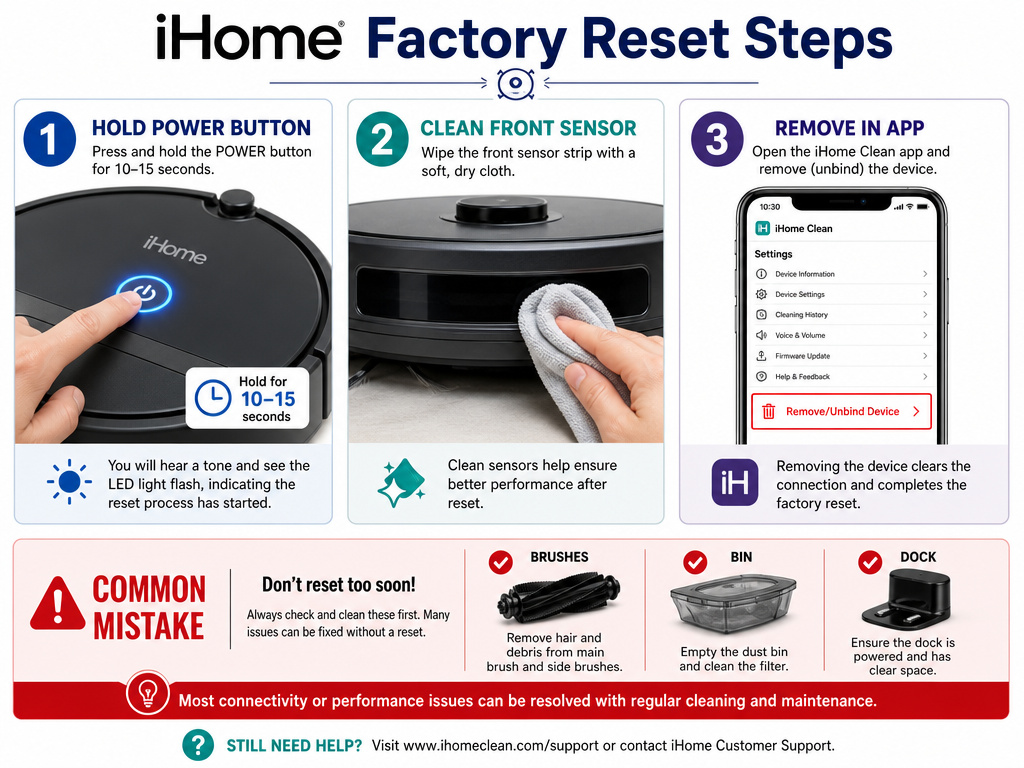
Sometimes, the software gets stuck. The robot might be charged, sensors clean, and brushes clear, but it still won’t respond to the button or the app. This is when you need a reset, not just a reboot, but a full factory reset.
This procedure, documented in the Nova Pro FAQ, applies to most iHome robot models:
- Reboot: Press and hold the Power button for 5 to 7 seconds until the robot turns off. Wait a few seconds, then press and hold again for 5-7 seconds to turn it back on. This is a soft reset.
- Sensor Clean: Wipe the infrared sensor strip on the front of the robot with a soft, dry cloth. This strip is how it sees the dock’s homing beacon.
- Factory Reset (if needed):
- Open the iHome Clean app.
- Tap on your robot.
- Tap the gear icon (Settings).
- Tap “Device settings.”
- Tap “Remove/Unbind device.”
- Go through the setup process again, as if the robot were new.
This last step clears corrupted maps, bad Wi-Fi handshakes, and firmware glitches. It’s the same nuclear option you’d use for a Roomba battery won’t charge issue that stems from software, not hardware.
Common mistake: Performing a factory reset before checking the basic physical causes. Always clean the brushes, empty the bin, and verify dock power first. The reset is for persistent, unexplained lock-ups.
Power and Charging Faults Beyond the Battery
You’ve checked the battery. You’ve done the reset. The robot still acts dead. Now you look upstream, at the power delivery itself.
The wall outlet is a silent killer. A faulty outlet can provide enough power to light the dock’s indicator but not enough to sustain a charge. Use a voltage tester or plug in a known-good device. Also, check your home’s circuit breaker. A tripped breaker on that circuit can mimic a dead vacuum.
The charging contacts are a point of failure. Over time, the metal contacts on the robot’s belly and the dock can oxidize or get coated in grime. This increases resistance, turning energy into heat instead of charge. Clean both sets of contacts with a cotton swab dipped in a tiny amount of isopropyl alcohol. Let them dry completely before re-docking.
The charger itself can fail. While less common, the AC adapter or the dock’s internal power supply can die. Symptoms include no lights on the dock, or the dock’s light being on but the robot never achieving a solid green “charged” state. If you have a multimeter, you can check the output voltage of the adapter. Otherwise, this is a point where contacting iHome support is your best bet.
This kind of electrical diagnosis is the same for any modern cordless appliance. Whether you’re fixing an Ionvac vacuum won’t turn on or troubleshooting a Dyson stick vacuum battery and blockages, the principle is identical: follow the power from the wall to the battery.
Frequently Asked Questions
Why won’t my iHome vacuum turn on even after charging all night?
This usually means the vacuum isn’t actually charging. The most common causes are a dead wall outlet, a faulty charging cable or dock, dirty charging contacts, or the vacuum being left on the charger (which puts some models in standby mode). First, verify the outlet works with another device. Then, clean the metal contacts on both the vacuum and the dock. Finally, try charging the vacuum directly via a cable instead of the dock, if your model supports it.
What does a solid red light mean on my iHome vacuum?
Solid red light typically indicates that the vacuum is charging. On many iHome models, the light will turn green or off once the battery is fully charged. If the light stays solid red for more than the stated charge time (e.g., 4 hours for the iHSV1, 5 hours for Nova robots), there’s likely a problem with the battery or the charging circuit. Consult your model’s manual for the specific light pattern definitions.
How do I manually reset my iHome robot vacuum?
For iHome Nova and Luna robots, a manual reset involves pressing and holding the physical Power button on the robot for 5-7 seconds until it turns off. Wait a moment, then press and hold the button again for 5-7 seconds to turn it back on. This reboots the system. For a more thorough factory reset, you must use the iHome Clean app to “Remove/Unbind” the device and then re-add it.
Can a dirty filter stop my iHome vacuum from turning on?
Yes, absolutely. On robot models with auto-empty bases, a severely clogged filter or full dustbin can trigger a system error that prevents the vacuum from starting a new cycle. The machine detects excessive strain on the motor and shuts down to protect itself. The error will often display as a flashing red power button or an alert in the iHome Clean app. Regular maintenance is not just for performance; it’s for function.
My iHome vacuum turns on but then immediately shuts off. What’s wrong?
This is a classic sign of a bad or deeply discharged battery. The battery has enough charge to boot the electronics but not enough to run the motor. It can also happen if there is a major blockage in the air path (like a sock stuck in the hose of a stick vac) causing the motor to overheat and shut down. First, check for and clear any blockages. If the problem persists, the battery likely needs replacement.
Before You Go
Getting an iHome vacuum to turn on is almost always a process of elimination. Start with the simple, free fixes: verify the outlet, clean the contacts, ensure a full charge off the dock, and clear any debris. For robots, the error codes in the app are your best guide, they’re specific where the flashing lights are vague.
If the basic checklist and a factory reset don’t revive it, your issue is likely a failed battery or a faulty internal component. At that point, the one-year limited warranty (for purchases from authorized retailers) is your next stop. The warranty explicitly covers defects in materials and workmanship, though it doesn’t cover normal wear and tear on batteries or filters. Have your purchase receipt ready and contact iHome customer service at 877-370-4580.
Remember, a vacuum that won’t power on is frustrating, but it’s rarely a mystery. It’s just a machine waiting for you to find the broken link in its chain.