
Dyson Vacuum Keeps Losing Power – Causes & Permanent Fixes
This post contains affiliate links. As an Amazon Associate, we earn from qualifying purchases.
A Dyson vacuum keeps losing power for three mechanical reasons: a battery past its charge cycles, a thermal protection shutdown, or a hidden airflow blockage. The fix is a systematic check of the battery, filters, and every inch of the airflow path, ending at the motor’s control board if the issue is a failed capacitor.
That battery-cycle count is the silent killer. Dyson batteries are engineered for thousands of hours, but after 300 to 500 full charge cycles, their capacity predictably drops to about 80 percent. The machine doesn’t just run shorter; it hits its low-voltage cutoff faster, which feels like a sudden power loss mid-job. This guide walks through the diagnostics in the order a technician would, battery and temperature first, then clogs, then the electronics, because guessing wrong wastes a weekend.
What follows: the exact temperature that locks out your machine, the one filter you’re probably washing wrong, and the documented capacitor fix for a V15 that stops after three seconds.
Key Takeaways
- Dyson cordless vacuums will not operate or charge if the room temperature is below 37°F (2.7°C), a hard cutoff to protect the battery.
- After 300–500 full charge cycles, a lithium-ion battery’s capacity drops to ~80%, causing the vacuum to hit its low-power cutoff much sooner.
- The main cyclone filter must dry for at least 24 hours after washing; a damp filter restricts airflow instantly, triggering a pulsing shutdown.
- Using Max or Boost mode as your default dramatically accelerates battery degradation and heat buildup.
- A documented failure in the Dyson V15 Detect involves degrading capacitors on the motor control board, causing it to shut off after a few seconds, a fix exists with specific replacement parts.
Why Your Dyson Vacuum Keeps Losing Power
The loss of power isn’t random. It’s the machine’s protection systems reacting to a physical limit. You’re feeling the symptom; the cause is always one of a short list.
Before you start: Unplug the charger and remove the battery before inspecting any internal parts. The trigger mechanism carries live current even when the machine is off. A static discharge can fry the control board.
The most immediate culprit is temperature. Dyson’s own support states the machines have a hard cutoff: they will not operate or charge if the room temperature is below 37°F (2.7°C). This isn’t a suggestion, it’s a circuit refusing to close. If you store the vacuum in a garage or porch over winter, it will act dead until it warms up. The optimal range is 50°F to 95°F (10°C to 35°C). Outside that, performance drops and protection circuits engage early.
Battery aging is the slow, inevitable cause. Dyson subjects its batteries to over 2,000 hours of testing, but chemistry dictates the lifespan. Each full charge cycle slightly reduces the battery’s total capacity. Think of it as a fuel tank that shrinks over years. When the tank is small, the vacuum’s internal monitor hits the “empty” warning faster. What feels like a sudden loss of power is just the battery reaching its lowered minimum voltage.
A hidden clog is the most common mechanical reason. It doesn’t have to be a sock in the hose. A pebble lodged behind the brush roll, a dense mat of hair in the cyclone shroud, or a packed filter will do it. The machine’s sensor detects the motor straining against the blockage and cuts power to prevent burnout. This often manifests as a “pulsing” action, on for a second, off for a second, before a full shutdown.
Finally, electronic failure happens. For the Dyson V15 Detect, a specific issue is documented: aging capacitors on the motor control board. As detailed in a community fix, the original 470μF capacitors can degrade by around 10%, causing voltage instability that the board reads as a fault. The vacuum starts, runs for three seconds, and dies with no error lights. It’s a design margin problem, not a user error.
| Symptom | Most Likely Cause | Immediate Check |
|---|---|---|
| Won’t turn on at all, no lights | Dead battery, cold temperature (<37°F), faulty charger | Check room temp, try a different outlet, inspect charger pins. |
| Runs for a few minutes, then dies | Aged battery, overheating motor, dirty filter | Feel the motor body for heat, note how long it runs on a full charge. |
| Pulses (on/off rapidly) then stops | Significant airflow blockage | Immediately check brush roll, wand, and cyclone intake. |
| Starts, runs 3–10 seconds, stops (no pulse) | Electronic fault (e.g., V15 capacitor issue) | This points directly to the motor control board. |
The Step-by-Step Diagnostic Path
Don’t start by taking the machine apart. Follow this sequence. It’s ordered by probability and ease of check. Jumping to step five while ignoring step one is how you replace a $150 battery only to find the filter was wet.
Step 1: Rule Out Temperature and Basic Power
Bring the vacuum into a room that’s been between 65°F and 85°F for at least an hour. This isn’t just about comfort; it’s letting the battery’s internal chemistry stabilize. Plug the charger directly into a wall outlet, not a power strip. Look for a solid amber or white light on the dock or vacuum body. No light means no communication between charger and battery.
If the vacuum has been in the cold, let it sit on the charger in a warm room for three hours before testing. The battery management system needs time to wake up.
Step 2: Inspect and Reset the Battery
Even with a full charge light, the battery can be the problem. Remove it from the machine. Look for any visible swelling, cracks, or corrosion on the metal contacts. Clean the contacts on both the battery and the vacuum with a dry cotton swab.
There’s a known charging glitch with some cordless models. The fix is straightforward: 1. Unplug the charger from the wall. 2. Reconnect it to the wall. 3. Place the vacuum on the charger and hold the trigger down for 15–20 seconds. Nothing will happen. 4. Release the trigger, remove the vacuum, and try to power it on.
This cycle resets the handshake between the battery and the controller. If your Dyson vacuum shows signs of not holding charge, this reset might temporarily restore it, but the underlying aging remains.
Step 3: Check for Hidden Clogs
This is where most Dyson vacuum clogs hide. You need to follow the air path from floor to bin.
- Brush Roll: Remove the cleaner head. Use a coin to unlock the soleplate if your model has one. Pull out the brush roll and clear any wrapped hair or string. Shine a light into the airway behind it, this is a prime spot for gravel.
- Wand: Detach it and look through it toward a light. Any shadow is a blockage. A long, flexible brush or a straightened coat hanger works to clear it.
- Cyclone Intake: This is the metal or plastic duct where the wand connects to the main body. A small plastic deflector here loves to catch popcorn kernels and Lego pieces. Use needle-nose pliers to carefully clear it.
- Bin and Cyclone: Empty the bin. Then, with the bin removed, look up into the center of the cyclone assembly. There’s a mesh filter screen at the top. Use a damp cloth to wipe it clean of fine dust.
If the vacuum runs but has lost suction, a clog is almost certain. Clearing it often resolves the intermittent power issue, as the motor no longer has to fight for air.
Step 4: Clean the Filters. The Right Way
There are two filters, and both must be clean and bone-dry.
- The Cyclone Filter (Pre-Motor): This is the large, often conical filter inside the bin assembly. Unclip it and wash it under cold running water. Do not use soap. Gently squeeze and pat it, never wring it. Dyson’s mandate is clear: let it air dry for at least 24 hours in a well-ventilated area. Putting it back damp is as bad as not cleaning it at all; it chokes airflow immediately.
- The HEPA (Post-Motor) Filter: This is usually at the top of the handle or behind a cover. Tap it out over a trash can to remove loose dust. Most are not washable, check your manual. If it’s washable, the same 24-hour dry rule applies.
A dirty filter is the fastest route to overheating and shutdown. The motor works harder to pull air through the clogged mesh, heats up, and the thermal fuse trips. Regular filter maintenance is non-negotiable.
Where this goes sideways: Washing the main filter and reinstalling it after two hours. The core stays damp for days. The vacuum will pulse and shut off within minutes of starting, and you’ll chase battery ghosts for a week.
Step 5: When to Suspect an Electronic Fault
If the battery is warm and charged, the airway is clear, the filters are dry and clean, and the vacuum still cuts out within seconds, especially without the pulsing action, the problem is likely on the control board.
For the Dyson V15 Detect, the community fix is specific. As reported by users, the original capacitors that stabilize current to the motor windings can degrade. The solution involves soldering three new 10μF ceramic capacitors (50V rating) onto the motor control board. One user noted replacing the stock 270μF capacitors with 330μF units also worked. This isn’t a beginner repair, but it’s a known, documented solution for a model-specific flaw.
This kind of fault explains why a cordless Dyson losing power might need more than a simple reset. The board is misreading good data from the motor.
Battery Care vs. Battery Replacement
All Dyson cordless batteries degrade. How you use the machine decides how fast.
- Stop Using Boost as Default: Boost/Max mode is for 30-second spot cleans. Using it for whole rooms pushes the battery and motor to their thermal limits every time. It’s the equivalent of redlining your car’s engine in first gear, things wear out fast.
- Store It Inside: Keep the vacuum in a climate-controlled space between 64°F and 82°F (18°C–28°C). The garage or a hot car trunk accelerates chemical aging in the battery cells.
- Understand the Warranty: Dyson offers a 2-year warranty on the entire machine, including the battery. If your vacuum is under two years old and the battery is failing, contact Dyson first. They will often replace it.
When is it replacement time? If a full charge in Normal mode lasts less than 5 minutes on a model that once ran for 30, the battery is done. After 300-500 cycles, this is normal wear. Buy a genuine Dyson replacement battery. Third-party batteries often lack the proper management circuitry and can cause charging problems or even damage the vacuum.
| Dyson Model | Typical Battery Lifespan (Full Performance) | Replacement Sign |
|---|---|---|
| V7 / V8 | 3–4 years | Runtime under 10 min on Normal |
| V10 / V11 | 4–5 years | Frequent shutdowns mid-clean, won’t hold charge overnight |
| V12 / V15 | 4–6 years | Machine stops within seconds, even after full filter/clog check |
| Gen5 | 5–7 years (projected) | Not yet widely seen; follow general degradation signs |
The One Fix Everyone Misses
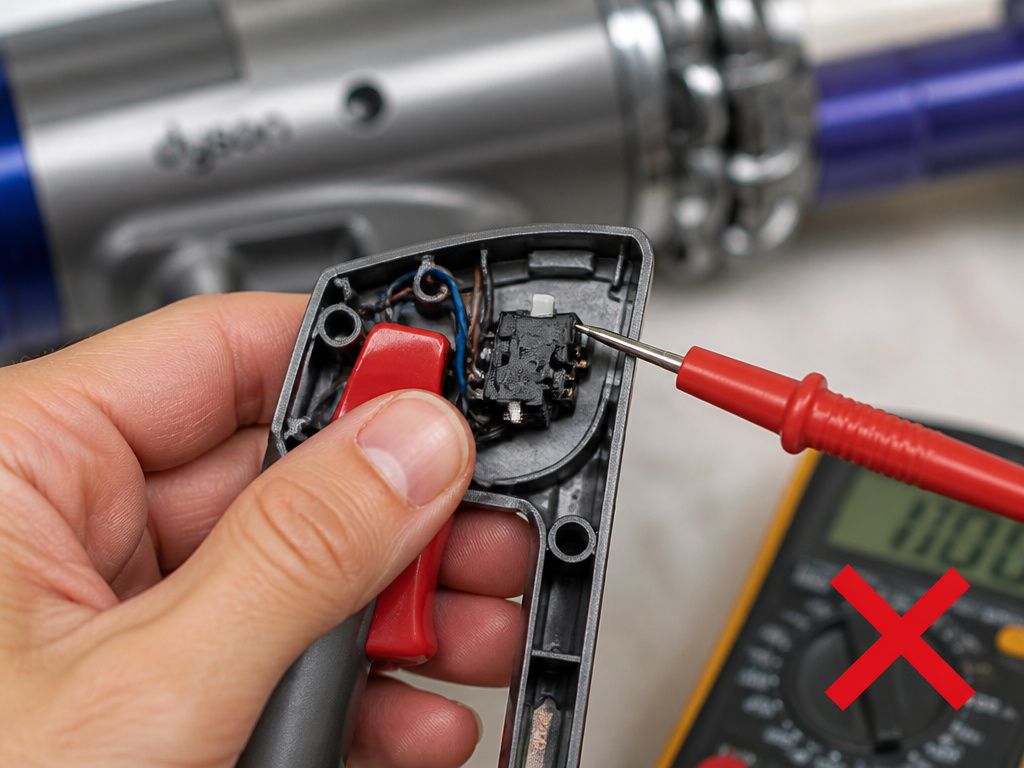
There’s a component nobody sees until it fails: the trigger microswitch. This small switch completes the circuit when you pull the trigger. Over thousands of clicks, it can become intermittent.
The test is simple. Pull the trigger to start the vacuum. Without releasing it, gently wiggle your finger on the trigger or flex the trigger housing slightly. If the vacuum cuts out only when you move, the microswitch contacts are worn. Replacing it requires opening the handle, but it’s a $5 part versus a $200 motor assembly.
This fault is sneaky. It mimics a Dyson stick vacuum power loss because the symptom is so random. The machine works fine until your grip shifts a millimeter, breaking the connection.
Frequently Asked Questions
Why does my Dyson run for a minute then shut off?
This is classic thermal protection or battery sag. The motor or battery is getting too hot, or the aged battery can’t sustain the voltage draw. Feel the motor body after it shuts off. If it’s very hot, focus on clogs and filters. If it’s cool, the battery is the prime suspect.
Is it worth replacing a Dyson battery?
Yes, if the vacuum itself is in good shape and less than 5–6 years old. A new genuine battery restores the vacuum to like-new runtime. It’s significantly cheaper than a new machine. If the vacuum is also having motor or suction issues, consider the total cost of repairs.
Why does my Dyson pulse and then stop?
Pulsing is the vacuum’s explicit “I’m clogged” warning. The motor detects high resistance, shuts off to cool, tries again, and repeats. This is almost always a physical blockage in the brush head, wand, or cyclone intake. Stop and clear the clog before you burn out the motor.
Can cold weather permanently damage my Dyson?
Using or charging it below 37°F can damage the battery cells. The immediate effect is a shutdown, but repeated cold-cycling can reduce the battery’s overall lifespan. The damage is cumulative, not usually from one single event.
Before You Go
A Dyson vacuum losing power is a diagnostic puzzle, not a death sentence. Start with the environment and the battery, the two most common culprits. Then hunt for clogs with a flashlight and patience. Finally, clean both filters and wait the full day for them to dry.
Remember the specific failures: the V15’s capacitors, the trigger microswitch, and the guaranteed shutdown below 37 degrees. This isn’t about buying more gadgets; it’s about understanding the three things that actually stop the motor. Check them in order, and you’ll usually find the fix is a twenty-minute clean, not a two-hundred-dollar part.