
Step-by-Step Guide on How to Empty a Hoover Bagless Vacuum
This post contains affiliate links. As an Amazon Associate, we earn from qualifying purchases.
To empty a Hoover bagless vacuum, press the bin release button, remove the dust container, hold it over a trash can, and press the easy-open button on the container’s base to dump the debris. The critical step most owners miss is checking and cleaning the washable filters, specifically the pre-motor and exhaust filters, every five container empties. Neglecting this causes air blockage, forces a thermal cut-out, and can void your Hoover guarantee.
That five-empties rule is the threshold where dust starts to pack into the filter foam, cutting airflow by more than half. The motor strains, heats up, and a safety switch trips.You’re then locked out for 30 to 45 minutes.
What follows is the universal process, the model-specific twists for filters, the exact reset times, and what to do when suction stays low even after you’ve emptied the bin.
Key Takeaways
- Empty before the max line. Letting debris sit above the max level indicator chokes airflow and is the fastest route to a thermal lockout.
- Filters are not optional. Wash the pre-motor and exhaust filters every five bin empties. Let them dry for a full 24 hours before reassembly.
- Direction matters. On cylinder models like the Blaze, rotate the filter pack clockwise to remove it; on others, it’s anti-clockwise. Check your manual.
- Thermal cut-outs have teeth. A clogged Hoover Velocity Upright takes 45 minutes to reset automatically; a Blaze cylinder takes about 30 minutes.
- Suction loss has a checklist. If emptying doesn’t restore power, work through: blocked hose, clogged separation unit, then missing filters.
The Universal Emptying Process (Step-by-Step)
The core steps are identical across most Hoover bagless cylinder and upright models: release, remove, open, tap, and reattach. Where people go wrong is in the force they use and the details they skip.
Before you start: Unplug the vacuum. This is non-negotiable. You’re handling a container full of fine dust; a stray spark or accidental power-on is a real hazard.
-
Locate and press the bin release button. On cylinder vacuums, this is usually a slider or button on the main body near where the container seats. On uprights like the Hoover Velocity, it’s a button on the handle or front of the bin housing. Press it firmly until you feel the container disengage.
- Skip this, and you’ll force the container, potentially breaking the plastic latch. A replacement bin isn’t a cheap part.
-
Lift the dust container away from the main body. Hold it by its handle or main structure. Don’t grab it by the lid or any attached tubes.
-
Carry it directly to a trash can. Hold the container over the center of the bin. This seems obvious, but doing this over a sink or indoors guarantees a cloud of dust on your floor.
-
Press the easy-open button or trigger. This button is typically on the bottom or lower rear of the container. Press it to release the trapdoor. All the debris should fall out in one clump. > Common mistake: Opening the trapdoor before the container is over the trash. The dust plume is mostly skin cells and fabric fibers, you’re breathing in your own shed detritus.
-
Gently tap or shake the container. After the main debris falls out, give the container a few light taps against the inside of the trash can. This dislodges fine dust stuck to the walls and the filter surfaces inside. Do not bang it.
- Bang it, and you risk cracking the plastic housing or damaging the internal cyclonic fins on models like the Hoover Velocity cylinder.
-
Close the trapdoor and reseat the container. Ensure the door clicks shut. Align the container with the guides on the main body and push until you hear a definitive click. A container not fully seated will leak suction and spew dust.
For upright models with a bottom-emptying bin, the process is even simpler: release, hover over trash, press the button. The best upright bagless models are designed for this zero-mess approach.
What “Empty” Really Means for Your Filters
Emptying the bin is only half the job. The true performance bottleneck is the filter system. Hoover’s manuals state filters should be washed after every 5 container empties or when visibly overloaded.
Washable filters are the pre-motor filter (often a blue foam and mesh pack) and the exhaust filter (a grey foam pad). Failure to clean them results in air blockage, overheating, and product failure, which may invalidate your guarantee. Source: Hoover Curve, Blaze, Hurricane, and Velocity Cylinder Instruction Manuals
This is physics. A clogged filter starves the motor of cooling air.The temperature spikes, and a thermal cut-out switch trips to prevent a burnout.
| Filter Type | Location | Failure Consequence | Cleaning Frequency |
|---|---|---|---|
| Pre-Motor Filter | Inside the dust container lid or bin handle. | Blocks air before the motor, causing immediate suction loss and rapid overheating. | Every 5 bin empties. |
| Exhaust Filter | On the rear or side of the main body. | Blocks exiting air, causing motor to work harder, leading to slow power loss and heat buildup. | Monthly, or per manual. |
| HEPA/Post-Motor Filter (on some models) | Behind the exhaust grille. | Allows fine dust to recirculate into the room, defeating allergy control. | As specified (often every 3-6 months). |
The rule to purchase new filters after every third wash is a guideline for peak performance. The foam degrades. After 18 months of regular use, even a clean old filter won’t seal as well as a new one.
Model-Specific Filter Access: Clockwise or Counter?
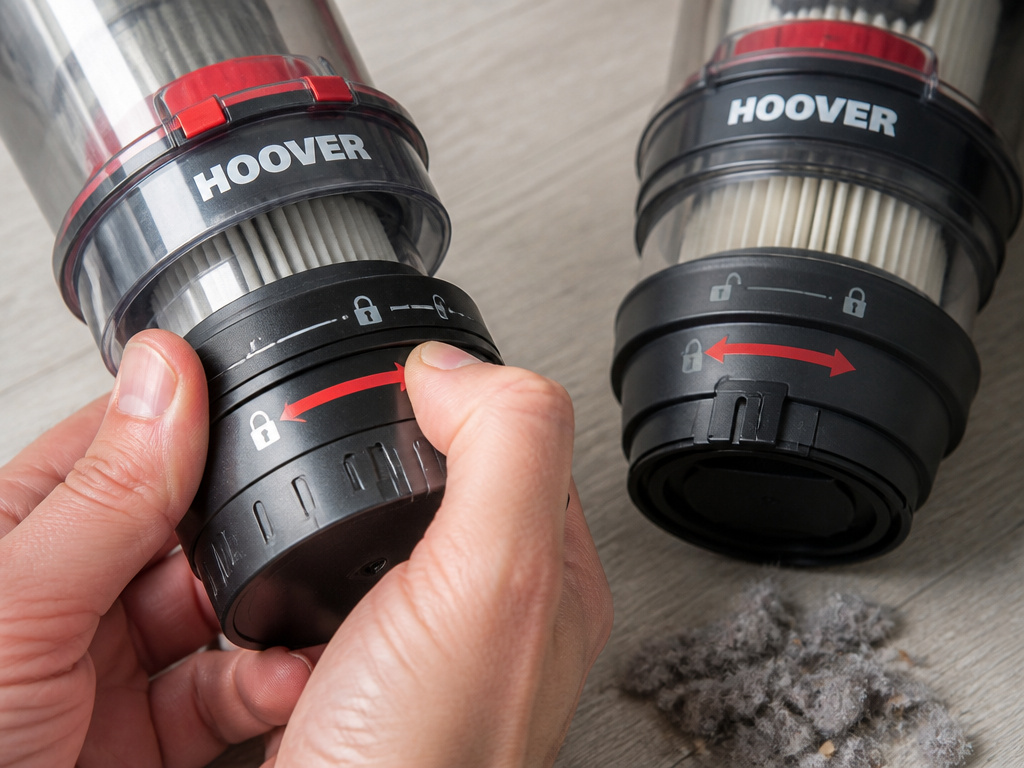
This is where owners snap plastic. The direction you turn the filter pack to remove it is not universal across Hoover’s lineup.
For Hoover Blaze (SP81BL03) and similar cylinder models: * To remove the bin lid: Rotate anti-clockwise. * To remove the pre-motor filter pack: Rotate clockwise.
For Hoover Hurricane (SX70HU11) and Velocity Cylinder (RU80VE11) models: * To remove the pre-motor filter pack: Rotate anti-clockwise.
The variance exists because of different latch designs. If you force it the wrong way, the plastic tabs shear off. Now the filter won’t seal, and you’ve created a permanent air leak.
The cleaning ritual is the same once they’re out:
- Separate any mesh frames from foam filters.
- Gently tap them over a trash can to dislodge loose dust.
- Wash under lukewarm running water. Never use hot water or detergents.
- Squeeze, don’t wring, excess water out.
- Let them air dry for a full 24 hours in a warm, ventilated spot.
Where this goes sideways: Reassembling a damp filter. Moisture gets sucked into the motor. That leads to corrosion and a repair bill that costs more than a new vacuum.
If you own a Hoover pet vacuum, this filter routine is doubly critical. Pet hair and dander are finer and oilier, clogging filters faster than household dust.
The 45-Minute Lockout (And How to Avoid It)
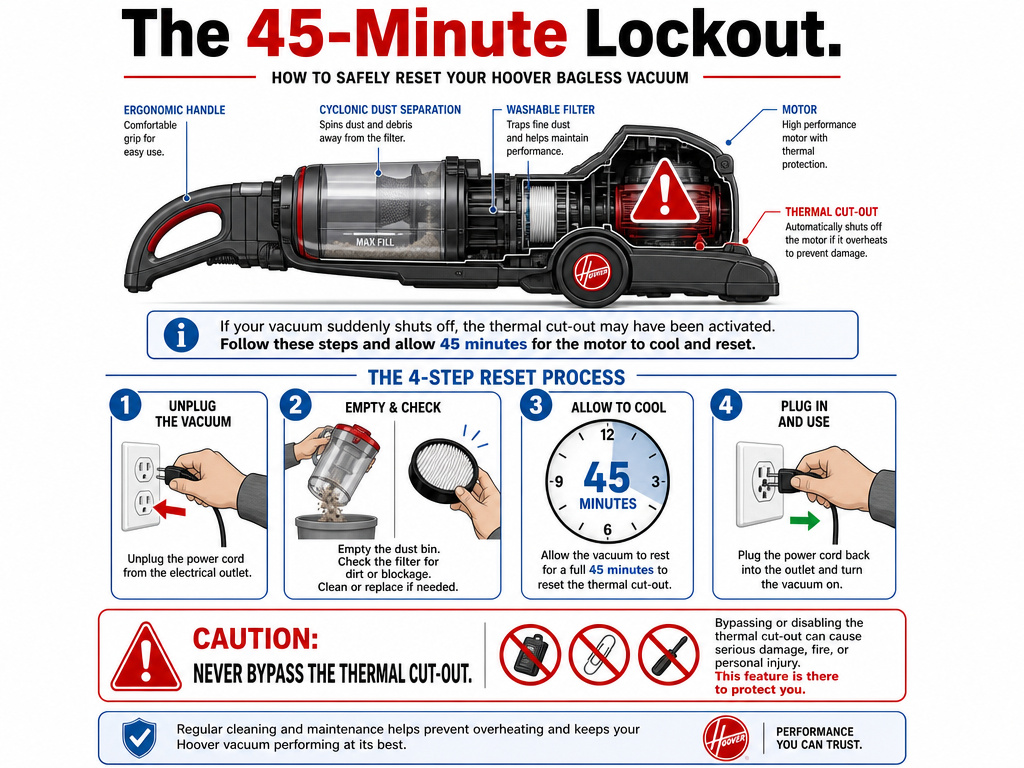
You finish vacuuming, and the machine suddenly dies. No sound, no power. You check the plug, it’s fine. This is the thermal cut-out.
It’s a safety switch that trips when the motor temperature exceeds a safe limit, usually because of a blockage or dirty filters. The Hoover Velocity Upright (VL81VL01) manual states the reset time is approximately 45 minutes. The Hoover Blaze cylinder manual cites about 30 minutes.
Why the difference? Upright motors are often enclosed in a smaller housing with less passive cooling. They take longer to dissipate the built-up heat.
What to do when it trips:
- Switch off and unplug the vacuum immediately.
- Correct the fault. Empty an overflowing bin. Clear a blockage in the hose or nozzle. Remove and check the filters.
- Wait. Leave the vacuum unplugged in a cool place for the full reset duration, 45 minutes for the Velocity Upright, 30 for the Blaze.
- Plug it back in and test. It should restart. If it doesn’t, the cut-out may have failed, or the motor may be damaged.
Never attempt to bypass the thermal cut-out. That switch is the only thing stopping your vacuum from becoming a fire hazard. If it trips repeatedly after you’ve cleared blockages and cleaned filters, the motor itself is likely failing.
This protection is a feature of all modern best bagless vacuum motors. It’s why following the emptying and filter guide is about preventing a total breakdown, not just suction.
When Emptying Isn’t Enough: The Suction Checklist
You’ve emptied the bin and cleaned the filters, but the suction is still weak. Now you move to diagnostics. This is the sequence from Hoover’s own user checklists.
First, check for blockages.
- Disconnect the hose from the main body and the handle. Shine a flashlight through it. A common culprit is a LEGO brick or a clump of hair.
- Check the extension tubes. Look through them. Use a long, flexible rod (like a straightened coat hanger) to gently push any obstruction through.
- Inspect the nozzle. Turn the vacuum over. Manually spin the brush roll. If it doesn’t turn freely, hair or string is wound around the ends. Cut it away with a seam ripper or scissors.
Second, clean the separation unit (on cyclonic models).
Some Hoover cylinders, like the Velocity model, have a removable red vortex finder inside the bin. If this gets caked with fine dust, air can’t spin properly. 1. Remove the bin and detach the handle. 2. Pull the red plastic component out by its tab. 3. Rinse it under lukewarm water. Do not use soap. 4. Let it dry completely before reassembling.
Third, verify all filters are present and seated.
A missing pre-motor filter is an instant suction killer. An exhaust filter not clicked into its grille creates a massive air leak. Ensure everything is where it should be.
If you’ve run this gauntlet and power is still low, the issue may be a worn motor or a fault in the electronic control. At that point, consulting the Hoover vacuum reviews for a reliable replacement might be more economical than a repair.
Frequently Asked Questions
Can I wash Hoover vacuum filters with soap?
No. Use lukewarm water only. Detergents leave residues that can attract more dirt and may damage the filter foam. Rinse until the water runs clear.
How do I clean a Hoover bagless vacuum hose?
Disconnect it from both ends. Run warm water through it. For stubborn clogs, use a long, flexible drain snake or a straightened wire coat hanger with a soft cloth wrapped around the end to push the blockage through gently.
Why does my Hoover vacuum keep losing suction?
The hierarchy of causes is: 1) Full bin, 2) Dirty filters (pre-motor first), 3) Blockage in hose/tube/nozzle, 4) Clogged separation unit (on cyclonic models), 5) Worn-out motor or seal.
Is it okay to empty my vacuum into the toilet?
It is not recommended. Vacuum debris can contain small, non-biodegradable particles and dense dust that may clog plumbing. Always empty into a sealed trash bag. For more on this, see our guide on proper disposal methods.
How do I empty a Hoover cordless or stick vacuum?
The process is similar but often simpler. Typically, you press a button to release the dust cup, hold it over trash, and slide a door open. For specifics, check our guides on how to empty a Hoover cordless vacuum or empty a stick vacuum.
The Bottom Line
Emptying a Hoover bagless vacuum is a 30-second task, but doing it correctly is what preserves the motor for years. The bin has a max line for a reason. The five-empties filter rule is in the manual because engineers measured the airflow drop. That 45-minute lockout on a Velocity Upright is a timer on a mistake you made three cleanings ago.
Make it a ritual: bin out, trapdoor open, tap, filters checked. That’s the difference between a vacuum that dies in 18 months and one that’s still pulling strong when you need to clean an upright vacuum for the hundredth time. Your machine will tell you when it’s struggling, listen to the sound of the motor long before you see the suction fade.