
Learn How to Replace the Vacuum Motor in Your Roomba Model
This post contains affiliate links. As an Amazon Associate, we earn from qualifying purchases.
To replace a Roomba vacuum motor, match three things: your exact Roomba model, the specific motor type (vacuum bin motor or main brush motor), and the correct screwdriver bits. The Roomba 805 requires a Tristar bit for one motor screw; the 551 needs a Phillips #1 for 5.5mm screws. Start by running the Built-in Test (BiT) to confirm a failed BiT 13 (vacuum) or BiT 11 (main brush) before disassembly.
The difference between a 30-minute repair and a stripped screw is the bit you pick up first. A Tristar bit isn’t a specialty tool, it’s the factory fastener on the Roomba 805’s motor mount, and using a Phillips head will cam out and ruin the plastic post.
What follows: the diagnostic codes that tell you which motor failed, the model-specific screw sizes that actually matter, and the one filter check that prevents a repeat failure within weeks.
Key Takeaways
- Run the Roomba’s Built-in Test (BiT) first. A failed BiT 13 points to the vacuum bin motor; a failed BiT 11 points to the main brush motor.
- Tool selection is model-specific. The Roomba 805 motor has one screw that requires a Tristar bit (TX8 or TX10); the Roomba 551 uses 5.5mm Phillips #1 screws.
- A punctured Roomba filter is a mandatory replacement. Dirt bypassing a torn filter grinds the new motor’s impeller bearings in under a month.
- Motor access follows a standard sequence: remove the bin and brushes, take off the bottom plate, then unplug and unscrew the motor module.
- Post-replacement, manually spin the new motor before final assembly to ensure the impeller moves freely without obstruction.
The 3 Things You Must Match Before You Start
Opening a Roomba without a plan wastes time. You need the right motor, the right tools, and confirmation you’re fixing the right problem. Start with the robot’s own diagnostics.
Failed BiT 13 – Vacuum: Roomba does not clean, ends with error “uh-oh and 3 beeps”, or the Vacuum Bin sounds loud. The prescribed fix is to replace the Bin Motor Assembly. (Source: iRobot Roomba Service Manual, 2006)
1. Diagnose with the Built-in Test (BiT)
Modern Roombas display error codes; older models use beep sequences. The underlying logic is the Built-in Test. For vacuum issues, listen for three beeps or an “uh-oh” alert, which correlates to a failed BiT 13. For non-spinning main brushes and a single beep, that’s a failed BiT 11. This test tells you which module to order.
2. Identify Your Exact Model and Motor Type
“Vacuum motor” is too vague. You have two distinct systems: * Vacuum Bin Motor: This is the blower that creates suction, housed inside the dustbin module on models like the Roomba S9 and i7. * Main Brush Motor: This drives the rubber and bristle rollers at the front of the robot, found under the cleaning module on models like the Roomba 551.
You cannot swap these parts. Your repair guide must be for your specific model, like a Roomba i7 vacuum motor replacement or a Roomba S9 vacuum motor replacement.
3. Gather the Model-Specific Tools
This is where generic advice fails. The service manuals specify exact fasteners.
| Roomba Model | Motor Type | Critical Fastener | Tool Required |
|---|---|---|---|
| Roomba 805 | Main Brush | One of three screws | Tristar bit (TX8/TX10) |
| Roomba 551 | Main Brush | 5.5mm mounting screws | Phillips #1 screwdriver |
| Roomba s9/i7 | Vacuum Bin | Various Phillips screws | Phillips #1, #2 |
If you try the Roomba 805 motor swap with only a Phillips driver, you’ll strip the Tristar screw. The plastic tower it sits in will break free, turning a simple swap into a chassis repair.
Step-by-Step: Accessing and Swapping the Motor
The process is consistent across models: expose the chassis, disconnect the old motor, and seat the new one. Patience here beats force every time.
Before you start: Disconnect the Roomba from its home base and remove the battery. This cuts all power. The motor connectors are delicate; pulling the wire instead of the plug housing breaks the solder joints inside.
Step 1: Prepare the Roomba
- Turn the Roomba upside down on a soft cloth.
- Remove the dustbin and the front side brush.
- Release the cleaning head module (main brushes) by pressing the tabs on either side and lifting it out.
Step 2: Remove the Bottom Cover
Locate the screws securing the bottom plastic plate. These are usually Phillips #1 or #2. The Roomba S9, for example, has four screws for the cleaning head module and four for the bottom cover. Keep screws organized by phase.
Step 3: Locate and Disconnect the Faulty Motor
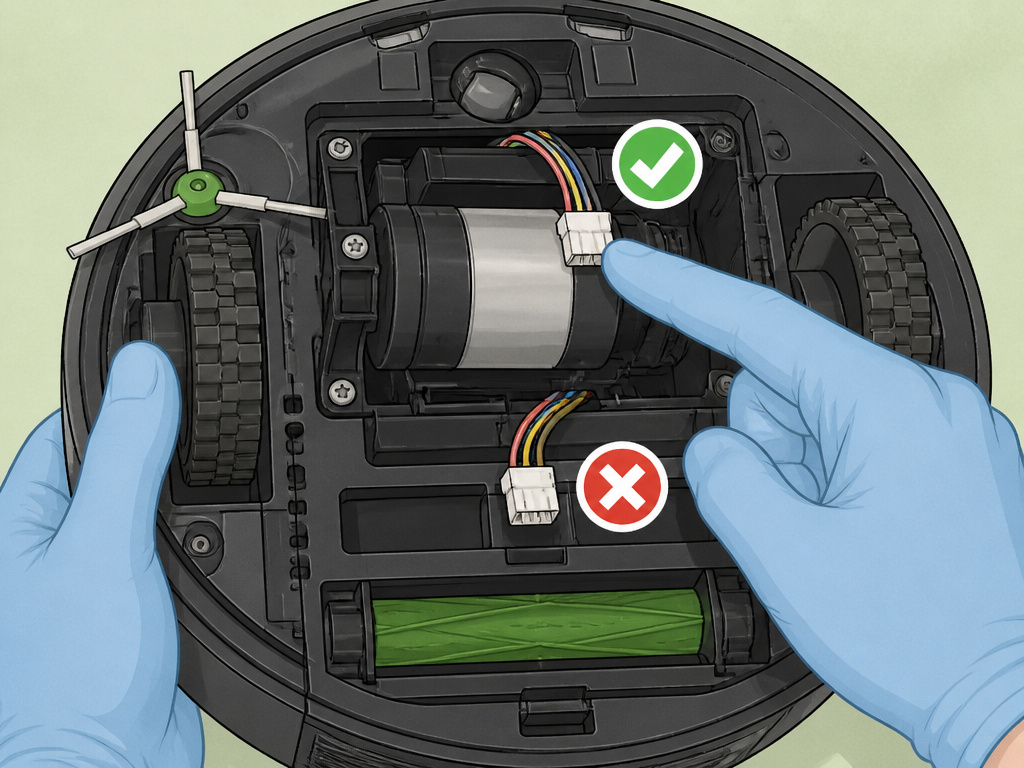
With the plate off, the internal chassis is visible. Identify the motor module: * Vacuum Bin Motor: Look for a cylindrical unit with an impeller, often connected to the bin housing. * Main Brush Motor: A smaller, boxier motor attached to the gearbox that drives the brushes.
Trace the motor’s wire to its connector on the main PCB. Gently rock the connector side-to-side to unplug it, do not pull the wires.
Step 4: Remove the Motor Mounting Screws
Here, use your pre-identified tool. The Roomba i3 vacuum motor replacement might use different screws than the 805. Unscrew all fasteners completely. If a screw spins but doesn’t back out, the plastic post is stripped, you’ll need to carefully pry the motor free.
Step 5: Install the New Motor
- Position the new motor module, aligning the screw posts.
- Hand-tighten all screws first to ensure proper alignment.
- Snug each screw down firmly, but stop before you feel the plastic start to compress. Overtightening cracks the posts.
- Reconnect the electrical plug until it clicks.
- Critical Check: Before replacing the cover, manually spin the motor fan or gear. It should rotate smoothly with no grinding or catching. If it’s stuck, the module is misaligned or defective.
The One Filter Check Everyone Forgets
Replacing a motor without inspecting the filter is the most common reason for a quick repeat failure.
A punctured filter is a mandatory replacement. Dirt bypassing the filter acts as an abrasive on the motor’s impeller bearings, wearing them out in weeks instead of years.
After removing the bin, take out the filter and hold it up to a bright light. Look for any pinpricks or tears, especially around the edges. Even a small hole lets fine dust through. If you find damage, you must replace the filter before running the robot with its new motor. A clean, intact filter is the only thing protecting your investment.
Troubleshooting: Post-Installation Problems
The robot is back together. You hit “Clean.” Nothing happens, or it beeps angrily. Don’t panic, check these points first.
The Roomba Still Won’t Vacuum
- Re-check connections. The motor plug might not be fully seated. Unplug and replug it.
- Verify the filter is installed. A missing filter can trigger a suction error.
- Listen for a hum. If you hear a brief hum then silence, the motor is getting power but is obstructed. Re-open and verify the impeller spins freely.
New Error Codes Appear
Sometimes a repair surfaces a secondary issue. Use our Roomba error codes guide to decipher the alert. * If you see a cliff sensor error (Error 15), you may have pinched a sensor cable during reassembly. * A wheel error (Error 6) could mean a wire was displaced, blocking a wheel.
The Battery Dies Immediately
A motor drawing too much current can drain a weak battery. If your Roomba also has charging problems, address the battery separately. A new motor with an old, tired battery will only run for minutes.
Vacuum Motor vs. Main Brush Motor: What’s the Difference?

Understanding which system failed saves you from ordering the wrong part. Here’s the head-to-head breakdown.
| Aspect | Vacuum Bin Motor | Main Brush Motor |
|---|---|---|
| Primary Symptom | No suction, bin sounds loud/whiny, failed BiT 13. | Brushes don’t spin, grinding noise, failed BiT 11. |
| Location | Inside the removable dustbin assembly. | Under the front cleaning head module, connected to a gearbox. |
| Function | Creates airflow to pull dirt into the bin. | Provides torque to spin the rubber and bristle rollers. |
| Common Failure Cause | Clogged filter, hair wrapped on impeller, worn bearings. | Hair jammed in gearbox, worn drive gears, burnt-out windings. |
| Example Model | Roomba j7 motor replacement involves the entire bin module. | Roomba 500-series main brush motor is a separate block. |
The repair complexity is similar, but the parts are not interchangeable. Always verify the failed BiT code against your model’s service manual.
When to Repair vs. When to Replace the Whole Roomba
This repair makes sense within a cost window. Consider a full replacement if: * The Roomba is over 5 years old and needs both a motor and a new battery. * The chassis is cracked or damaged where the motor mounts. * You discover multiple failures during diagnostics (e.g., a bad motor and persistent wheel error).
For a newer model like an i7 or S9, a motor swap is almost always worthwhile. For an older 500-series model, weigh the cost of the motor part against the value of the robot.
Frequently Asked Questions
Can I use any 12V motor as a replacement?
No. Roomba motors are specific to their mounting, shaft size, voltage, and RPM. A generic motor won’t fit the housing or connector, and the wrong RPM will cause cleaning or error code issues. Always source a model-specific replacement.
How long should a new Roomba vacuum motor last?
With proper maintenance, regular filter cleaning and removing hair from brushes, a quality replacement motor should last 2-4 years under normal home use. Failure within months points to an obstruction or a defective filter.
Is replacing a Roomba motor difficult?
It’s a moderate DIY repair. The hardest part is having the correct screwdriver bits and patience with plastic clips. If you can follow a guide like the Roomba i3 motor replacement guide, you have the required skill. It’s less complex than replacing a laptop fan.
What if my Roomba model isn’t listed here?
The core principles still apply. Identify your model number, search for its specific service manual or teardown video online, and note the screw types before you begin. The sequence of remove-bin, remove-brushes, remove-bottom-plate is nearly universal.
Will this void my Roomba’s warranty?
Yes, opening the unit and replacing internal components will void any remaining manufacturer warranty. If your Roomba is still under warranty, contact iRobot support for a repair or replacement.
The Bottom Line
Replacing a Roomba motor comes down to preparation. Match the model, match the failed component using the BiT codes, and match the screwdriver to the fastener, especially that Tristar bit on the 805. Check the filter for holes every single time. The swap itself is a logical, step-by-step process that takes about an hour. For most modern Roombas, this repair restores full function for a fraction of a new robot’s cost.