
How to Clean Your Shark Lift Away Vacuum & Maintain Suction
This post contains affiliate links. As an Amazon Associate, we earn from qualifying purchases.
Clean your Shark Lift Away vacuum in three stages: empty the dust cup after every use, rinse the pre-motor foam and felt filters every three months with cold water only, and rinse the HEPA post-motor filter once a year. Every filter must air-dry completely for at least 24 hours before reinstalling, putting a damp filter back is the fastest way to kill suction and cause a motor fault.
That 24-hour dry time isn’t a suggestion. It’s the line between a vacuum that runs for years and one that overheats and shuts down by next season. The manuals are clear, but most people skip the timing because they need to vacuum now.
What follows is the factory sequence, pulled from half a dozen Shark OEM manuals. You’ll get the specific part numbers for your model, the one tool you actually need, and the three mistakes that turn a routine clean into a repair visit.
Key Takeaways
- Never use soap on any filter. Rinse with cold or lukewarm water only. Soap residue clogs the micro-pores in the HEPA filter permanently.
- Dry filters for a full 24 hours. Reinstalling a damp filter pulls moisture into the motor, leading to immediate loss of suction and long-term corrosion.
- Clean the pre-motor filters every 3 months and the HEPA filter every year. This schedule is printed in the manual; stretching it to 6 months lets fine dust bypass the foam and sandblast the motor fan.
- Check for blockages at every connection point. A red brushroll light usually means a clog in the hose, wand, or nozzle, not a mechanical failure.
- Use scissors on the brushroll. Shark manuals explicitly instruct you to “run scissors along the groove” to remove wrapped hair and fibers without damaging the bristles.
The 3-Part Cleaning Sequence Every Manual Assumes You Know
Your vacuum is a sealed air path. Cleaning it breaks that seal in a specific order: contain the loose debris first, then the fine dust caught by the filters, and finally the mechanical parts that move. Reverse the order and you just recirculate dirt.
Start by unplugging the vacuum. This is non-negotiable for any model with a brushroll indicator light or electronic controls. A short during maintenance can blow a control board.
Before you start: The vacuum’s motor and electronics are housed in the pod. Never submerge the pod, spray cleaners directly on it, or get any liquid inside the filter compartment before the filters are out. A splash on the wrong component triggers an internal fault code that requires a full board replacement.
Stage 1: Empty the Dust Cup. Every Single Time
The dust cup is the first line of defense. Letting it fill past the MAX line forces debris against the lint screen, which then pushes fine dust straight into the foam pre-motor filter. That dust is abrasive.
- Press the release button(s) on the dust cup handle. On most Lift-Away models, there’s one button on top or two on the sides.
- Tilt the cup forward and lift it away from the pod.
- Hold it over a trash can and press the lower release latch. The bottom door swings open.
- Tap the cup gently to dislodge debris. For stuck pet hair or dust bunnies, open the top lid (press the upper release button) and clean the lint screen with your fingers or a dry brush.
Skip this step and the next time you turn on the vacuum, that packed dust will choke the airflow. You’ll hear the motor pitch rise, and the pod will get warm to the touch within five minutes.
Reinstall the cup by placing the bottom into the pod first, then tilting it back until it clicks. A misaligned cup breaks the seal.
Stage 2: Rinse the Filters. With a Timer Running
This is where the 24-hour clock starts. The filters are a stacked protection system: foam catches large particles, felt catches medium ones, and the HEPA filter traps microns.
| Filter Type | Cleaning Frequency | Water | Key Rule |
|---|---|---|---|
| Foam Pre-Motor | Every 3 months | Cold | Rinse until water runs clear. Squeeze—don’t wring—to remove excess water. |
| Felt Pre-Motor | Every 3 months | Cold | Lay flat to dry. Bending or folding it creases the material and creates gaps. |
| HEPA Post-Motor | Every 12 months | Lukewarm | Rinse gently under low pressure. Do not scrub the pleated material. |
First, remove the dust cup to access the pre-motor filter compartment. Lift out the foam filter, then the felt filter underneath. On models like the NV830, these come as a single frame unit called the XFF680 Pre-Motor Filter Kit.
Second, access the HEPA filter. Press the filter access button at the bottom of the filter cover or door, tilt it, and lift it off. Pull the HEPA filter straight out. This is often part number XHF680.
Rinse filters with cold water only. To prevent damage from cleaning chemicals, rinse filters with cold water only. Allow all filters to air-dry for at least 24 hours before reinstalling them to prevent liquid from being drawn into electric parts. Shark Performance Lift-Away Upright Vacuum Manual
The HEPA filter rule is specific. The manual for the Cordless Vertex Pro states: “DO NOT scrub HEPA Post-Motor Filter.” Scrubbing unravels the delicate glass fiber media. Rinse it by letting lukewarm water flow through it in one direction.
Where this goes sideways: People rinse filters and put them back damp because they need to vacuum. Moisture gets sucked into the motor chamber. Within a few uses, you’ll get a faint mildew smell from the exhaust, followed by a thermal cutoff that makes the vacuum overheated and shut down. The fix then is a full teardown, not just a filter clean.
Stage 3: Reassemble in Correct Order
Reassembly is a seal check. It must be exact.
- Ensure all filters are bone-dry. Hold them up to a light; no dark, damp spots.
- Insert the dry felt filter first, then the foam filter on top. If it’s a frame unit, snap it back into the pod until it clicks.
- Slide the HEPA filter back into its chamber. On most models, the right side goes in first, then you press the left side until it clicks.
- Replace the filter cover. Align the top first, then press the bottom until it snaps.
- Reinstall the dust cup. Listen for the click.
A missing click means an air leak. The vacuum will sound louder and suction at the floor nozzle will feel weak. This is a common reason for a vacuum not sucking after maintenance.
Cleaning the Brushroll and Soft Roller (The Part You Can See)
The brushroll and soft roller on DuoClean models are wear items. Hair and string wrap around the ends, creating drag. That drag overheats the brushroll motor belt, which is why a brush roll not spinning often starts here.
For the brushroll:
- Turn the floor nozzle over. You’ll see two or three slide locks or coin-turn locks.
- Slide the locks toward the back of the nozzle or turn them counterclockwise with a coin to release the cover.
- Lift off the brushroll garage cover.
- Run scissors along the groove in the brushroll to cut and lift away wrapped fibers. This is the official Shark method from the NV830 manual. Do not pull on threads; you can dislodge the brushroll bearings.
- Clear any debris from the airway inside the garage.
- Replace the cover, ensuring the tabs seat fully. Lock it back in place.
For the soft roller (DuoClean models):
- Locate the soft roller access button or pull tab at the front of the nozzle.
- Slide the button up or pull the tab to release the roller.
- Tap it to remove loose dirt. Use a dry towel to wipe it clean.
- For deep cleaning: Hand wash with water only. Let it air-dry for 24 hours. The manual warns against using any cleaners on the soft rubber fins.
- Reinsert the roller under the front bumper until it clicks.
The soft roller collects a paste of fine dust and skin oils. If you never wash it, that paste hardens and the roller stops gripping hard floors. You’ll see streaks of debris left behind.
How to Check for and Clear Blockages
A sudden loss of power or a red brushroll light is almost always a blockage, not a broken motor. The air path has four main choke points.
Follow this sequence: 1. Detach the hose from the back of the pod. Check the hose end and the pod’s inlet. 2. Detach the wand from the floor nozzle and the handle. Check both ends of the wand. 3. Detach the wand from the nozzle and tilt the nozzle neck back. Check the opening. 4. Detach the handle from the wand and the hose from the pod. Check those openings.
Use a flashlight. A common clog is a Lego, a cat toy, or a compressed wad of carpet fibers stuck in the wand joint. If the vacuum won’t turn on after a blockage, the thermal protector may have tripped. Unplug it and let it cool for at least 60 minutes, another manual-specified time, before trying again.
When to Replace Filters and Parts
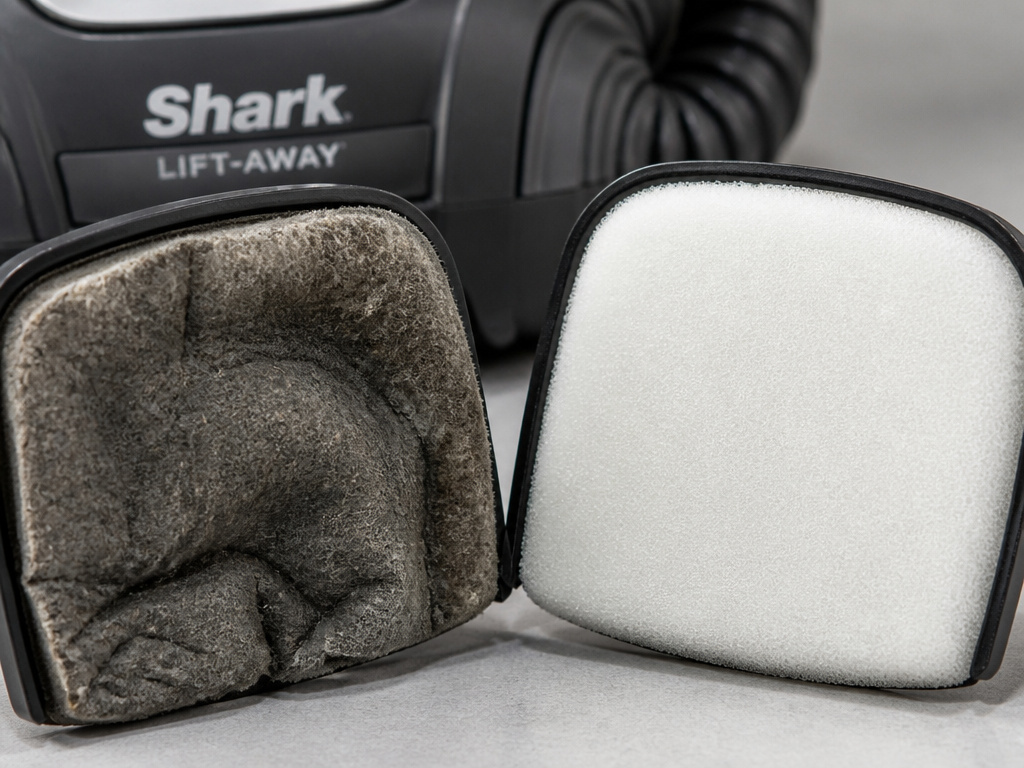 Cleaning has limits. Filters degrade, and brushrolls wear down.
| Part | Replacement Interval | Signs It’s Time |
|---|---|---|
| Pre-Motor Foam & Felt Filters | Every 2.5 years | Foam becomes stiff or develops permanent creases. Felt feels thin or has holes. |
| HEPA Post-Motor Filter | Every 3 years | Visible damage to pleats, or suction remains weak after a full 24-hour dry. |
| Brushroll | When bristles are worn by 50% | Obvious shortening/missing bristles. Poor carpet pile lift. |
| Soft Roller | When fins are torn or flattened | Visible cracks, tears, or a completely smooth surface. |
These intervals are from Shark’s replacement guide. Stretching a HEPA filter to five years means it’s no longer filtering to the HEPA standard. You’re blowing fine dust back into the room.
For most homes, ordering genuine Shark replacement filters like the XFF680 and XHF680 kits is worth it. Third-party filters often have inconsistent pore sizes, which either restricts airflow or fails to catch dust.
The One Tool That Makes It All Easier
 You don’t need a kit. You need one thing: a long, narrow pair of sewing scissors. They fit into the brushroll groove and the hose openings better than utility scissors or a seam ripper. Keep them with your vacuum accessories.
A flashlight is the second tool. Phone lights work, but a small LED penlight lets you see deep into hose ends and the dust cup inlet.
Avoid compressed air cans to blow out dust. They force debris deeper into crevices and can damage the HEPA filter’s media. Use water and patience instead.
Frequently Asked Questions
Can I use vinegar or soap to clean my Shark vacuum filters?
No. Every Shark manual explicitly states “DO NOT use soap when cleaning the filters.” Soap and vinegar leave residues that clog the filter material permanently. Rinse with cold or lukewarm water only. This applies to the foam, felt, and HEPA filters.
How long does it REALLY take for the filters to dry?
At least 24 hours in a well-ventilated area. In humid climates, it can take 36-48 hours. The foam filter is the slowest to dry because it holds water in its cells. If you reassemble too soon, you risk liquid being drawn into the motor, which can cause a short or mildew. Always err on the side of more dry time.
Why does my vacuum smell bad after I clean the filters?
Mildewy smell means you reinstalled a damp filter. A burning smell points to a blockage causing the motor to overwork, or debris touching the brushroll motor. Unplug the vacuum, remove all filters, and let everything dry completely for another day. Check for blockages in the hose and nozzle.
Is it okay to wash the dust cup and attachments in the dishwasher?
The plastic dust cup and hard plastic attachments are usually dishwasher-safe on the top rack. However, the hose, wand, and any parts with electrical connections (like the pod or handle) should never go in the dishwasher. Hand wash them with a damp cloth. Always check your specific model’s manual first.
The Bottom Line
Cleaning a Shark Lift Away vacuum isn’t about making it look new. It’s about preserving the sealed airflow that gives it suction. The sequence is non-negotiable: empty the cup, rinse the filters on schedule, dry them for a full day, and clear the mechanical parts of wraps and clogs.
The 24-hour dry time is the guardrail. Respect it, and your vacuum will run for years. Ignore it, and you’ll be troubleshooting a loss of suction or an overheated motor by next season. Stick to the manual’s intervals, use the right vacuum attachments for the job, and when it’s time for a new machine, you’ll know which of the best Shark vacuum models actually lasts.